



April 12, 2023
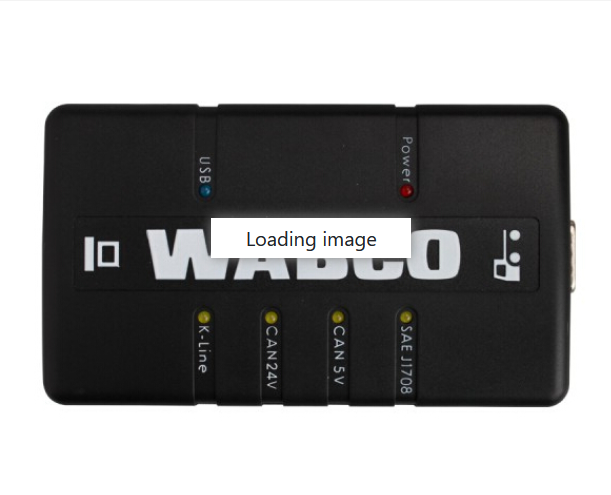
WABCO System Diagnostics Kitis a universal diagnostic tool for trailers, trucks and buses. WABCO System Diagnostics (SD) supports most popular and wanted diagnostic protocols. WABCO Diagnosis Tool comes with a full set of diagnostic software.
WABCO System Diagnostics (SD) consists of a range of Windows based software solutions. and all the hardware necessary to carry out diagnostic work on every WABCO system. A wide range of diagnostic hardware completes the System Diagnostics package: easy-to-use blink code plug, digital testers, conformity test unit, adapters and cables, and a complete test bench.
WABCO System Diagnostics Kit WABCO Diagnosis Tool for Bus Truck WABCO DIAGNOSTIC KIT WDI WABCO System Diagnostics tool Wabco Diagnostic Kit is a universal diagnostic tool designed for maintenance of trailers, trucks and buses. Wabco Diagnostic tool supports most popular and wanted diagnostic protocols for wider compatibility range. Wabco Diagnostic Kit comes with a full set of diagnostic software which allows you to connect to almost all necessary electronic, hydraulic and pneumatic systems or modules WABCO DIAGNOSTIC KIT is A wide range of diagnostic hardware, and supply completes the System Diagnostics package. easy-to-use blink code plug, digital testers, conformity test unit, adapters and cables, and a complete test bench.
Diagnostic software for every WABCO system
All hardware necessary for diagnosis
Periodic software updates and upgrades easy to access and download
Up to 20 language versions of software available
WABCO Diagnostic Software is available for every WABCO-produced component needing diagnosis:
ABS C
ABS D
ABS D+
ABS HPB
ABS SAE
ABS-EAPU
ATC CAN Standard
ATC Coach
ATC KWP Citaro Travego
CAN-Viewer
CDC
EBS 1C Asia
EBS BUS Standard
EBS CBU MAN
EBS EPB Bus
EBS EPB MB Truck
EBS Euro
ECAS 4×2 S2000
ECAS Bus A
ECAS Bus Citaro
ECAS CAN2
ECAS ENR MB Truck
ECAS Truck JED
ECAS Truck KWP K
HBS AddOn-E
IVTM
Modular AMT
MTS
ODR Tracker
OptiDrive (Fast Gear)
SmartBoard
TCE
TEBS-D
TEBS-E
TECAS
Trailer CAN Router-Repeater (TRR)
TrailerGUARD Telematics
VCS
VCS II
ZBR2
Posted by: youobd2 at
03:52 AM
| No Comments
| Add Comment
Post contains 336 words, total size 3 kb.
March 11, 2023
When draining JCB 760 Series Powershift gearboxes it is recommended that the oil is drained through the cover plate A to make sure that the debris collected in the transmission sump is flushed out. Draining oil through the sump plug will filter oil through the strainer and not flush out the debris.
WARNING!
Make the machine safe before getting beneath it. Lower
the attachments to the ground; engage the parking
brake; remove the starter key, disconnect the battery.
JCB ServiceMaster 4 v22.9.3 [12.2022] Diagnostic Software Download and Installation
JCB Heavy Duty Truck Diagnostic TOOL JCB Electronic Service tool with JCB Service Master 4 V22.7.2
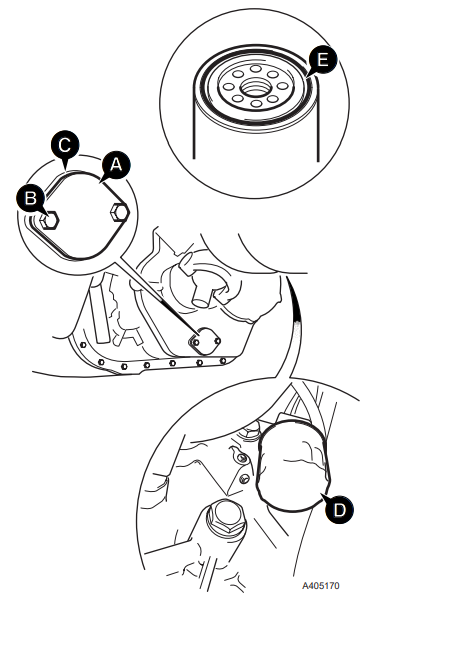
1 Park the machine on firm level ground, apply the park brake. Lower the loader arms, open the engine bonnet, raise the loader arms and fit the safety strut. Lower the excavator to the ground, switch OFF the engine and remove the starter key.
2 Apply the parking brake and disconnect the battery, remove the engine side panels.
3 Place a container of suitable size beneath the transmission to catch the oil.
4 Remove bolts B. Pull off cover plate A and gasket C, allow the oil to drain into the container. Be aware that the oil may be hot.
Note: When the cover is removed oil will gush out. Keep to one side when you remove the cover plate.
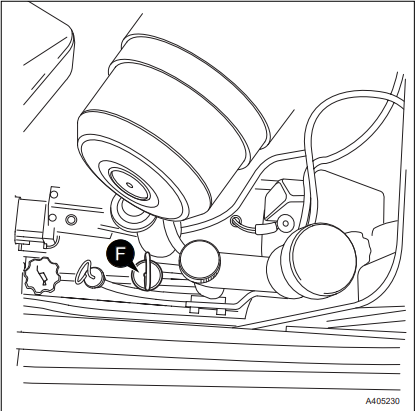
5 Fit cover plate A and a new gasket C. Apply JCB Threadlocker and Sealer to bolts B before fitting them. Torque tighten the bolts to 28 Nm (20.5 lbf ft.).
6 Unscrew and remove the filter D. Fit the new filter:
6.1 Smear seal E with transmission oil.
6.2 Screw the filter on until it just contacts the filter head.
6.3 Turn the filter at least another 3/4 of a turn.
7 Fill the system with new oil through the dipstick/filler F.
Do not fill past the top mark on the dipstick.
8 On completion check for oil leaks.
Note: Fit only a genuine supplied JCB filter, otherwise damage to the system may be incurred through contamination.
Posted by: youobd2 at
02:16 AM
| No Comments
| Add Comment
Post contains 351 words, total size 4 kb.
February 19, 2023
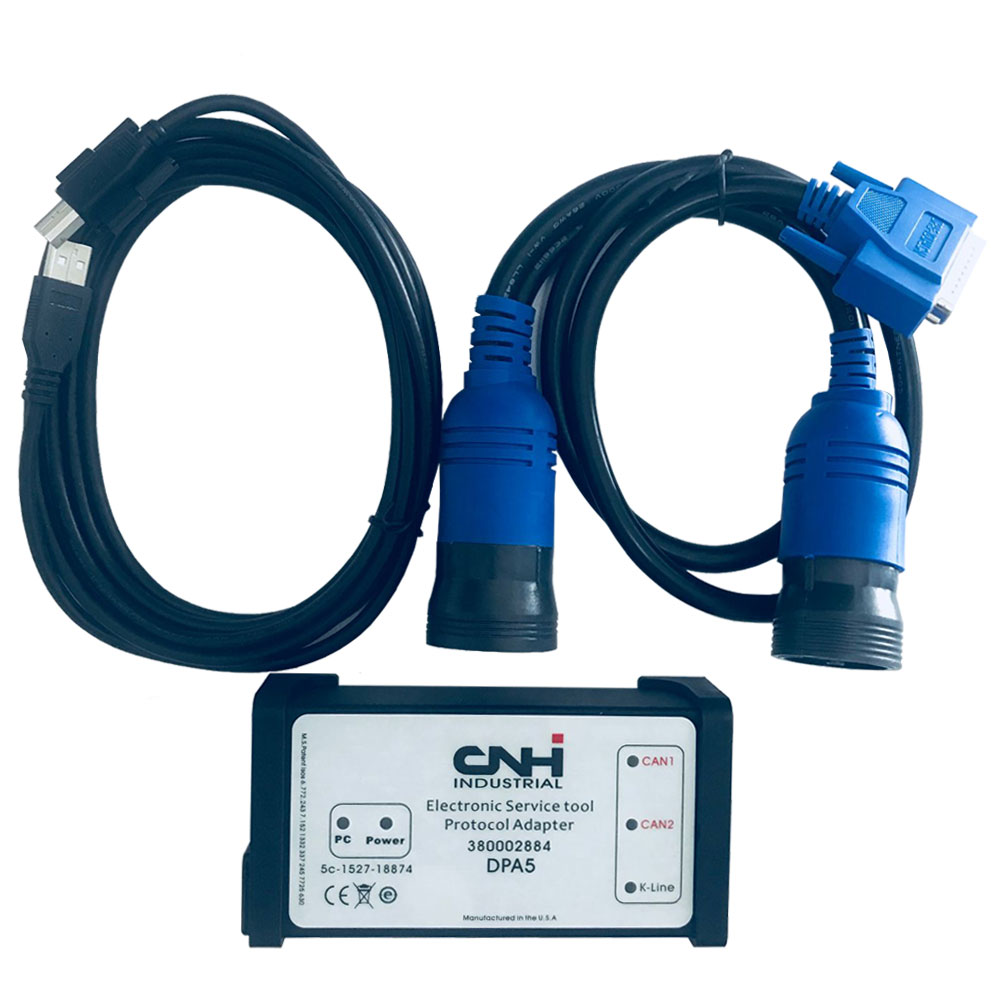
New Holland Electronic Service Tool Download:
https://mega.nz/#F!WVghzKwY!anc22uzd2t41QLiGgAt88Q
New Holland Electronic Service ToolsDESCRIPTION
Electronic Service Tool (EST) Engineering Level* (software only) – used by New Holland dealer technicians to connect with vehicles that have a Controller Area Network (CAN) BUS.
Supported languages:English, Italian, Russian, Polish, Spanish, French, Portuguese, German, Dutch, Danish.
OS: VISTA,Win 8 x32 x 64, Win7 x32 x64, WinXP
With this service tool you can:
- Check status of parameters;
- Retrieve faults;
- Run diagnostic tests;
- Make ECU and parameter programming;
- Monitor active and logged diagnostics;
- View and change ECU configuration;
- View diagnostic procedures and schematics.
- Troubleshoot problems;
- Use asist database;
- Run scope diagnostics.
New Holland Electronic Service Tool Supported Brands:
New Holland (Agriculture and Construction);
New Holland FK (Fi at-Kobelco);
New Holland O&K (Orenstein & Koppel);
CASE (Agriculture and Construction);
STEYR;
KOBE-LCO;
Iveco (Astra) (articulated dump trucks only);
Flexi-Coil;
Sumitomo (S.H.I.)
Posted by: youobd2 at
03:19 PM
| No Comments
| Add Comment
Post contains 173 words, total size 2 kb.
February 09, 2023
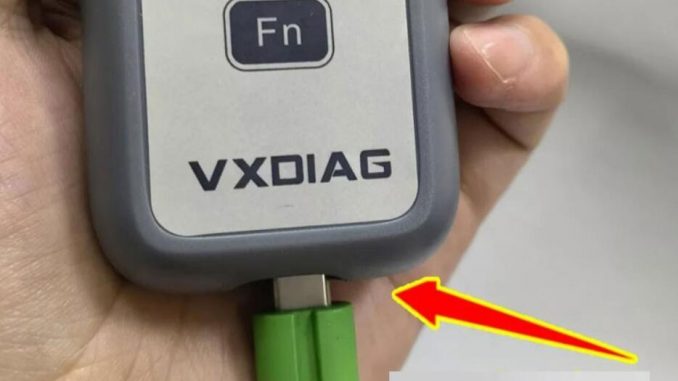
The guide is to help people who have problems in setting upBMW INPA softwarewithVXDIAG VCX SE BMW.
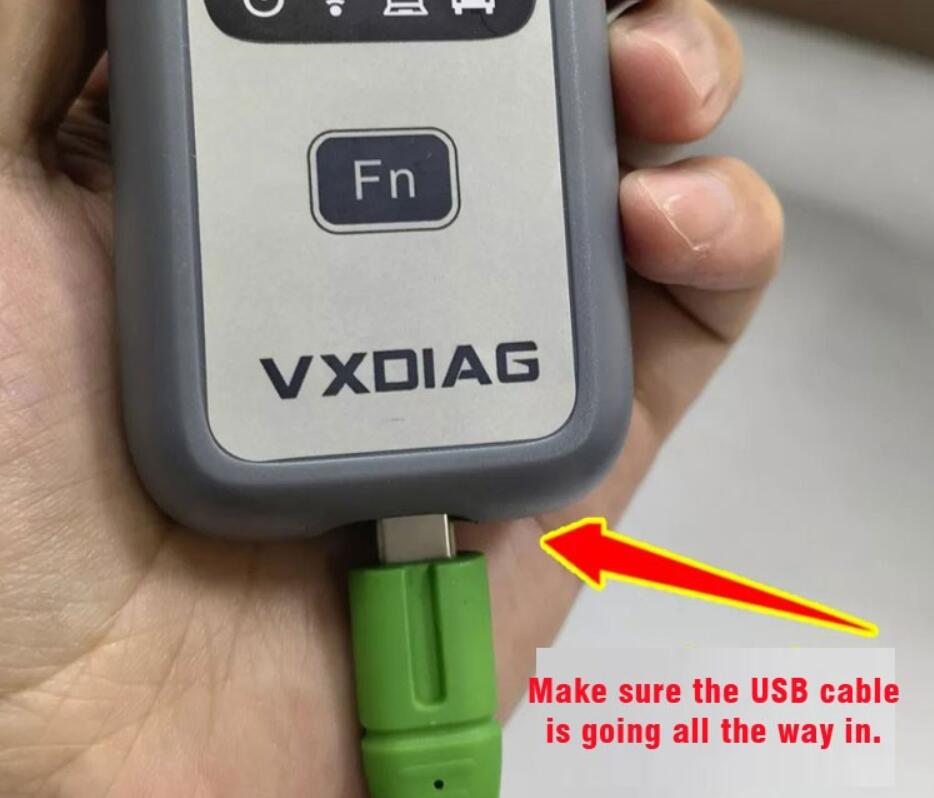
Setup requires USB connection
Make sure the USB cable is going all the way in.
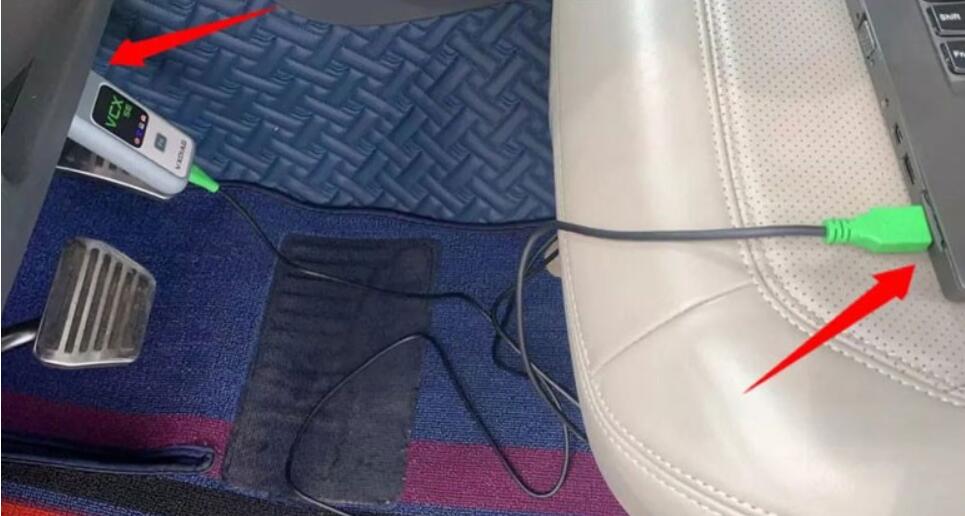
Connect VCX BMW with vehicle and laptop via USB cable
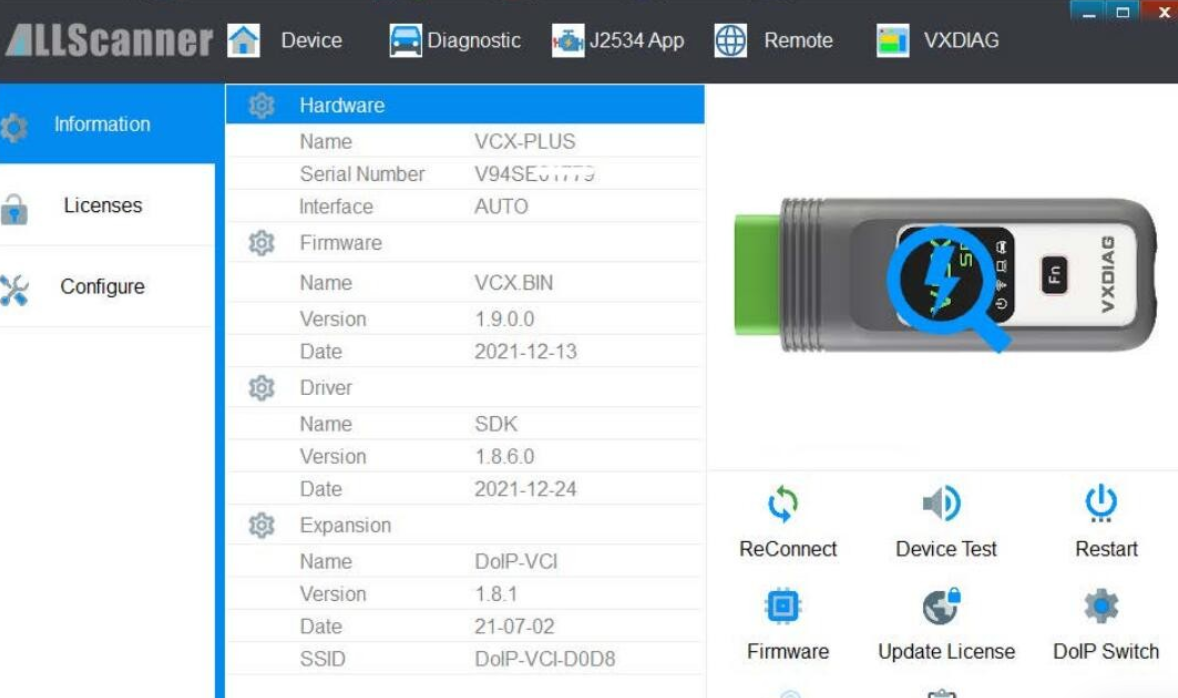
Open VX Manager to check device is well connected
VX Manager detects serial number, firmware driver version etc, vcx se bmw is well connected.
Open EasyConnect program
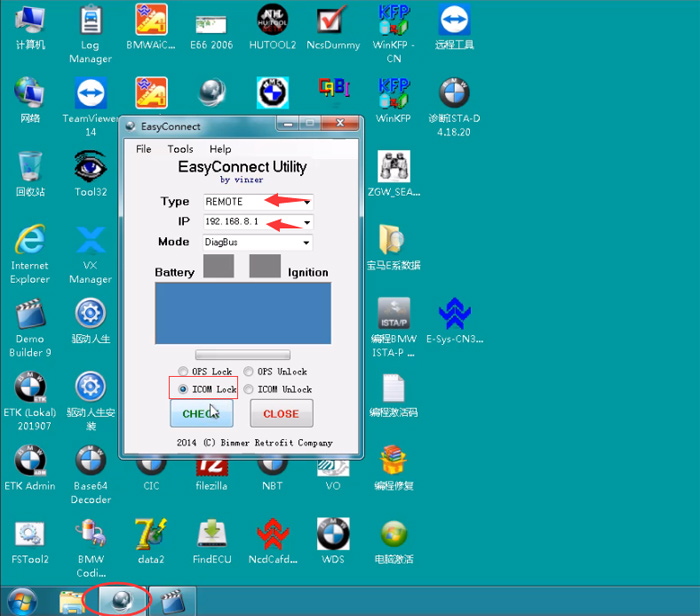
Choose Type: REMOTE
Set IP: 192.168.8.1
Select ICOM Lock and press CHECK button
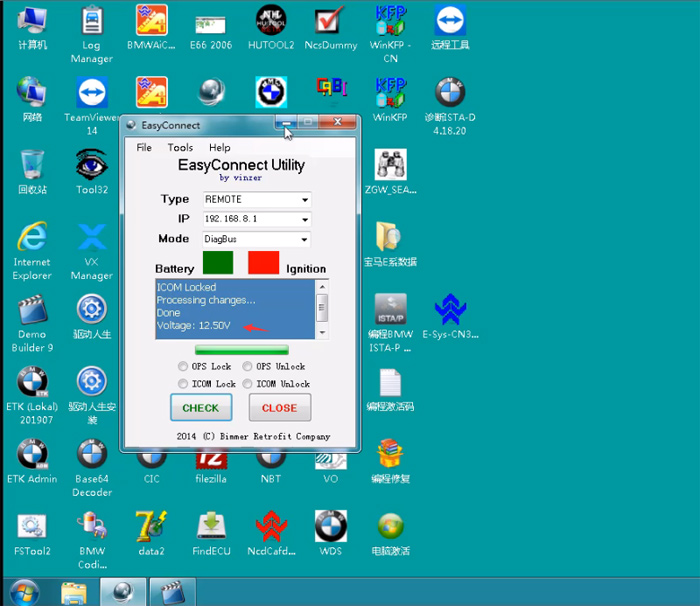
Voltage: 12.50V
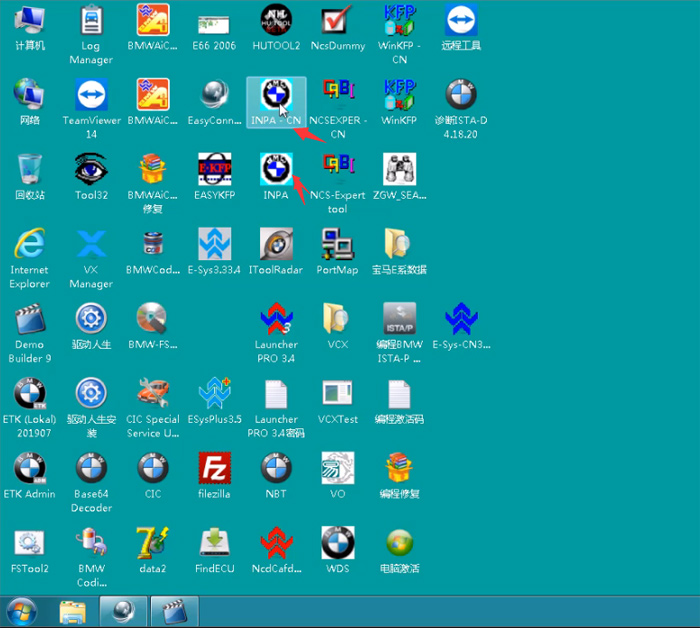
Now can you start INPA software on desktop
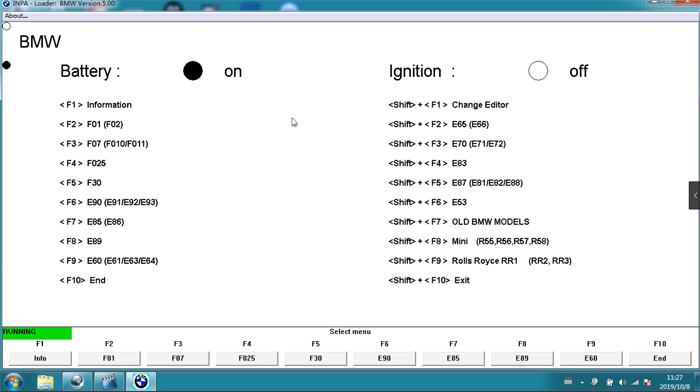
If the ‘on’ icon turns black, inpa software is ready to use.
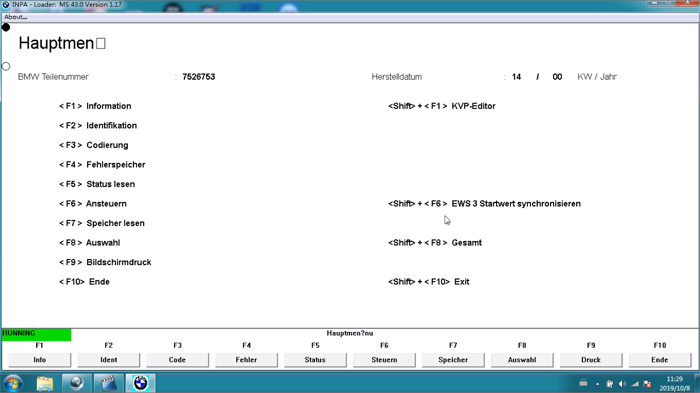
Check video guide here as well
Posted by: youobd2 at
06:41 AM
| No Comments
| Add Comment
Post contains 120 words, total size 7 kb.
January 31, 2023
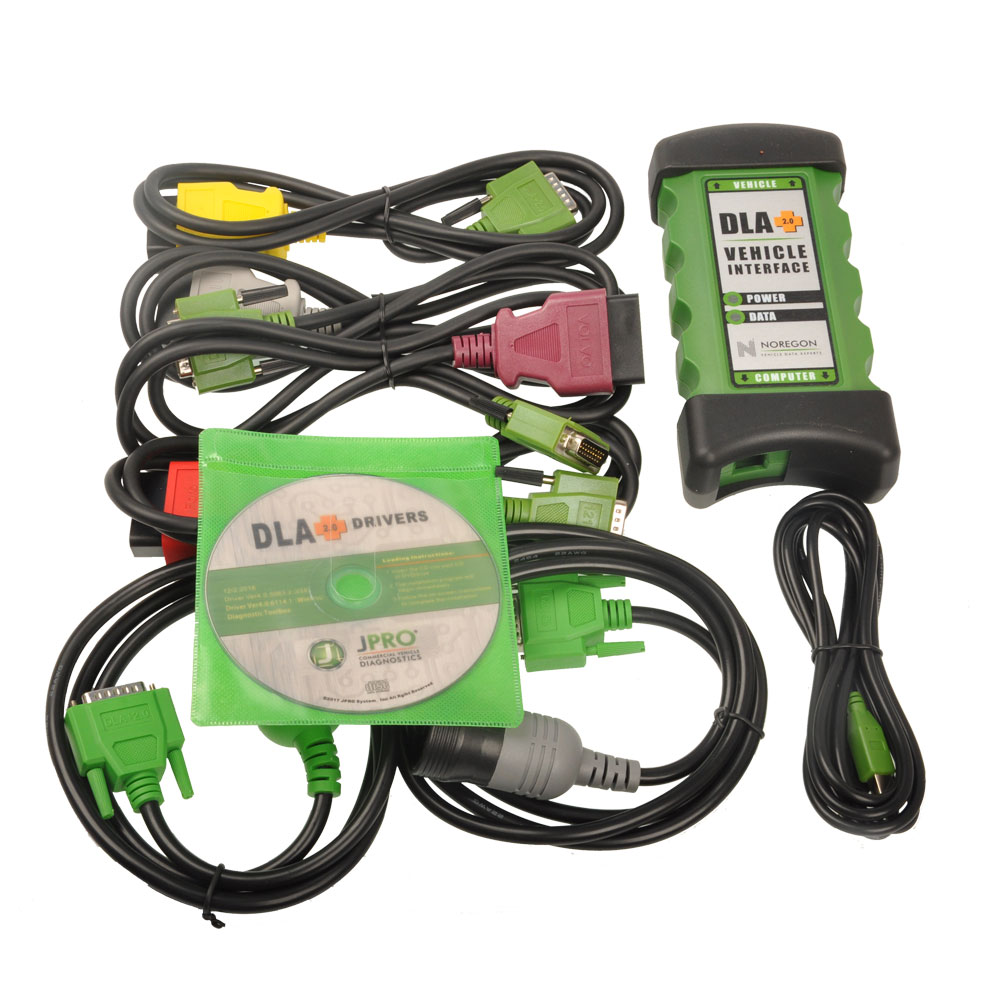
JPRO Truck Dignostic Tool Features:
1.Includes Heavy-Duty Modules: Mack, Volvo, Cummins, Detroit Diesel, International & PACCAR
2.Includes Medium-Duty Modules: Ford, GM, Isuzu & Sprinter
3.Bi-Directional Controls – Perform parameter changes (Mack & Volvo), DPF Regens (Mack, Volvo, Cummins, Detroit Diesel, International & PACCAR) & bi-directional tests with proprietary data & faults
4.OE Level Fault Code Information – Display over 99% of Heavy-Duty & Medium-Duty fault codes with detailed OEM level component and trailer descriptions
5.Fault Management – Clears faults and diagnoses all vehicle components in a single, easy to use application
6.Vehicle Reporting – View and print log files, including: Vehicle Health, Trip Reports & LOV Reports
7.Store & Save Data – Record data log files for playback at a later time, even away from the truck
8.Total Vehicle Health Status – See the entire vehicle in one pass on one screen + Up-to-Date – Provides 99% coverage of all heavy-duty truck DTCs through 2022
Software download link:
Noregon JPRO Commercial Fleet Diagnostics Newest 2022 V3
https://mega.nz/file/DtFzjZya#p8skznM0JwDLBMMm4g3FcBKH4ntcNbtEM5J727DH8cY
Posted by: youobd2 at
11:40 AM
| No Comments
| Add Comment
Post contains 174 words, total size 2 kb.
January 13, 2023
What is the best diagnostic tool for Mercedes?
Are you looking for the perfect scan tool for your Mercedes? Either your vehicle is OBD1 or OBD2, I’ve got you covered. The right Mercedes scanner for you depends on your repair needs, experience with diagnostic equipment, budget and vehicle type. You may also prefer Mercedes diagnostic software over a scan tool.
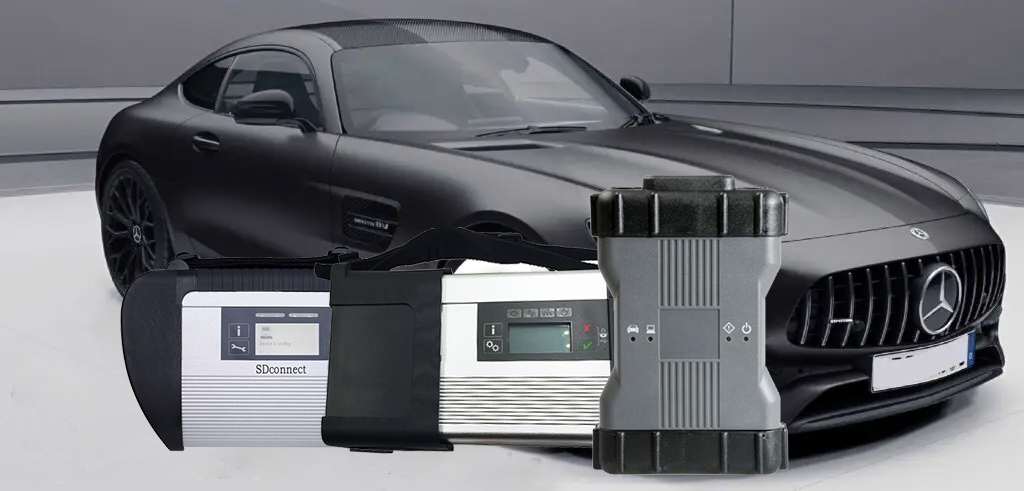
For some of us, cars are not just an asset, they are an investment that we put all our effort and time into, but what if that car suddenly breaks down and there is no diagnosis as to what exactly went wrong? The Mercedes Benz obd2scanner comes into play and performs a thorough scan and analysis of all parts of your car, not forgetting that it contains all the details regarding the problem and how to fix it! In this guide, we’ve put together 3 of the BEST diagnostic tools that you can purchase for a Mercedes.
How to choose anOBD2 Scanner
An OBD2 scanner has various characteristics and attributes based on which one should make a decision when choosing an OBD2 scanner. The person should consider the person’s level of familiarity with the scanner tools and the purpose behind the purchase. Based on the attributes, it should be decided which traits align with the person’s goals, and then you should make a purchase, e.g. B. For a Mercedes Benz, a person will search for the best obd2 scanner for Mercedes Benz. As important as it is to see the features thoroughly, on the other hand. It is also important to know how to use OBD2 scanner.
What’s aMercedes Benz Scanner?
A Mercedes Benz scanner simply refers to an on-board diagnostic(OBD) scanner and tester tools that support the Mercedes Benz Car. The Mercedes obd2 scanner allows you to read and clear trouble codes related to different systems in the car including engine, transmission, braking system, airbag system, and so forth.
When it comes to OBD II protocols, Mercedes used ISO 9141 protocol on their car after the year 2000. If you have a 2000s Mercedes car, you need to buy an OBDII scanner that supports ISO 9141 or it won’t work on your car. Fortunately, ISO 9141 has become a standard protocol for many brands and models so most scanners are available in the market support this very protocol.
There are two major types of Mercedes Benz diagnostic tools including wired and wireless OBD2 scanners. All scanners would need to be connected through the OBDII port on your car. Wired scanners allow you to connect the car and the interface through the wire. Wireless scanners enable you to plug the adapter into the port that transmits the data via wireless connection(usually Bluetooth) where you can access the interface through paired devices like smartphones or tablets.
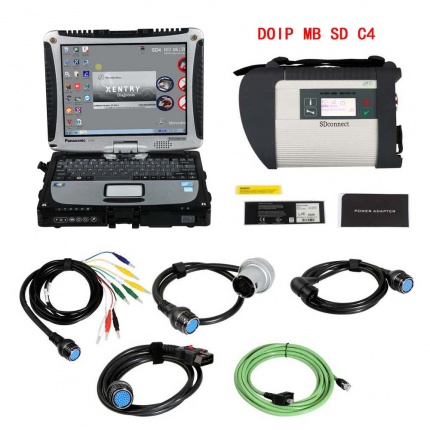
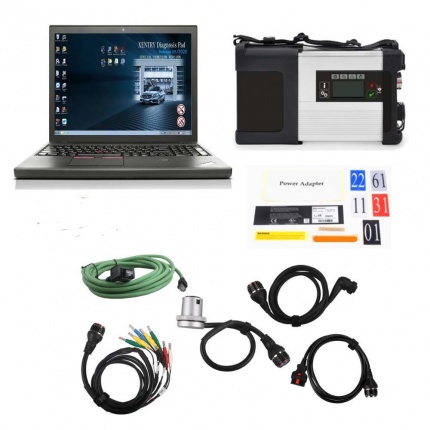
Lots of customer encounter setting problem when using MB SD Connect Compact C4 C5 C6 star diagnosis, so we recommend this bundling sale for those customer who want once get in hand then can use.
https://www.obd2tool.com/category-163-b0-MB+Star+Diagnostic+Tools.html
MB STAR Softwares list:

Posted by: youobd2 at
01:39 PM
| No Comments
| Add Comment
Post contains 568 words, total size 7 kb.
December 25, 2022
how to read and write EEPROM data for BOSCH EDC16 ST95640 chip by XTOOL X100 PAD3.
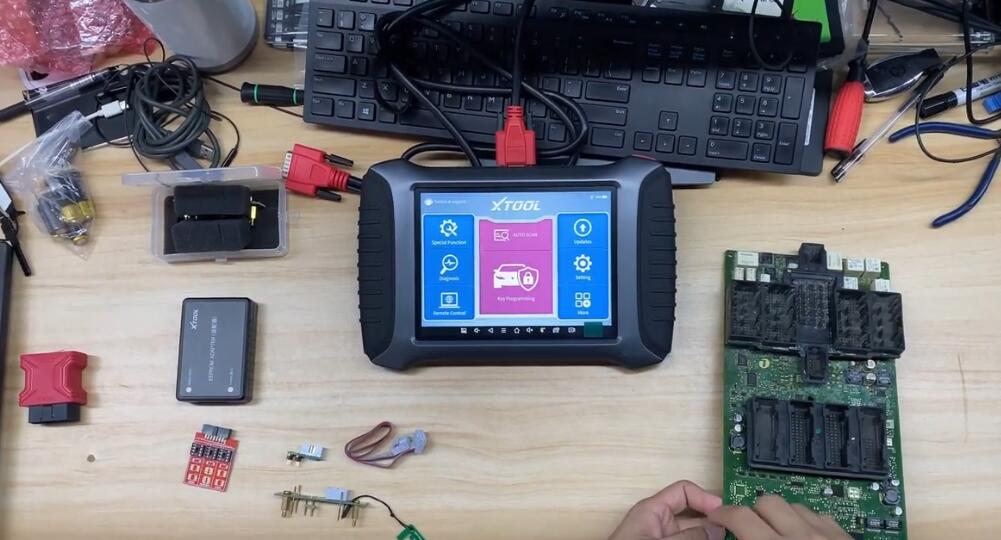
Device Required:
XTOOL X100 PAD3 with KC501 adapter
Procedures:
Build connect between IC clip cable to KC501 and KC501 to X100 PAD3
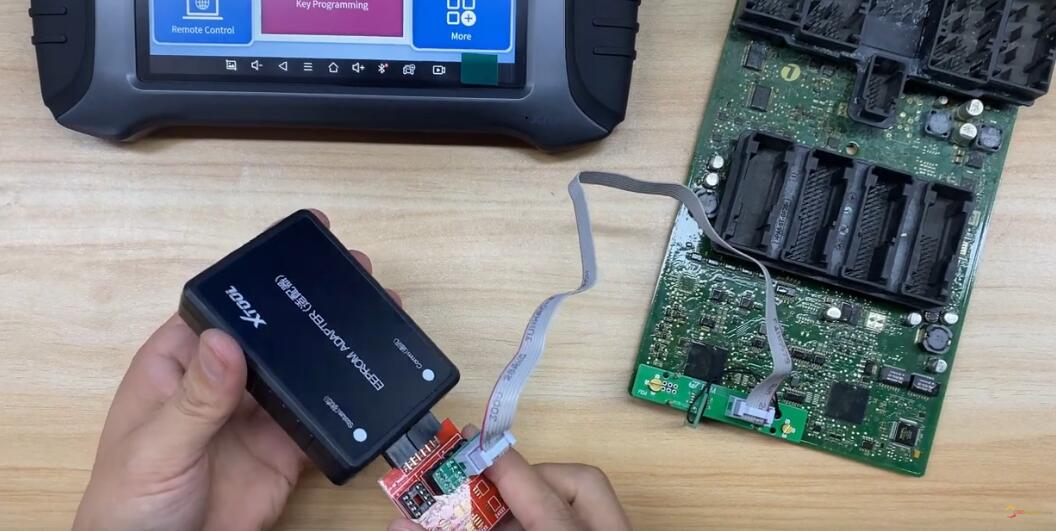
Power on X100 PAD3
Then select "Special Function”–>”EEPROM”–>”EEPROM Adapter”
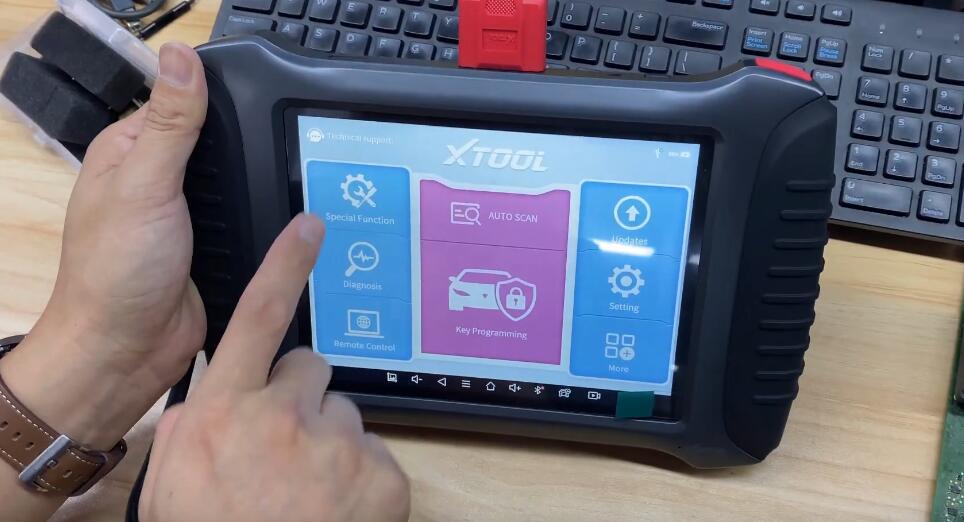
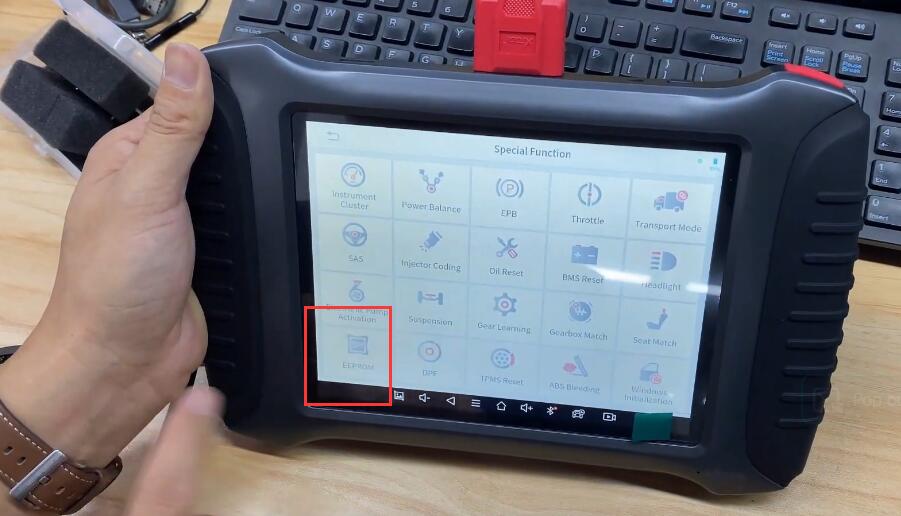
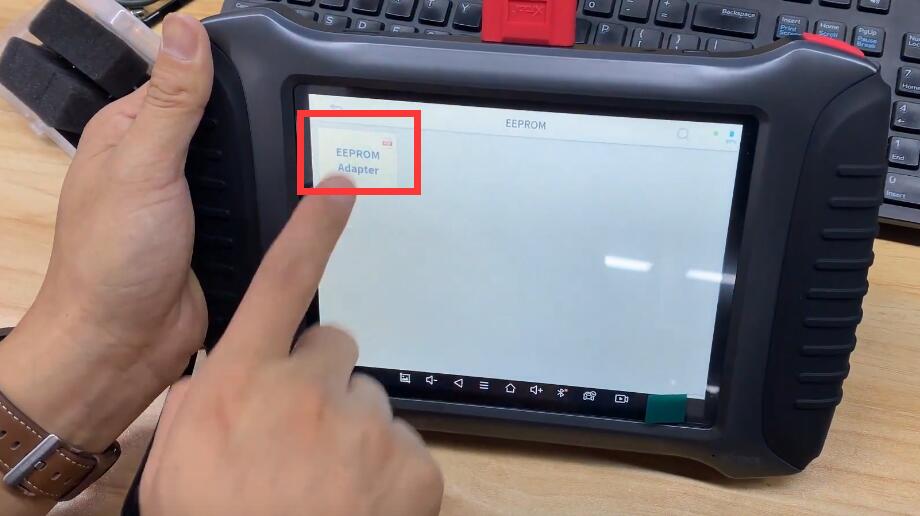
Select ”Read/Write EEPROM”–>"KC501”
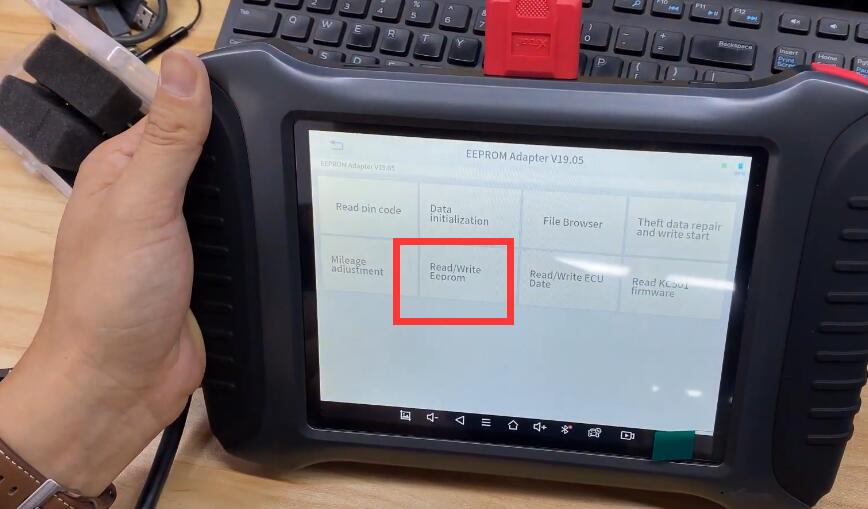
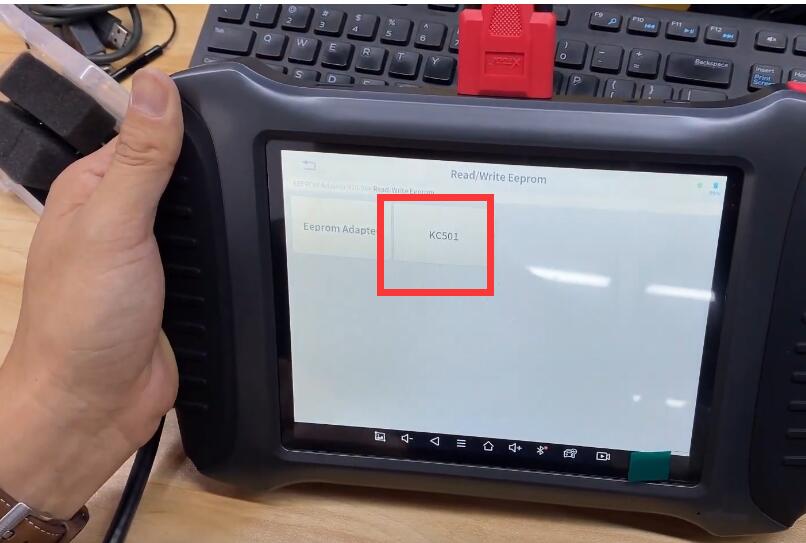
Select "ST”–>”ST95640”–>”SKx16”–>”Read data”
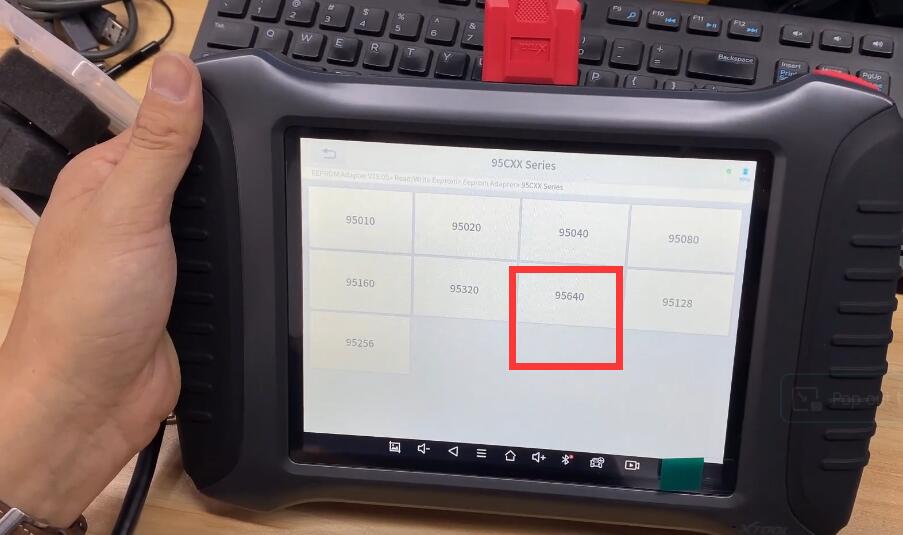
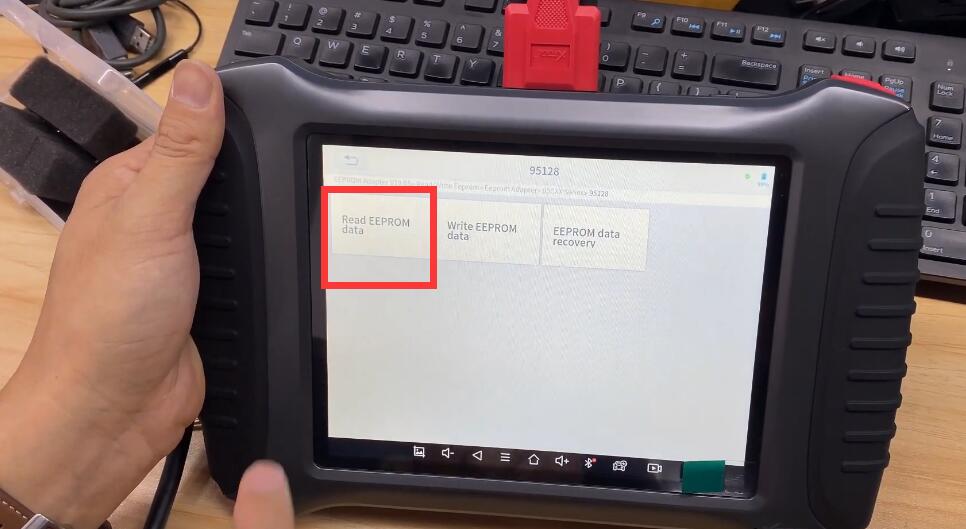
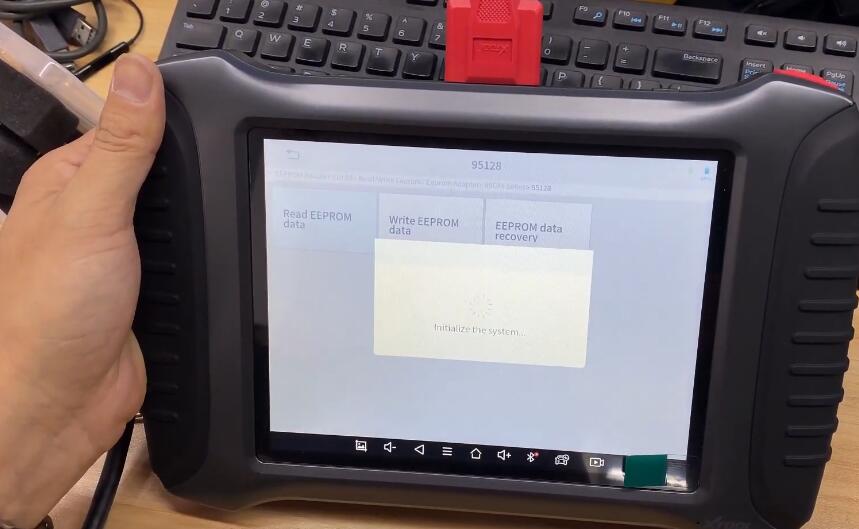
Reading data
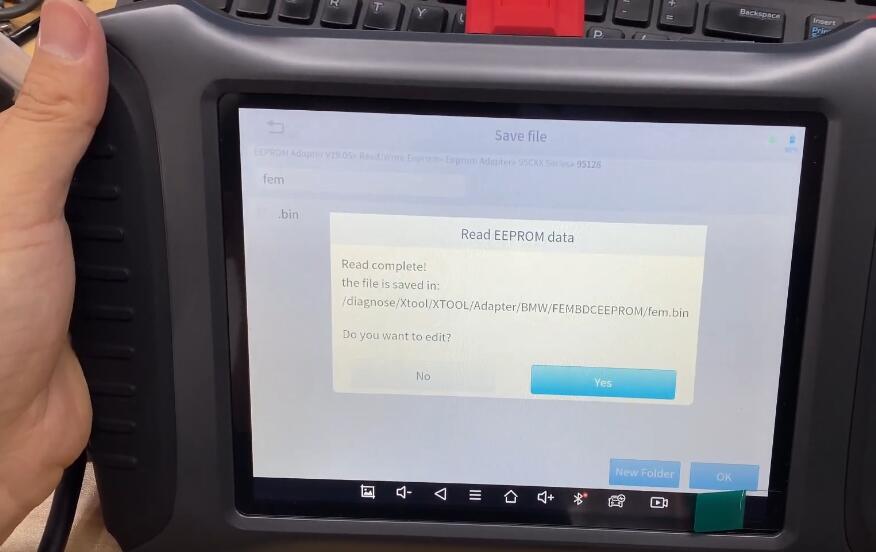
After finish,pls save it
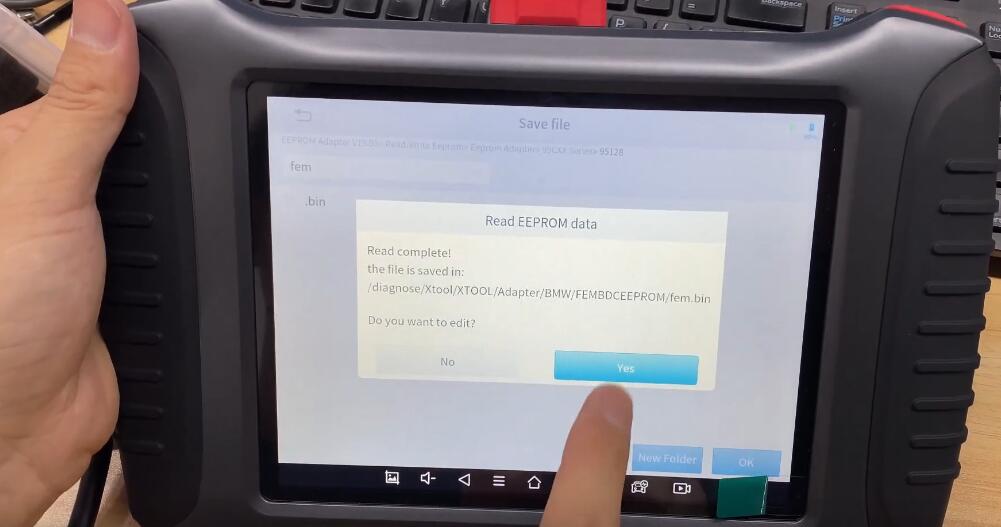
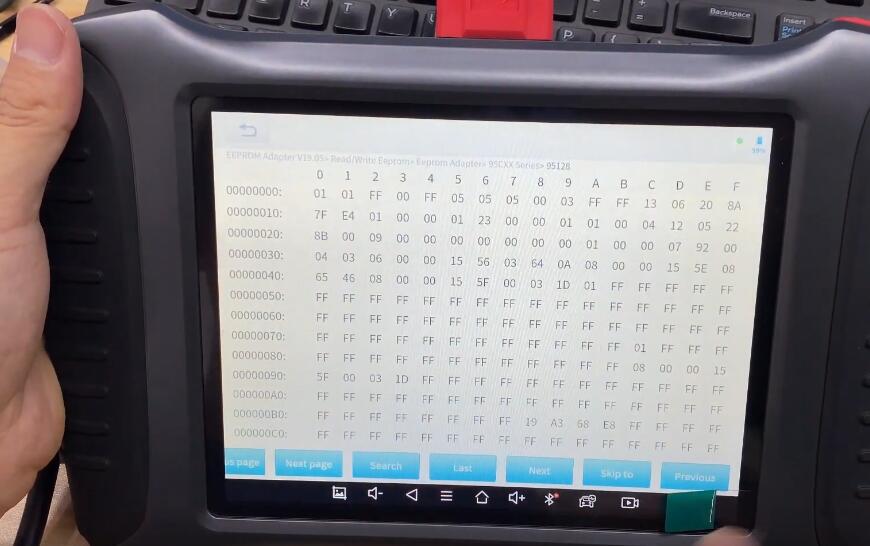
For writing data back,pls go to previous option to select "Write data”
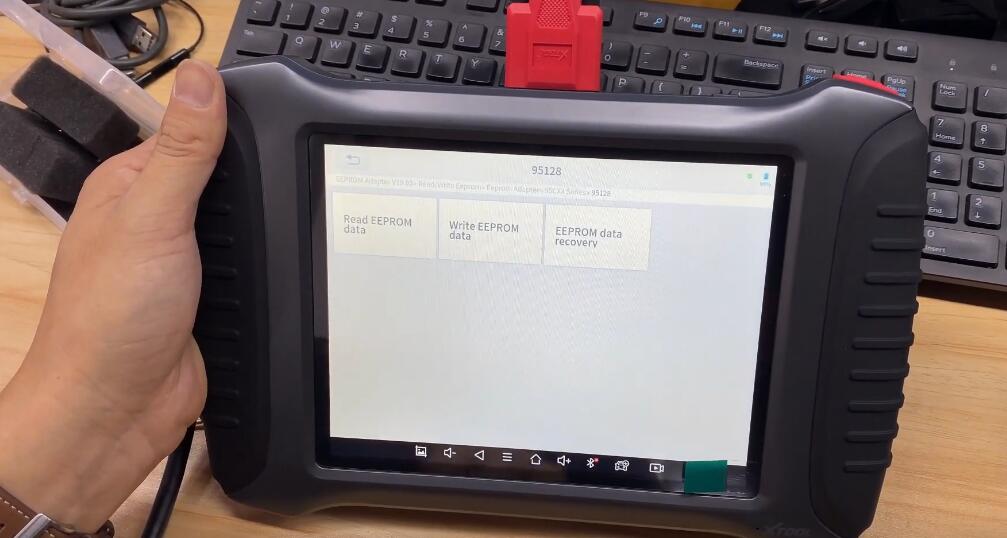
Select which file you want to write,then click "OK”
Finish
Posted by: youobd2 at
03:27 AM
| No Comments
| Add Comment
Post contains 95 words, total size 13 kb.
December 19, 2022
John Deere Service AdvisorAG is a workshop repair manual that contains detailed technical service information, operation and maintenance manuals, installation instructions, designed to serve agricultural equipment John Deere, such as: Tractors, Tractor Attachments, Cotton Harvesting, Cutting and Mowing Equipment, Harvester, Hay and Forage, Landscaping, Planting and Seeding, Scraper, Skid Steer Loaders, Snow Products, Sprayers, Sugar Cane Harvesters, Sugar Cane Planter, Tillage, Utility Vehicles, Golf and Turf Products, Motor Inverter, OEM Engines, Commercial Equipment, Excavator, Engine, Riding Lawn Equipment, and others
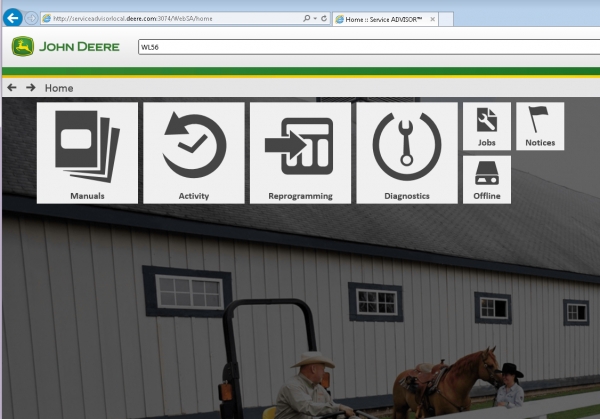
1. V5.3 AG+V5.3 CF software prompt expired (this software supports models until 2021)
Solution:
Please set the computer time to 2021
2. John Deere Service Advisor V4.2 software prompts expired (this software supports models up to 2016)
Solution:
Please set the computer time to 2016
John Deere Service Advisor software
https://www.obd2tool.com/goods-10250-John-Deere-Service-Advisor-Software.html
We have installed John Deere Service ADVISOR 5.3 AG +CF Software in the 512G SSD hard drive. After receiving the hard drive, put the hard drive into your laptop and use it.
Posted by: youobd2 at
01:58 PM
| No Comments
| Add Comment
Post contains 169 words, total size 2 kb.
December 08, 2022
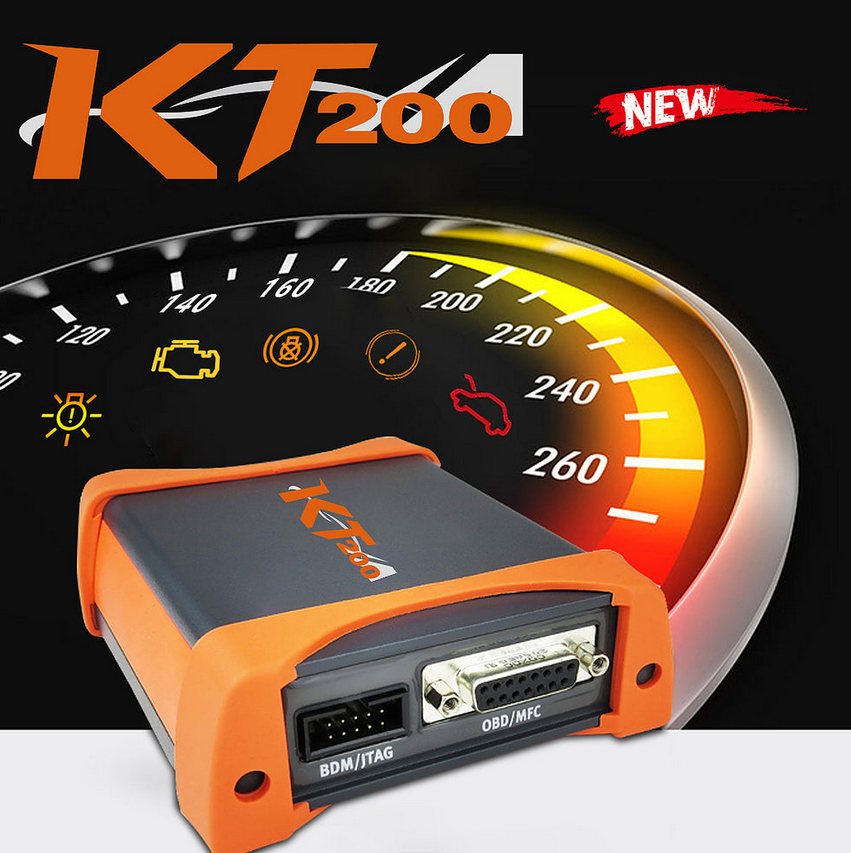
KT200 ECU programmerread and writes ECU & TCU FLASH and EEPROM in OBD, Bench, Boot Mode, and BDM/JTAG.KT200 ECU Programmer made by ChipTuningKit covers ECU & TCU of cars, trucks, motorcycles, tractors, and boats.
Download & Technical Support
KT200 SUPPORT
KT200 Programmer Support ECU List
KT200 Programmer Support TCU List
KT200 has 2 versions:
1. Car version (Basic version): Car OBD, Truck OBD, Full System, BDM/JTAG, TOOL BOOT, Bench Mode, TCU Gear
2. Full configuration Version: Car OBD, Truck OBD, Full System, BDM/JTAG, TOOL BOOT, Bench Mode, TCU Gear, Tractor OBD, Boat OBD, Motorbike OBD
KT200 Highlights:
1. ECU maintenance, chip tuning DTC code removal of professional reading and writing equipment covering 99% of the models on the market.
2. TCU encoding and cloning functions.
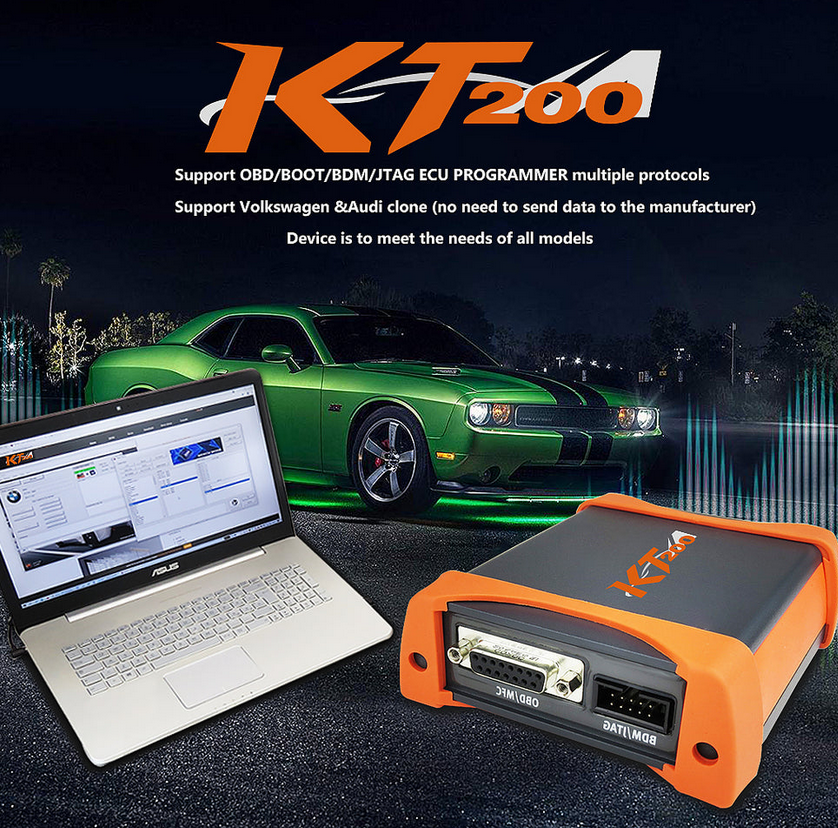
3. Support OBD/BENCH/BOOT/BDM/JTAG.
4. Read and write Bosch MD1 and MG1 ECUS in Bench Modes.
5. Bosch EDC17, MED17/ME17, and SIEMENS Pcr2.1(with Pinout also unlocking possibility) read and write in Bench Mode
6. Vehicle list is constantly updated stays ahead of the industry.
7. The KT200 software allows you to forcibly write (forcible clone) without checksumming and supports forcibly reading and writing unknown ECUs with supported chip models.
8. Covering a full range of German, ECU Programmer, Japanese, American and Chinese models.
9. Support VW, Audi clone. (local operation without sending data to manufacturers).
KT200 ECU Programmer, you can:
1. Read and write ECU data
2. ECU/TCU clone
3. ECU maintenance engineering
4. Chip Tuning
5. OBD2 reading
6. Read ECU maps
7. Checksum correction
8. Read and write Virtual data
9. Supports online update
Notice: The KT200 ECU Programmer requires an Internet connection.
We provide the following items: DTC code Removal EGR & DPF Removal, IMMO OFF, releasing speed limit, mileage correction, Hot start or Cold Start Vmax, and so on.
What Are the Newly Added Protocols to the Chip TuningKit KT200 Programmer Device?
MD1CE101 WITH OBD! You can use New Holland, Case, Stery, and Tractors for chip tuning, EGR, DPF, and AdBlue operations.
Read and write JCB DELPHI DCM3.3 / DCM3.3 + tractors via OBD.
With MD1CE101 OBD, you can read and write FPT Industrial Engines via OBD.
FORD ECU SIEMENS EMS2204, EMS2214, EMS2511 Reading and writing via new OBD.
The following models can be read and programmed:
1.CAR
2.TRUCK MOTORBIKE
3.TRACTOR
4.BOAT
5.Additional TCU package available for Automatic Transmissions.
The cover-free method can read and write the following protocols through PIN OUT:
BOSCH EDC7
BOSCH EDC16
BOSCH ME9/MED9
BOSCH MD1
BOSCH MG1
-FREESCALESPC5777
-AURIXTC29x
-STSPC58
BOSCH EDC17
BOSCH MED17/ME17
SIEMEN SPCR2.1
(Unlocking also possible via pinout)
System-wide via PIN OUT (MICRO/FLASH+EEPROM) the following ECUs:
BOSCH
CONTINENTAL
DELCO
DENSO
MARELLI
SIEMENS
TEMIC
TEMIC
BDM EJTAGMODESFOR:
BDM MPC55x
BDM MPC56x
BDM MC32/ZC32
BDM HC12/S12x
JTAG NEXUS MPC/SPC56xx
JTAG NEXUS MPC55xx
JTAG RENESAS:
SH7055
SH7058
SH7059
SH7251
SH72543
SH72544
JTAG NEC76F00xx
76F0038AGD
76F0038GD
76F0039AGD
76F0039GD
76F0040GD
76F0070
76F0070
76F0085
BOOT MODES:
-BOOT MODEC16729Fxxx
-BOOT MODE ST K-LINE/RX-TX/CAN
ST10F168
ST10F269
ST10F273
ST10F275
ST10F276
ST10F276
ST10F280
ST10F296
-BOOT MODE Tricore for micro
TC1724
TC1728
TC1738
TC1738
TC1762
TC1766
TC1767
TC1782
TC1791
TC1792
TC1793
TC1793
TC1796
TC1797
-BOOT MODE Renesas
SH7052
SH7054
SH7055
SH7055
SH7058
SH7059
SH7251
SH72543
SH72544
-BOOT MODE Mitsubishi
MH7202
MH7203
MH8102F
MH8105F
MH8106F
MH8202
MH8206F
MH8301F
MH8301F
MH8304F
MH8405F
-BOOT BAM SYSTEM MOTOROLA
SPC5674
SPC5777
-BOOT MODE Fujitsu
-BOOT MODE Hitachi
ADDITIONALPACKAGEFORAUTOMATICTRANSMISSION
FULLREADANDWRITETCU(MICRO+EEPROM)
TCU CLONING
TCU CODING FUNCTIONS
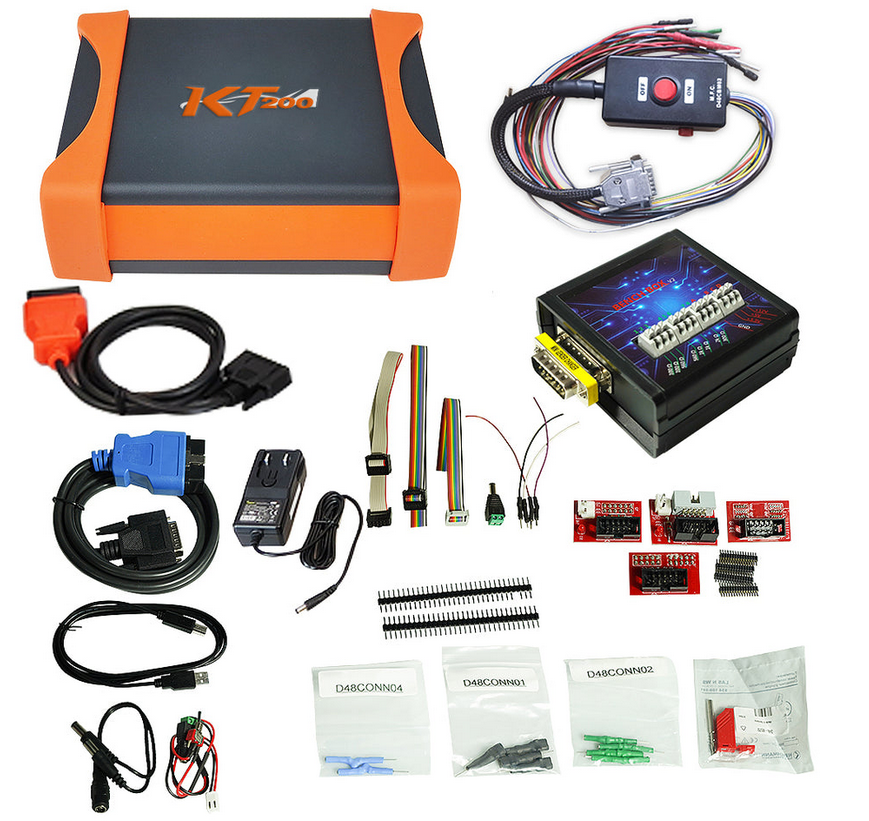
KT200 Package List:
1 host
1 BENCH BOX
OBD harness 2 pcs
1 pinout line
4 BOM adapters
3 transfer cables
4 wires
1 set of resistors
4 sets of adapter plugs
5 sets of power adapters
Posted by: youobd2 at
12:36 PM
| No Comments
| Add Comment
Post contains 595 words, total size 8 kb.
March 21, 2022
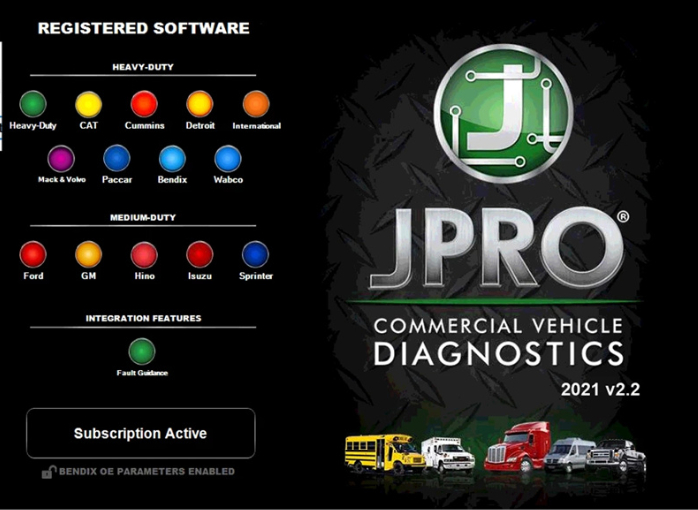
The focus of this update is to ensure technicians have all the tools necessary to maintain and repair the modern truck.
Noregon has announced the release of its first major update of 2021 for its flagship product, JPRO Professional. JPRO is an in-shop diagnostic and repair tool that allows fleets and repair facilities to triage, diagnose and repair all makes and models within a single application.
The focus of this update is to ensure technicians have all the tools necessary to maintain and repair the modern truck. Noregon enhanced coverage and introduced bi-directional tests for advanced driver assistance systems (ADAS) and added parameter adjustment capabilities for TPMS components.
JPRO Truck Diagnostic Tool Features:
1.Includes Heavy-Duty Modules: Mack, Volvo, Cummins, Detroit Diesel, International & PACCAR
2.Includes Medium-Duty Modules: Ford, GM, Isuzu & Sprinter
3.Bi-Directional Controls – Perform parameter changes (Mack &
Volvo), DPF Regens (Mack, Volvo, Cummins, Detroit Diesel, International
& PACCAR) & bi-directional tests with proprietary data &
faults
4.OE Level Fault Code Information – Display over 99% of
Heavy-Duty & Medium-Duty fault codes with detailed OEM level
component and trailer descriptions
5.Fault Management – Clears faults and diagnoses all vehicle components in a single, easy to use application
6.Vehicle Reporting – View and print log files, including: Vehicle Health, Trip Reports & LOV Reports
7.Store & Save Data – Record data log files for playback at a later time, even away from the truck
8.Total Vehicle Health Status – See the entire vehicle in one pass on
one screen + Up-to-Date – Provides 99% coverage of all heavy-duty truck
DTCs through 2020
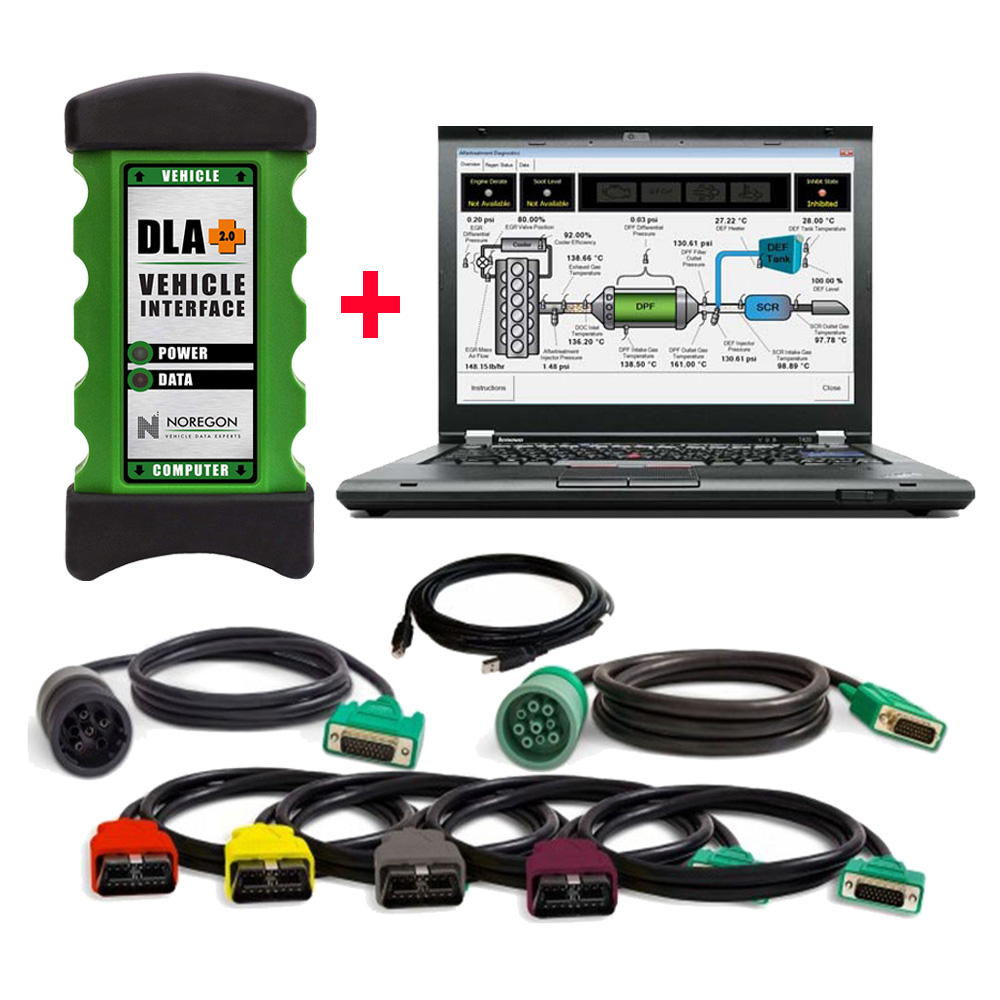
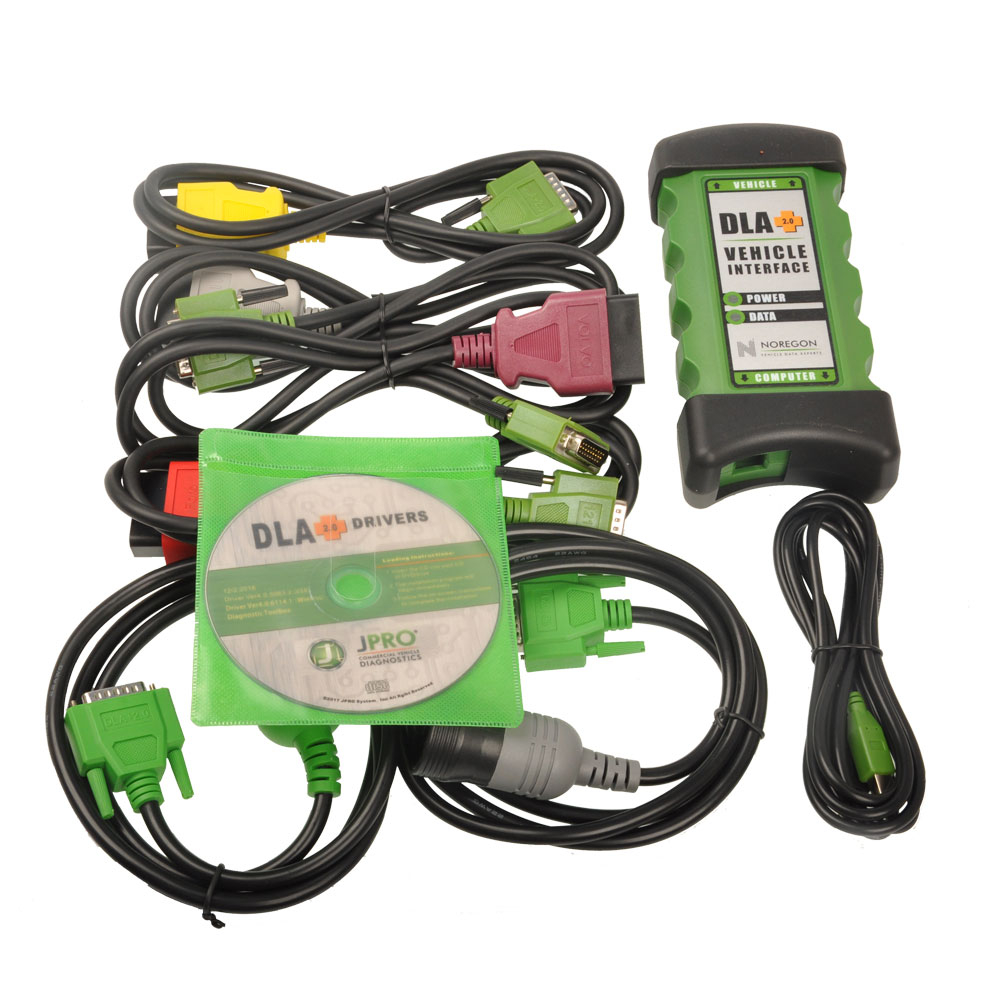
Jpro Diagnostic tool Packing list :
1.Second Hand Laptop Lenovo T420 Laptop (With JPRO Professional Diagnostic Software 2021 V2.2 & 2019V optional)
2.JPRO DLA+ 2.0 Adapter Cable
3.Heavy-Duty Vehicle Cables Type 2 Vehicle Cables (6-Pin & 9-Pin)
4.Medium-Duty Type-B OBDII Cables (Ford, GM, Sprinter/Hino/Isuzu, Mack & Volvo)
5.USB Cable
6.DVD(JPRO Software with keygen+ins)
7.Adapter Carrying Case
Second Hand Laptop Lenovo T420 Laptop Specification :
Brand: Lenovo
Condition: Used
Type: Laptop/Notebook
Screen Size: 14.0
Processor Type: Intel (R) Core(TM) I5-2520M CPU
Processor Speed: 2.50 GHz
Processor Configuration: Dual Core
Memory: 4GB
Compared with other laptop, this one is better quality and run faster.
FAQ
Don’t see your question answered below? Contact us!
1.What does JPRO do?
JPRO empowers diesel technicians to diagnose and repair all makes,
models, and components. JPRO reduces a technician’s dependency on OEM
software by offering industry-leading bi-directional controls, including
DPF regens, cylinder cutouts, parameter changes, and much more.
2.What trucks will JPRO work on?
For commercial vehicles, JPRO is an all makes, models, and components
solutions. For detailed information, check out our coverage chart.
3.Can JPRO adjust parameters such as road speeds or idle shutdown settings?
Yes! JPRO allows for many parameter adjustments, including max road and
cruise speeds, idle shutdown, PTO, VSS, Trip Information, and more!
Coverage varies by manufacturer, so please visit our coverage chart for
complete details.
4.What adapters work with JPRO?
For the most
reliable connection and functionality, we recommend a Noregon DLA+ 2.0
adapter but any RP1210C compliant adapter should work with JPRO.
5.If I buy JPRO, do I need anything else?
JPRO software requires a compatible Windows based PC, laptop, or
tablet, RP1210C compliant adapter, and the appropriate cable that
connects the computer to the vehicle’s OBD-II, 9-pin, or 6-pin port.
PLEASE NOTE: JPRO’s HD support for Mack and Volvo only supports the following adapters: • Noregon DLA+, DLA+ Wireless, DLA+ 2.0, DLA+ 2.0 Wireless, and DLA+ PLC • Vocom 88890300 • NEXIQ USB-Link, USB-Link 2
PLEASE NOTE: Ford, GM, Isuzu or Sprinter mediud-duty vehicle require any of the following adapters for connection: Noregon DLA+, DLA+ Wireless, DLA+ 2.0, DLA+ 2.0 Wireless
6.Do I need internet access for JPRO?
An internet connection is not necessary for connecting to the vehicle,
or for using many features in JPRO, but certain tools like Fault
Guidance and NextStep Repair require an active connection. Additionally,
setup, updates, license verification, or submission of information to
third-party warranty systems require internet access.
7.Can JPRO perform bi-directional vehicle tests?
Yes! JPRO comes loaded with industry-leading bi-directional tests for
the makes and models you commonly repair. For a full list of included
tests, visit our coverage chart.
8.If I have OEM software, why do I need JPRO?
Diagnosing on a component-by-component basis is time consuming in an
industry where time is extremely valuable. JPRO covers all components on
the vehicle to provide users with a holistic view of total vehicle
health.
Posted by: youobd2 at
06:30 AM
| No Comments
| Add Comment
Post contains 750 words, total size 8 kb.
March 09, 2022
Problem:
How to restore BMW icom next a2+B+C after a factory reset? LAN doesn’t work after reset.
Answer:
You need to restore it with usb drive, here is the file you need and how
to do it…… first restore then update …. you should search what is the
last version of ista that support F
1.https://mega.nz/file/tBYzVSBY#imbaH6NeLbV7n7dutVb3BMXYMGLVw0Ear-HqTXUUZTs
icom_01_37_00 .rar
2.Update firmware BMW ICOM A/A2/A3 (The next paragraph will list the details)
3.BMW ICOM A/A2/A3 Factory Restore (The last paragraph will list the details)
Step-by-step procedure on BMW ICOM A1-A2-A3 Factory Restore
Perform a factory reset if you face one of the following issues:
1.Single ICOM with at least one green LED, but does not become visible in ISTA
2.Single ICOM with at least one green LED, but it is not available in Connection Manager and therefore cannot be reserved
3. Single ICOM is not working in WLAN
4 .Single ICOM with at least one green LED, but Firmware Update is not possible neither via ISTA nor via ICOM Web GUI
Prerequisites:
1.USB flash drive. 2.0 with a minimum of 60 MB free space formatted with FAT32 (e.g. by Microsoft Windows)
2."ICOM_Restore.bin†file, which can be downloaded from this page. Make
sure you always use the latest file for the factory reset
Fix: Perform the following steps:
1.Copy the "ICOM_Restore.bin†file to the USB flash drive
2.Disconnect the network cable from ICOM A
3.If ICOM A is placed in an OBD II jack of the vehicle, then pull it out (ICOM A must have status offâ€)
4.Connect the USB flash drive to ICOM A
5.This step has to be done in a maximum time of 5 sec or the update process will not start:
Press the reset button on the ICOM A and hold it pressed:
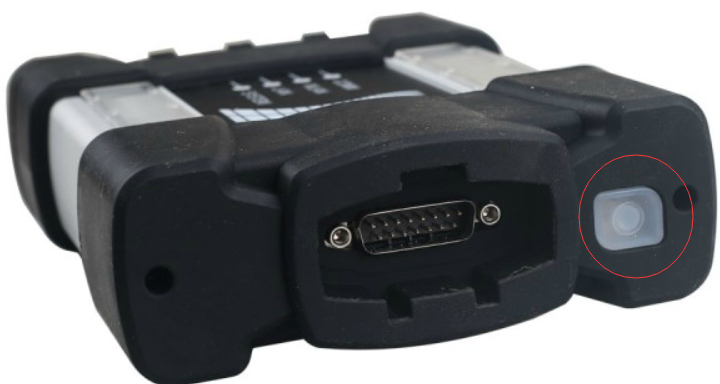
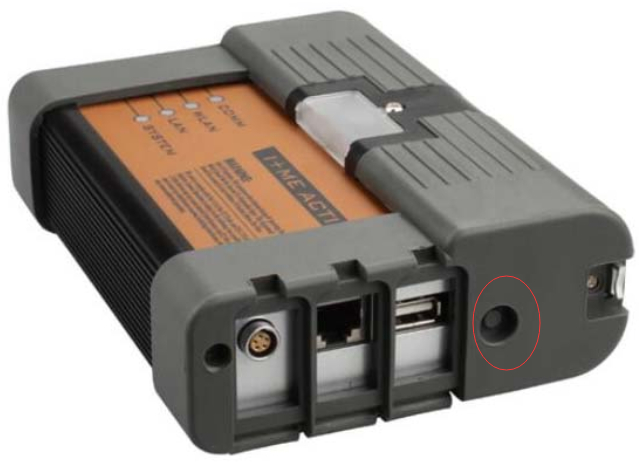
Connect ICOM A to the OBD II jack while the button is pressed (all LED will become red)
Release the reset button and then press it 3 times
The LEDs will flash red (if not, repeat the above steps)
The process is finished after 3 minutes
When the system LED is shining green, the update process is finished successfully
Disconnect to USB flash drive
6.Factory reset is done
7.Disconnect the ICOM A
8.Connect the LAN cable between the ICOM A and the network
9.Connect the ICOM A to a vehicle or external power supply
10.ICOM becomes visible now again in ISTA / work correctly again
Step-by-step procedure on BMW ICOM Upgrade:
1.First step is to make sure the LAN adapter is set to DHCP and is enabled, here is how to do it:
–Open Network Connections by clicking the Start button, and then
clicking Control Panel.in the search box, type adapter, and then, under
Network and Sharing Center, click View network connections.
–Right-click the connection that you want to change, and then click
Properties. If you’reprompted for an administrator password or
confirmation, type the password or provide confirmation.
–Click the Networking tab. Under This connection uses the following
items, click either Internet Protocol Version 4 (TCP/IPv4) or Internet
Protocol Version 6 (TCP/IPv6), and then click Properties.
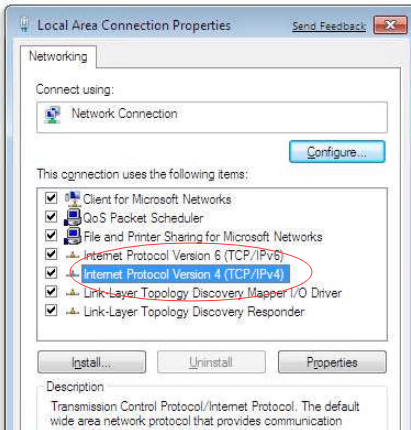
The Network Connection Properties dialog box
–To get IP settings automatically using DHCP, click Obtain an IP address automatically,and then click OK.
–To get a DNS server address automatically using DHCP, click Obtain DNS server
address automatically, and then click OK.
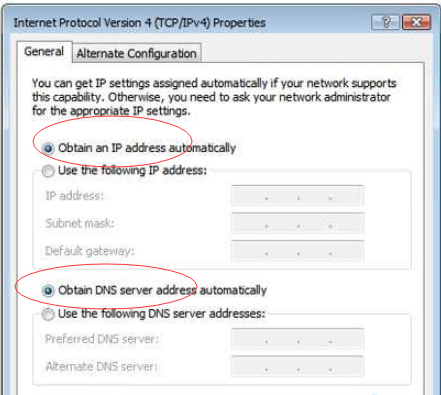
2.Connect ICOM to the car and to the UTP cable provided in the package
–there should be 4 green leds powered on
3.Check that the network adapter has an IP like 169.254….
4.Using the web browser go to http://169.254.92.38:60080
User: root Password: NZY1150263
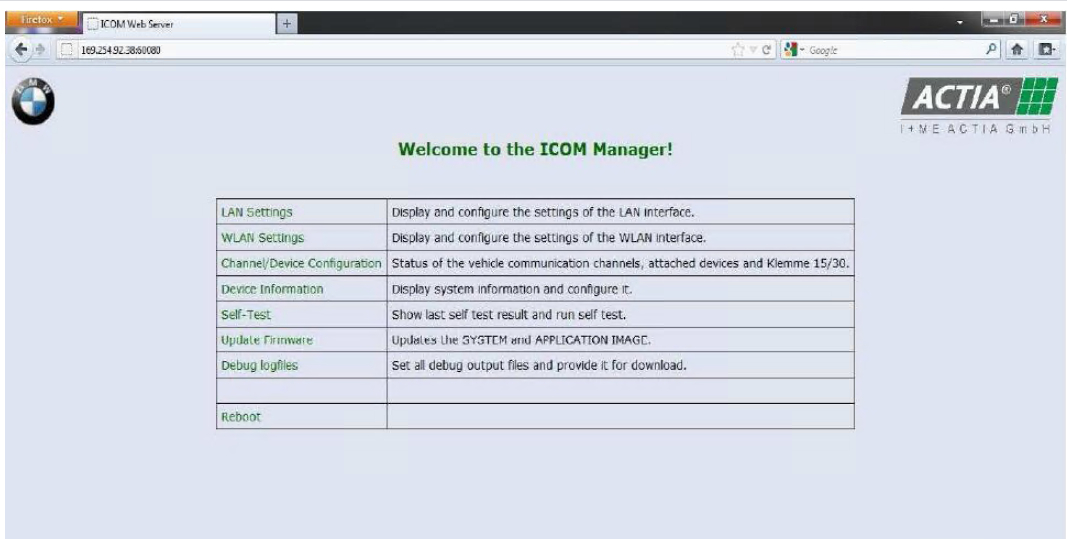
5.Select channels menu and click only once on the button available there:
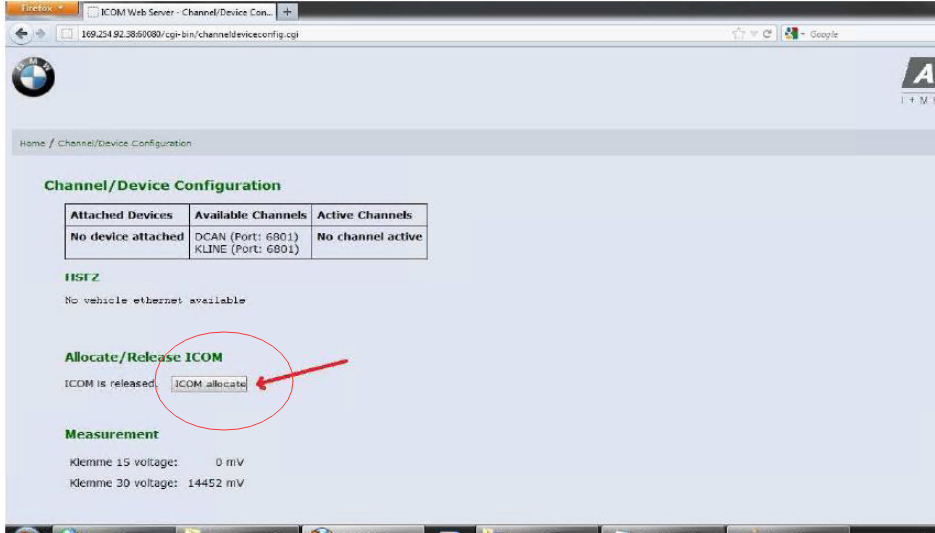
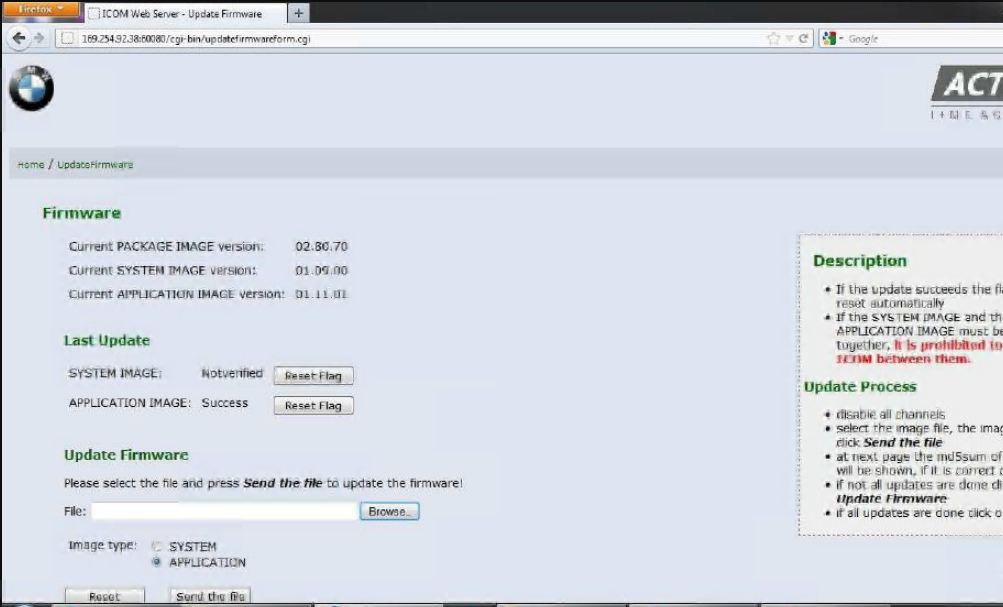
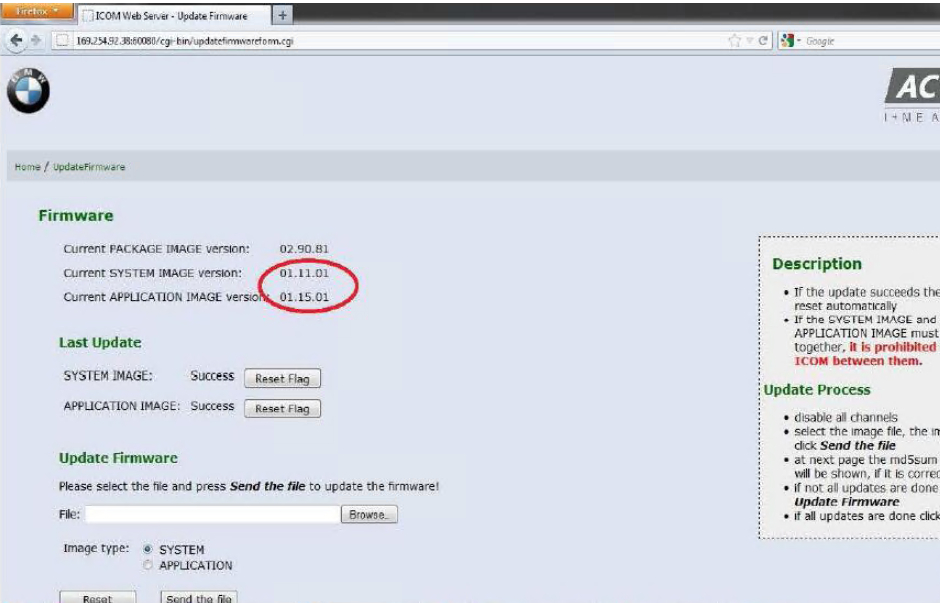
6.Go to firmware update and update with ICOM-BootImage-01-11-01.bin,
then with ICOMApplicationImage-01-15-01.bin, don’t reboot between parts:
— at the image type we have selected System, now Browse for the
ICOM-BootImage-01-11-01.bin and click on "Send the file†button and wait
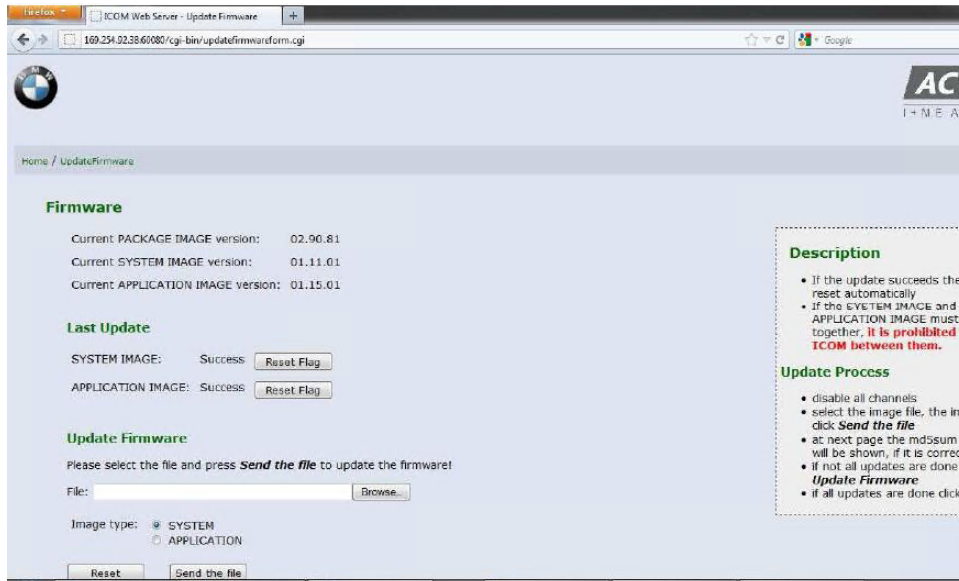
–click on Yes and wait
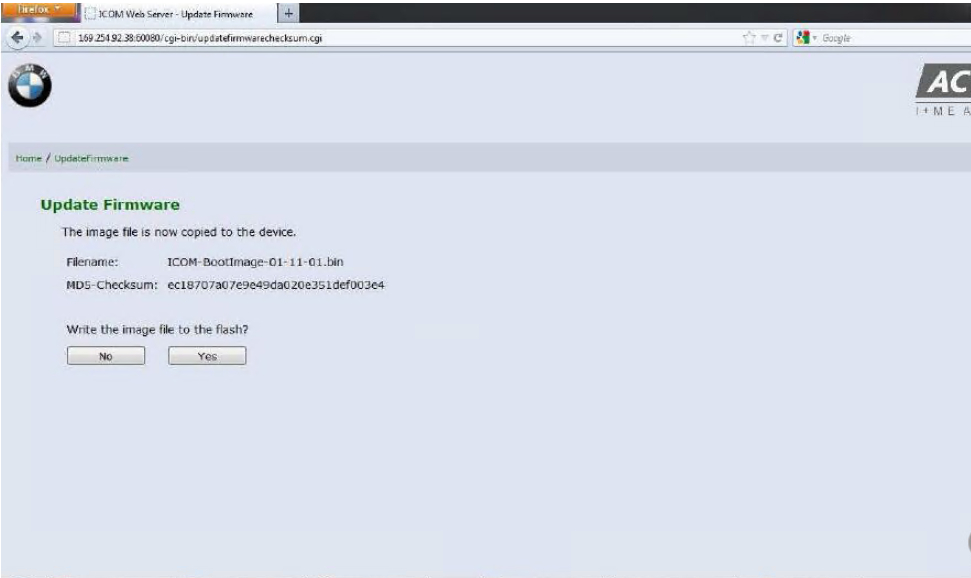
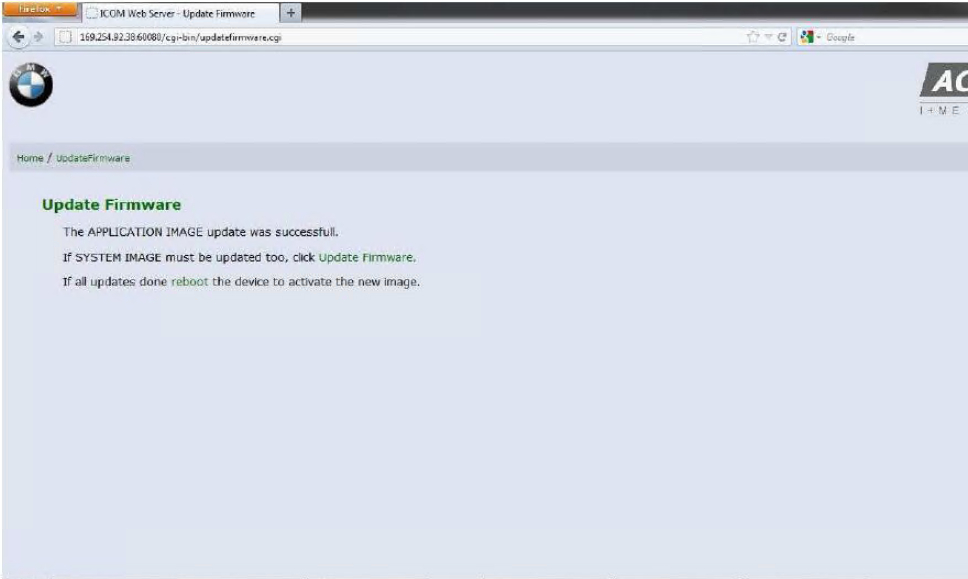
–now click on Update Firmware to go and update with ICOM-ApplicationImage-01-15-01.bin
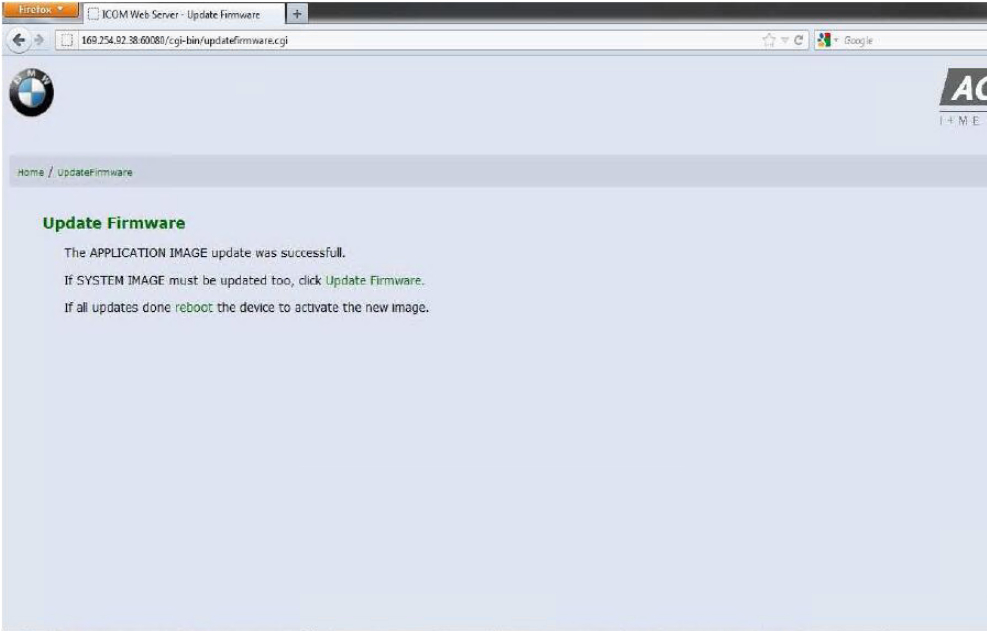
— at Image type check the option called APPLICATION and Browse for
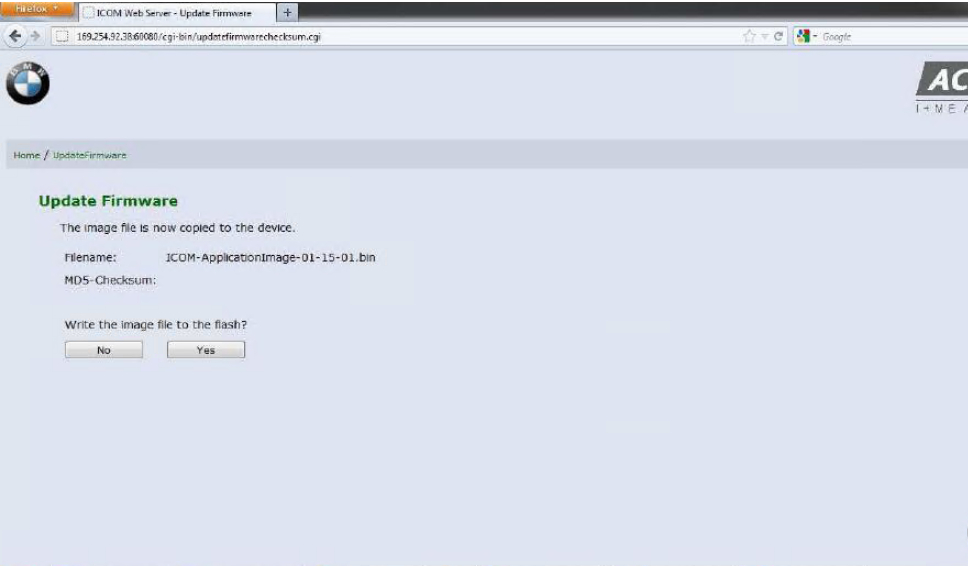
ICOM-ApplicationImage-01-15-01.bin and click on "Send the file†button
and wait
–click on Yes and wait
7.Reboot ICOM
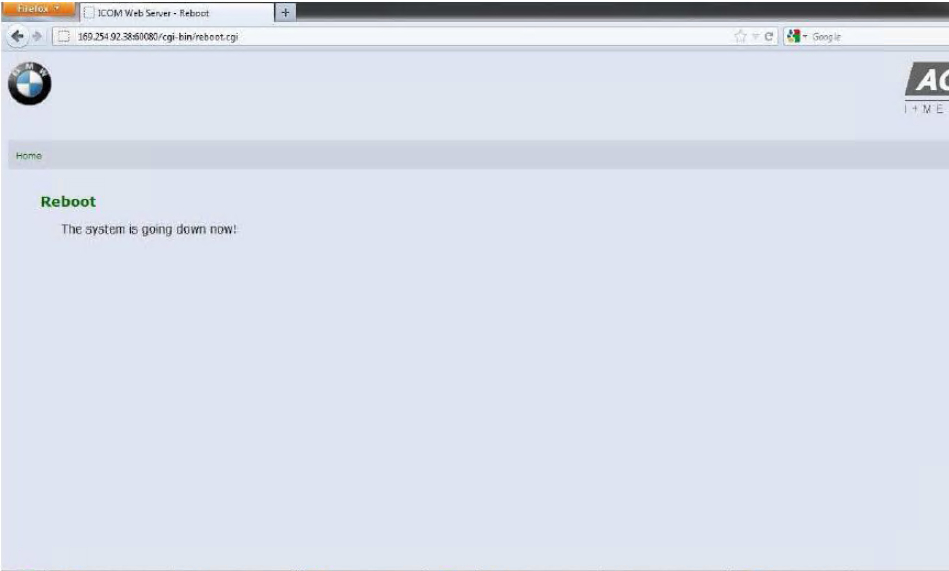
8.After at least 2 minutes press on Home button and go to Update
Firmware and check to see the firmware versions for boot is 1.11.01 and
application is 1.15.01:
Any need please feel free with us sale@cnautotool.com, thanks
Posted by: youobd2 at
02:04 PM
| No Comments
| Add Comment
Post contains 738 words, total size 11 kb.
February 16, 2022
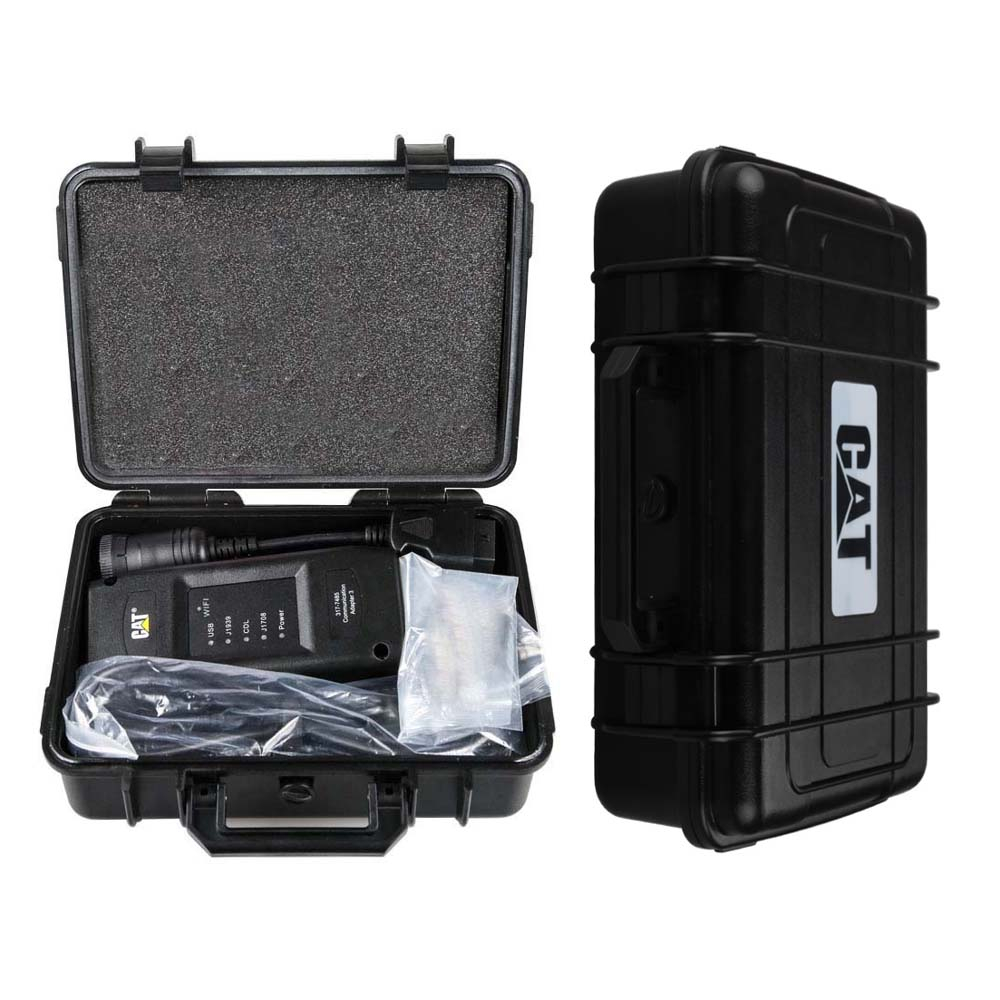
Caterpillar Electronic Technician (Cat ET) is diagnostic software required to communicate, diagnose and service electronically controlled Caterpillar engines and machines. When connected to an Electronic Control Module (ECM), a technician has the ability to diagnose existing and potential problems, configure the product, and obtain data for analysis.
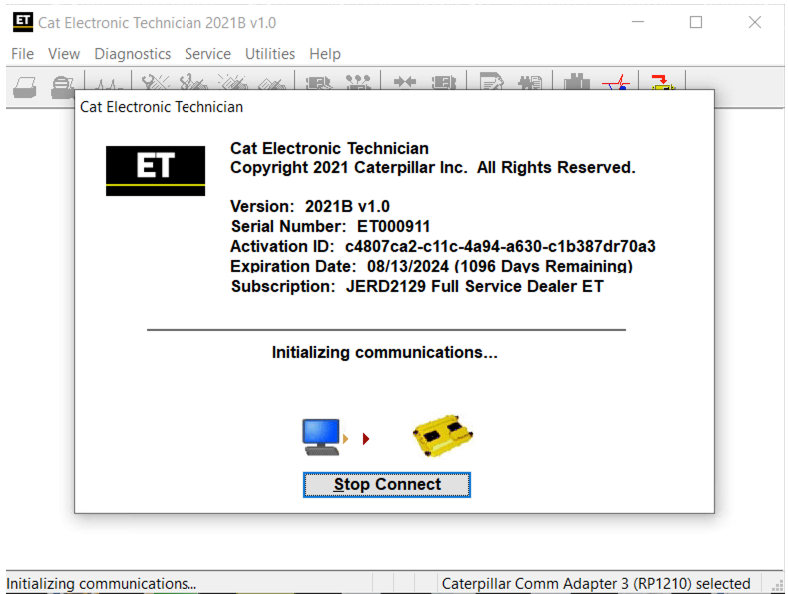
2021B is an upgraded version of 2021A , A represents the first quarter, and C is the software updated in the third quarter.
2021B Cat ET software as Cat Caterpillar ET 2018C 2019A 2019C 2020C 2021A Software update version, 2021B Caterpillar Electronic Technician software With CAT ET 4 Cat caterpillar adapter 4 support caterpillar diagnostic till 2021.
Cat et Caterpillar Electronic Technician Software:
Brand: Caterpillar
Region: WorldWide
Support Multi-languages:English, Chinese, Danish, French, German, Italian, Japanese, Portuguese, Russian, Spanish
Support All cars of CAT
Package :
1.Used Dell D630 laptop
2.Real CAT et3 Comm Adapter III(it’s best quality cat et 3,not adapter 2,please check Communication port)
3.USB Cable (From device to your computer)
4.J1939/J1708 9PIN Cable (from device to your truck)
5.6PIN Cable (for old truck)
6.14PIN Cable(for new truck)
7.Plastic box
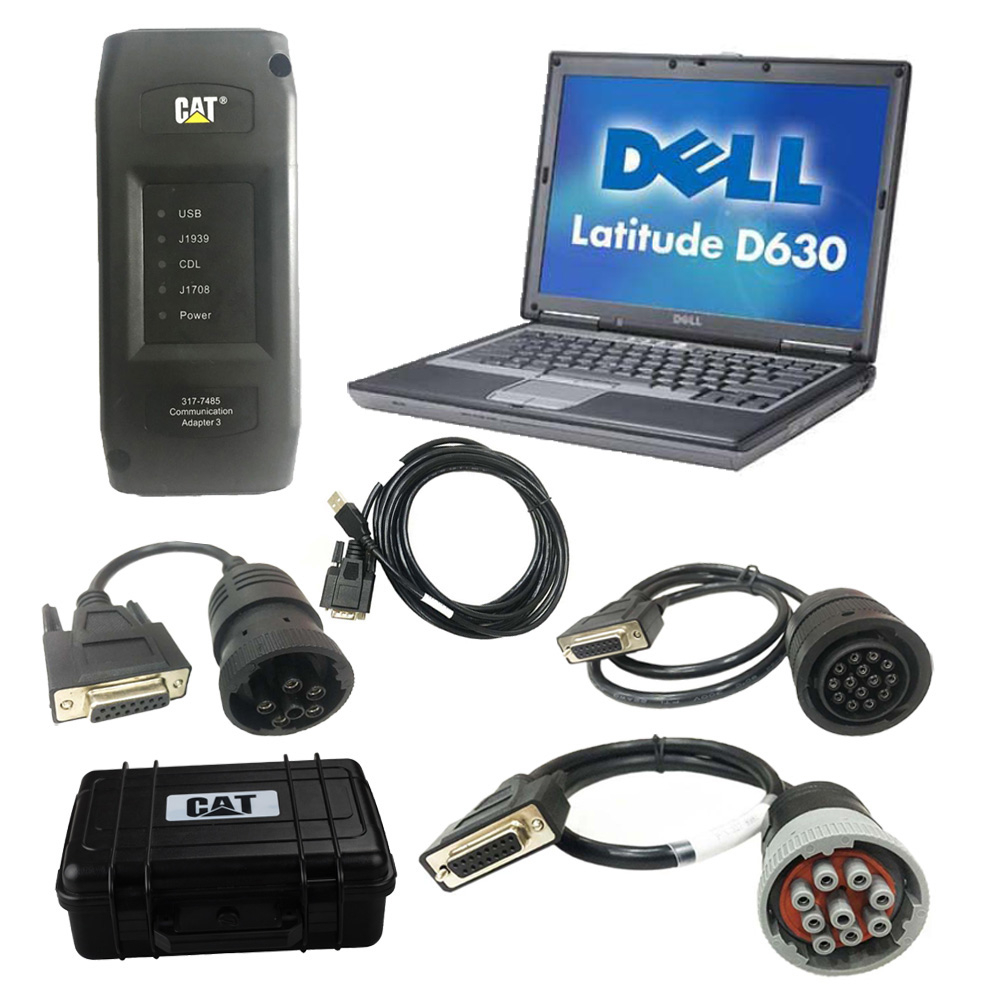
The Second hand Dell D630 Laptop specification:
Brand: Dell
Type: Laptop/Notebook
Screen Size: 14.0
Memory (RAM): 4G
Processor Type: Intel Core 2 Duo
Primary Drive: DVD+/-RW
Processor Speed: 1.80 GHz
Processor Configuration: Dual Core
The list of supported CAT machines and engines can be found below(if your vehicle is missing, please contact us we will double check):
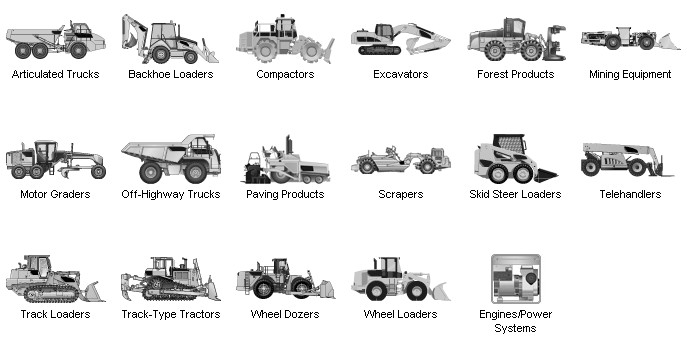
Engines:
Electric Power
Electric Power Generation
Industrial
Marine Power Systems
Oil and Gas
Machines:
Articulated Trucks
Asphalt Pavers
Backhoe Loaders
Cold Planers
Compactors
Dozers
Drills
Excavators
Feller Bunchers
Forest Machines
Forwarders
Harvesters
Hydraulic Mining Shovels
Knuckleboom Loaders
Material Handlers
Motor Graders
Off-Highway Trucks
Pipelayers
Road Reclaimers
Site Prep Tractors
Skid Steer and Compact Track Loaders
Skidders
Telehandlers
Track Loaders
Underground – Hard Rock
Underground – Longwall
Underground – Room and Pillar
Utility Vehicles
Wheel Dozers
Wheel Excavators
Wheel Loaders
Wheel Tractor-Scrapers
Features
Display, graph and log status parameters.
Retrieve prognostic data including histograms, engine totals for fuel used and miles traveled.
View active diagnostics and clear logged diagnostics. View events where
irregularities have occurred and have been logged by the ECM.
Perform calibrations to enhance performance of the ECM.
Customize the ECM with application-specific settings.
Over 100 custom Diagnostic, Information and Service features including:
– 2D and 3D Histogram plotting capability (engine software
support required).
– Custom Status screen groups
– Snapshots (Download and display snapshot data recorded by the
ECM)
– Configuration Aid that allows upload/download of same
configuration to multiple control modules
Customized Service Tool Options
Customized service tool name
Customized graphics for the splash screen and icons
Customized installation
Aftermarket differentiation, i.e., the tool for one customer does not work on the product of another customer.
Licensing options for customer management
Flash programming of the ECM(s)
Training demonstration allows familiarity with the tool’s primary functions without connecting to ECM(s)
Perform customized diagnostic tests to identify harness problems,
cylinder or component failures (Automatic Cylinder Cutout with cylinder
to cylinder fueling comparison)
Caterpillar ET Software Function:
This diagnostic app allows you to:
View active and logged diagnostics.
View events where irregularities occurred and were logged by the ECM.
View the status of a group of parameters (temperatures, pressures, etc.) simultaneously.
Record and log performance data.
Graph a group of status parameters.
View the current configuration of an ECM.
Change ECM configurations.
Perform diagnostic tests.
Perform calibrations.
Print reports and diagnostic results.
CAT Caterpillar ET Diagnostic Tool from Caterpillar provide the capability to access Electronic Control Modules (ECMs) from a personal computer. Many job-critical tasks can be performed with an electronic service tool.
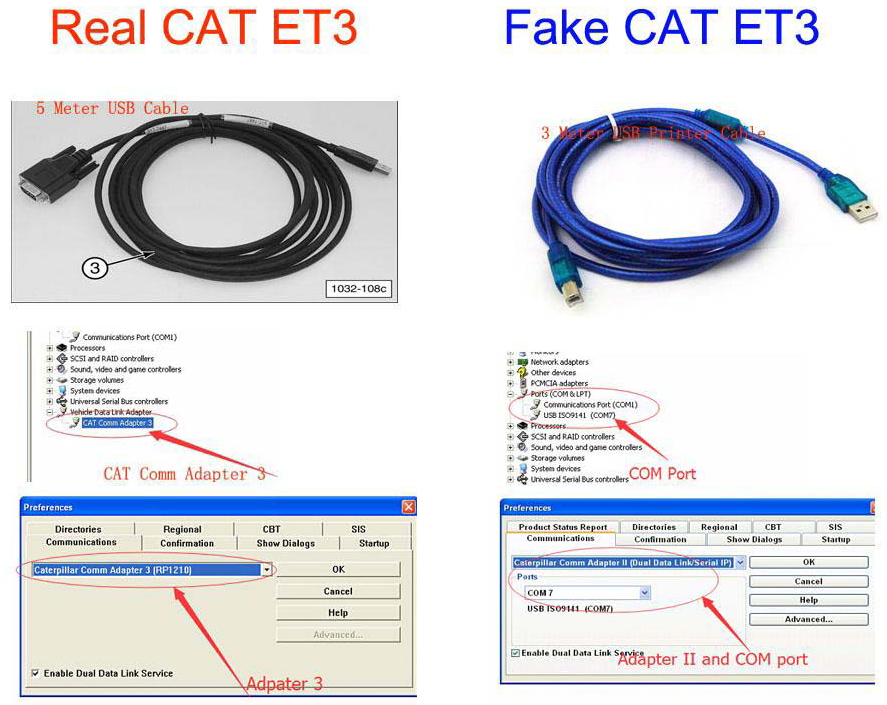
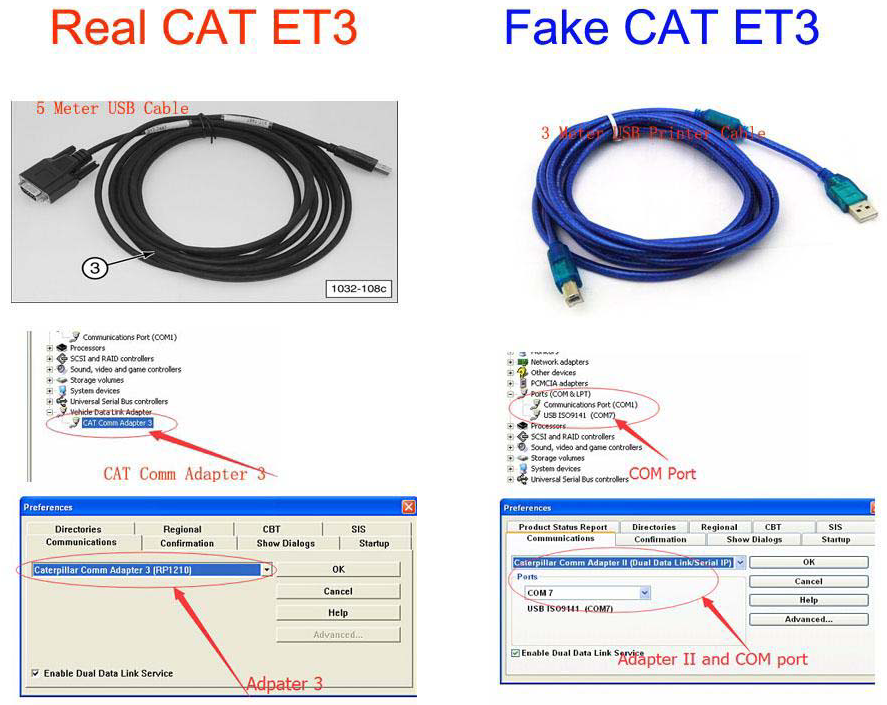
Original Factory Caterpillar ET3 Adapter III Compare With OEM Caterpillar ET Diagnostic Adpater III
1. Original Factory CAT ET can use once pluged, no need install the USB
drive, the software can automatic realize it for ET3 Adapter, and the
machine can automatic weld the high quality Circuit board, quality will
be more reliable.
2. The OEM Caterpillar ET Diagnostic Adapter III need use USB Drive to
install, and need choose the COM Port, and in the software ET also need
choose ET2 then can be used.
The Details as follows:
Posted by: youobd2 at
09:20 AM
| No Comments
| Add Comment
Post contains 697 words, total size 8 kb.
February 15, 2022
How to reflash MB SD C4 Plus without battery? You can edit Toolkit.ini to change the value of MinUpdateVoltageVbatt and MinUpdateVoltageVExt, and update the related files.
Step 1: Change MinUpdateVoltageVbatt/VExt Value
Right click the corresponding icon
Select ‘Goto BIN directory’
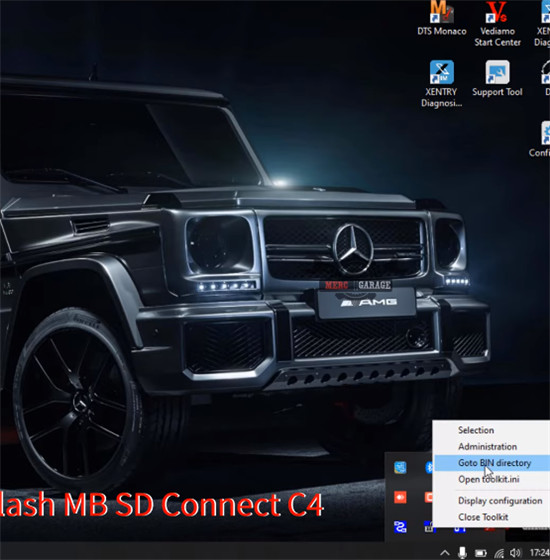
Then right click ‘Toolkit.ini’ and select ‘Editwith Notepad++’
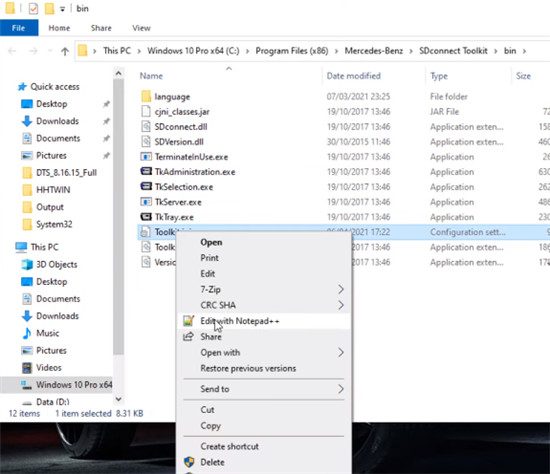
You can see MinUpdateVoltageVbatt=7200 and MinUpdateVoltageVExt=11000.
Change these two values to 0
i.e MinUpdateVoltageVbatt=0
MinUpdateVoltageVExt=0
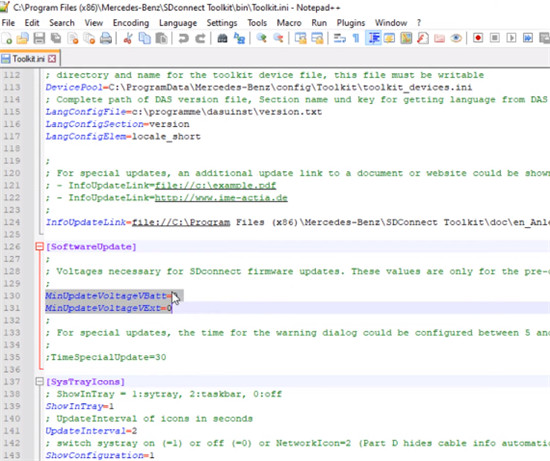
Remember to reboot the computer after changing.
Open ‘Administration’
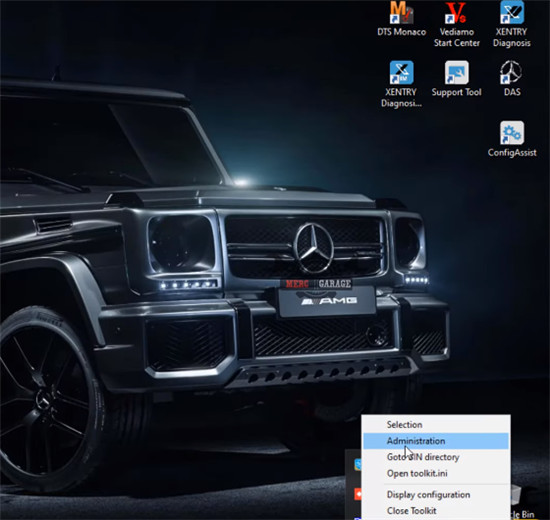
It shows ‘the toolkit is being initialized.’
Step 2: Update 02 CSD_2_11.zip
Click 01/Cable Accessible>> Software update>> 02 CSD_2_11.zip>> Start
It will take approx 2 min to update the software.
The indicators light up during the process.
Update SDconnect software successfully
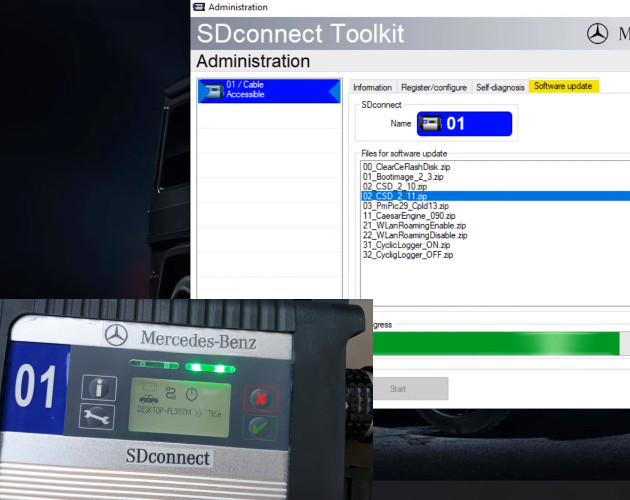
Step 3: Update 01_Bootimage_2_3.zip
Click 01/Cable Accessible>> Software update>> 01_Bootimage_2_3.zip>> Start
It also takes approx 2 min to update.
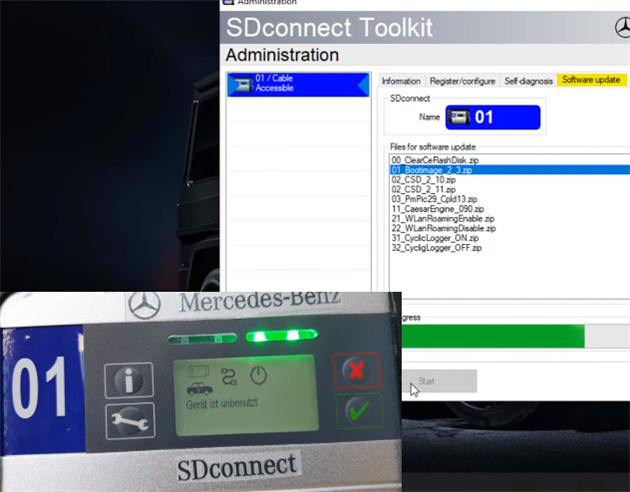
Step 4: Update 03_PmPic29_Cpld13.zip
Click 01/Cable Accessible>> Software update>> 03_PmPic29_Cpld13.zip>> Start
It also takes approx 2 min to update.
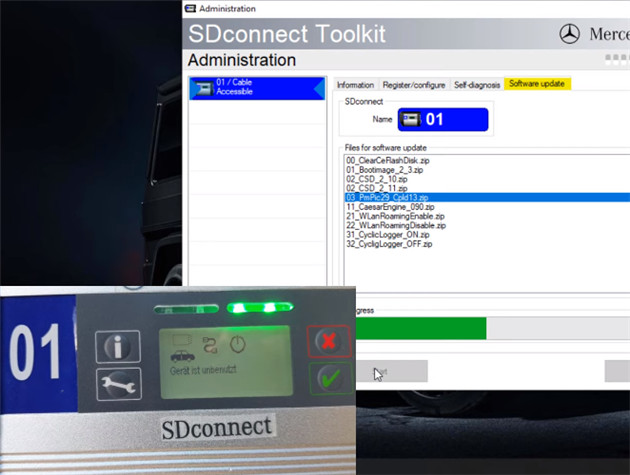
Update is completed.
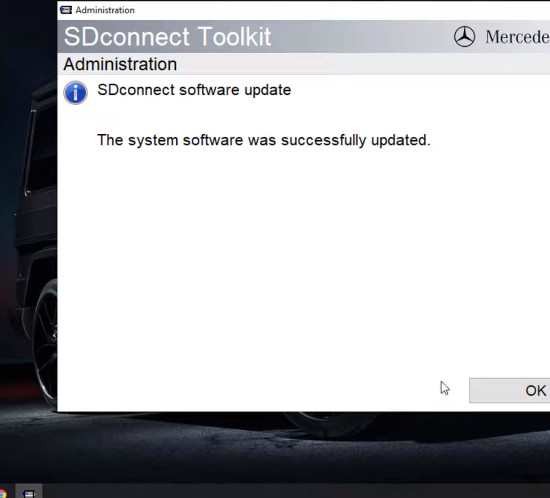
Hope it helps!
Posted by: youobd2 at
10:35 AM
| No Comments
| Add Comment
Post contains 166 words, total size 4 kb.
Many of us now have aPIWIS 2orPIWIS 3. I "assembled†my PIWIS 2 last year. I downloaded the software on-line (for free!) and then bought a clone Samtec interface from China. The program runs using VMWare on my old MacBook Pro. Windows XP is the operating system so everything is a bit clunky and slow but it works well enough and is perfect for my occasional diagnostic and coding needs! Best of all, my total build cost was crazy cheap! In fact, I sold my Durametric Pro cable after putting together the PIWIS because the PIWIS is a much more powerful tool!
My primarily motivation to get a PIWIS was to lower my car through the air suspension. I was initially looking at lowering using a module ($$$) or using links. I had read that lowering could be done with a PIWIS but there was very little DIY information on-line on how to do this. I have now figured out how to do this and will do up a "DIY Lowering with PIWIS†for the community once I get a chance.
When I first started using my PIWIS I got a low voltage warning even though my battery was fully charged (had been sitting for days on a Porsche Charge-o-mat Pro) and I had my 10A battery charger connected during my PIWIS session. A forum member on Rennlist with extensive PIWIS knowledge posted about the need for "clean†power while using the PIWIS. This ideas of "clean†power intrigued me. This lead me down a "rabbit holeâ€â€¦
I came across this Porsche After Sales Technical Bulletin confirming the need to use a battery charger with a fixed voltage between 13.5V – 14.5V while ECU programming on modern Porsche vehicles. Porsche recommended using a battery charger capable of putting out a minimum current of 90A to maintain this stable voltage. Few of us have chargers that can produce a STEADY 90A (not a one time boost charge).
So…VOLTAGE needs to stay constant (stable) while ECU coding. To accomplish this, amperage needs to fluctuate to maintain constant voltage. So, using a conventional battery charger that puts out constant amperage doesn’t fit the bill.
I then looked into commercially available power supply units (PSU) that supply constant voltage (i.e. "clean†power). The Schumacher INC100 fits the bill but is crazy expensive! I thought about buying one but, in the end, couldn’t justify the cost for my occasional DIY use.
Then I stumbled across a forum post on BoostAddict that described how to make your own PSU using a computer sever power supply. I went ahead and made my own and it works AMAZINGLY! I’ve used it for hours and the voltage remains rock solid stable with no fluctuation. I guess this shouldn’t be a surprise as it is designed to power computer systems. It is quiet, portable, doesn’t overheat, and it cost me $55 (CDN) all in!
FYI…I did not come up with this PSU build. I’m solely passing along the knowledge I gained as I chased the rabbit down the hole!
Disclaimer: Do this at your own risk and don’t mix up the polarity!
Posted by: youobd2 at
10:30 AM
| No Comments
| Add Comment
Post contains 528 words, total size 3 kb.
January 28, 2022
In this instruction,Obd2tool.com show you guide on how to change hydraulic system oil for Caterpillar 950F excavator. More repair case for CAT machine,please refer to:Caterpillar Trouble Repair.Caterpillar Trouble Repair.
Procedures:
NOTICE
Care must be taken to ensure that fluids are contained during performance of inspection, maintenance, testing,adjusting and repair of the product. Be prepared to collect the fluid with suitable containers before opening any compartment or disassembling any component containing fluids.
Dispose of all fluids according to local regulations and mandates.
1.Operate the machine in order to warm the hydraulic oil.
2.Park the machine on level ground. Lower the attachment to the ground and apply slight downward pressure. Engage the parking brake and stop the engine.
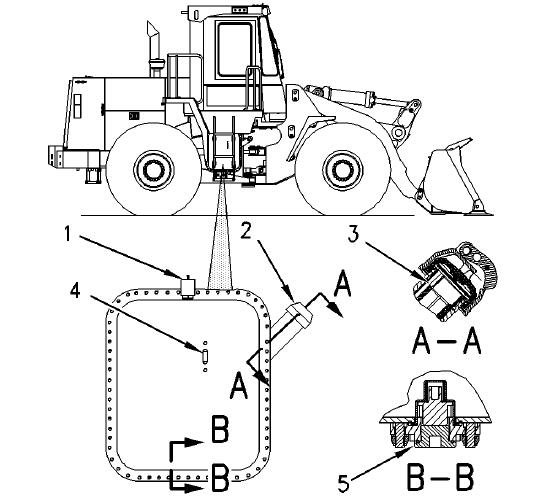
3.The hydraulic tank is located on the right side of the machine. Press the button on the breaker relief valve (1) in order to relieve any tank pressure.
4.Remove the hydraulic tank filler cap (2) and the filler strainer (3). Wash the filler cap and the strainer in a clean, nonflammable solvent. Install the strainer.
5.Inspect the gasket on the hydraulic tank filler cap for damage. Replace the gasket, if necessary.
6.Remove the drain plug (5) from the bottom of the hydraulic tank. Wash the drain plug in a clean, nonflammable solvent.
7.The hydraulic tank is equipped with an ecology drain valve. Attach a hose to a 126-7914 Oil Drain Coupling. Install the threaded end of the coupling into the drain valve in order to unseat the internal drain valve.
NOTICE
Never start the engine while the hydraulic oil tank is being drained or while the hydraulic oil tank is empty.
Excessive wear and damage to the hydraulic components can occur.
8.Close the drain valve. Install the drain plug.
9.Change the hydraulic oil filter.
10.Fill the hydraulic tank with clean oil. Make sure that the oil level is at the "FULL†mark on the sight gauge (4). Install the filler cap.
11.Start the engine and run the engine for at least ten seconds. Then, stop the engine and add hydraulic oil to the tank until the oil level is at the "FULL†mark on the sight gauge. Install the
filler cap.
12.Start the engine and run the engine at low idle. Cycle the implements so that all hydraulic systems are filled with oil.
Note: If the alert indicator for a low oil level comes on, stop the engine and immediately add oil to the hydraulic tank. The oil level should not be below the suction ports in the hydraulic tank while the engine is running.
13.Add hydraulic oil to the tank until the oil level is at the "FULL†mark on the sight gauge.
14.Stop the engine. Top off the hydraulic tank so that the oil level is at the "FULL†mark on the sight gauge. Install the filler cap.
Note: The oil must be free of air bubbles. If air bubbles are present in the hydraulic oil, air is entering the hydraulic system. Inspect the hydraulic suction line and the hose clamps.
15.If necessary, tighten any loose clamps or any loose connections. Replace any damaged hoses.
Posted by: youobd2 at
08:46 AM
| No Comments
| Add Comment
Post contains 523 words, total size 4 kb.
Mercedes-Benz Star Diagnosis C3 is a multiplexer of the Mercedes diagnostic complex, which is known in specialist circles as Mercedes Star C3, MB Star C3, Star C3. Scanner (multiplexer) is a diagnostic scanner Mercedes, an absolute, fully functional copy of the original dealer diagnostic scanner (multiplexer) from Mercedes Benz Star Diagnosis C3. The Star Diagnosis C3 scanner works with the original Mercedes Xentry DAS diagnostic software. The system offers full support for all procedures provided by the manufacturer, such as diagnosis, programming, coding, testing of all components, modules and assemblies that are equipped with electronic control units from Mercedes vehicles.
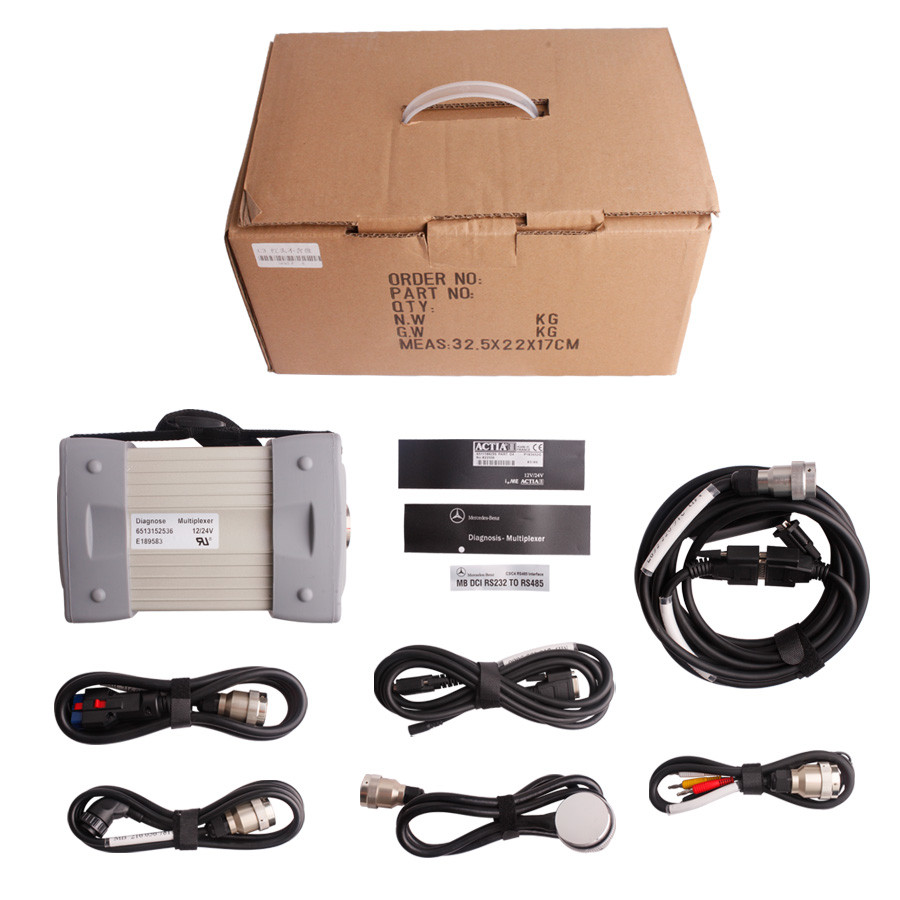
Newest software: 2021.09
Multi-Language: English, French, Spanish, Portuguese, Italian, Japanese, Ruassian, Croatian, Czech, Danish, Dutch, Finish, Greek, Hungarian, Korean, Polish, Romanian, Swedish, Turkish, Chinese
MB Star C3 has past truck test. It can used to do benz trucks
Mb Star C3 Functions:
1.1989~up to now Car, Bus, Truck, Sprint, Smart ;
2.All electric system Diagnostic;(Do not include flash code)
3.reading trouble code
4.erasing trouble code
5.live-data
6.adaptation
7.component testing
8.maintenance
9.information consultation
10.component location diagram
11.wiring diagram
Mb Star C3 New Features:
1.This version of MB STAR C3 can fit all computers,it is not only limited on IBM T30,provide great convenience to customers.It has one hard disk contain DAS and WIS system.
2.With a 7 meter RS232-RS485 cable,provide more convenience to garage when diagnose.
3.Every hard disk has it’s special number,have self-test function.Just give us the self-test report and the number,we will find out what’s the matter with this tool,avoid the shipping charge when this tool need fix.Great improvement!
4.What is most important, this C3 has past truck test.It can used to do benz trucks.
Mb Star C3 Testable System:
ENGINE
AUTO-SPEED
AIRCONDITIONAL SYSTEM
SRS
ABS
ASR
MPL
GM
BENZ ORIGINAL ANTI-THEFT
DASX SYSTEM
KEYZESS GO SYSTEM
OBD-II SYSTEM
Product Software Includes:
1.D-A-S: the automatically Diagnosis Assistance System ,Concise interface and straightforward operation with IBM high-quality computer can realize the quick and accurate code reading and the whole car system testing
2.W-I-S net: Workshop Information System Supply the whole view of the wiring diagram in a car,component location diagram and maintenance method. What you do is to enter the chassis number, and then you will get the manufacture data, engine configuration and the car model -all in detail.
3.EPC.net : Electronic Parts Catalog
4.ST Finder art location finder
5. STAR UTILITIES : the movement management system and self-test
MB Star C3 Supported Vehicle List:
Support Mercedes Benz Cars After Year 2000
Passenger Car Support List:
A(176), A(169), A(16 , B(246), B(245), CLC(117), C(204) C(203), C(202), 190(201), E(212), E(211), E(210), 124(124), S(222), S(221), S(220), S(140), S(126),
E(207), CLK(209), CLK(20
, CLS(21
, CLS(219), CL(216), CL(215), CL(140) SLK(172), SLK(171), SLK(170), SL(231), SL(230), SL(129), SL(107), SLS(197),
M(166), M(164), M(163), G(463), G(461), E(212), E(211), E(210), 124(124), S(222), S(221),S(220), S(140), CLK(209), CLK(20
, CLS(21
, CLS(219), CL(216),
CL(215), CL(140), SLK(172), SL(231), SL(230), SL(129), SL(107),SLS(197), M(166), M(164), M(163), G(460), GL(164), GLK(204), R(251)
Van Support List:
MB 100(631), T1, SprinterIII, SprinterII, SprinterI, Sprinter900, Citan, Vito(639), Vito(63
, V(63
, Viano(639), T2, Vario, Vaneo(414)
Truck Support List:
Actros963/4, Actros2,3, AtegoIII, AtegoII, AxorII, Eonic, Zetros, Actros, Atego Light, Atego Heavey, HPN M96, Atron, HPN M2000, SKL, FSK, Further model series
Unimog Support List:
U20, UGN, UHN
Bus Support List:
TRAVEGO, INTOURO, INTEGRO, CITARO, CAPACITY, CITO, TOURISMO, O350/O403, CONECTO, O404, O405-O408, Minibus, OC500, TOURO, TOURINO, MBC, MULITEGO, O500, O500/OH, OH, OH368, OF, OF384, LO, O400, FURTHER MODEL SERIES
Super Sports Car Support List:
SLR(199)
Mb Star C3 Package List:
1x MULTIPLEXER
1x 16Pin OBD II Cable
1x 4Pin Cable
1x 38Pin Cable
1x 14Pin Truck Cable
1x COM Cable
1x RS232 to RS485 Cable
1x Serial Adapter Cable
1x Hard Disk (optional)
Posted by: youobd2 at
08:38 AM
| No Comments
| Add Comment
Post contains 611 words, total size 5 kb.
December 30, 2021

-
Description: 2021B Cat ET software as Cat Caterpillar ET 2018C 2019A 2019C 2021A Software update version, 2021B Caterpillar Electronic Technician software With CAT ET 3 Cat caterpillar adapter 3 support caterpillar diagnostic till 2021.
CAT Caterpillar ET Diagnostic ToolProduct Description :
CAT Caterpillar ET Diagnostic Tool from Caterpillar provide the
capability to access Electronic Control Modules (ECMs) from a personal
computer. Many job-critical tasks can be performed with an electronic
service tool. The user can display the status of a group of parameters
(temperatures, pressures, etc.) simultaneously, view active and clear
logged diagnostics, display the current configuration of an ECM and much
more. The service tool works with a communication adapter to allow
connection to an ECM. A graphical interface makes this software quick to
learn and easy to use. A separate pull-down menu for each function
enhances the "ease of use.†The version and identification of the ECM is
automatically retrieved and is displayed on a summary screen when the
program is started. Diagnostic tests and calibrations can also be
performed.
CAT Caterpillar ET Diagnostic Tool enable
service technicians to reprogram ECMs, reconfigure control system
parameters, fine tune performance or diagnose the root cause of a
failure the first time. These powerful tools allow service personnel to
display and analyze vital performance and health information from any
system quickly and accurately. The service tool communicates with any
system using ATA (J170
, J1939 or the Caterpillar proprietary data link
networks. The service tools provide information and features needed to
help a technician diagnose problems and perform repairs and to customize
and personalize the operation of a product. By allowing customers to
design flexibility and configurability into a product, Caterpillar
service tools stretch beyond the capabilities of preprogrammed ECMs or
onboard display systems.
With the CAT Diagnostic Tool, you can:
View active and logged diagnostics
View events where irregularities occurred and were logged by the ECM
View the status of a group of parameters (temperatures, pressures, etc.) simultaneously
Record and log performance data
Graph a group of status parameters
View the current configuration of an ECM
Change ECM configurations
Perform diagnostic tests
Perform calibrations
Print reports and diagnostic results
For some machine and engine products, additional functionality has been included with the service tool program
Features
Display, graph and log status parameters.
Retrieve prognostic data including histograms, engine totals for fuel used and miles traveled.
View active diagnostics and clear logged diagnostics. View events where
irregularities have occurred and have been logged by the ECM.
Perform calibrations to enhance performance of the ECM.
Customize the ECM with application-specific settings.
Over 100 custom Diagnostic, Information and Service features including:
– 2D and 3D Histogram plotting capability (engine software
support required).
– Custom Status screen groups
– Snapshots (Download and display snapshot data recorded by the
ECM)
– Configuration Aid that allows upload/download of same
configuration to multiple control modules
Customised Service Tool Options
Customized service tool name
Customized graphics for the splash screen and icons
Customized installation
Aftermarket differentiation, i.e., the tool for one customer does not work on the product of another customer.
Licensing options for customer management
Flash programming of the ECM(s)
Training demonstration allows familiarity with the tool’s primary functions without connecting to ECM(s)
Perform customized diagnostic tests to identify harness problems, cylinder or component failures (Automatic Cylinder Cutout with cylinder to cylinder fueling comparison)
Caterpillar electronic technician 2020B with WinFlash future is an updated version of the caterpillar dealer diagnostic software that can help technicians to diagnose existing and potential problems with their electronically controlled Caterpillar Engines and Machines.
To get the vehicle information the Cat ET software must be connected to the Electronic Control Module (ECM). For this purpose, you need a suitable diagnostic link adapter (DLA), for instance, Genuine CAT Comm Adapter III
The list of supported CAT machines and engines can be found
below(if your vehicle is missing, please contact us we will double
check):
Engines:
Electric Power
Electric Power Generation
Industrial
Marine Power Systems
Oil and Gas
Machines:
Articulated Trucks
Asphalt Pavers
Backhoe Loaders
Cold Planers
Compactors
Dozers
Drills
Excavators
Feller Bunchers
Forest Machines
Forwarders
Harvesters
Hydraulic Mining Shovels
Knuckleboom Loaders
Material Handlers
Motor Graders
Off-Highway Trucks
Pipelayers
Road Reclaimers
Site Prep Tractors
Skid Steer and Compact Track Loaders
Skidders
Telehandlers
Track Loaders
Underground – Hard Rock
Underground – Longwall
Underground – Room and Pillar
Utility Vehicles
Wheel Dozers
Wheel Excavators
Wheel Loaders
Wheel Tractor-Scrapers
Original Factory Caterpillar ET3 Adapter III Compare With OEM Caterpillar ET Diagnostic Adpater III
1. Original Factory CAT ET can use once pluged, no need install the
USB drive, the software can automatic realize it for ET3 Adapter, and
the machine can automatic weld the high quality Circuit board, quality
will be more reliable.
2. The OEM Caterpillar ET Diagnostic Adapter III need use USB Drive to
install, and need choose the COM Port, and in the software ET also need
choose ET2 then can be used.
The Details as follows:
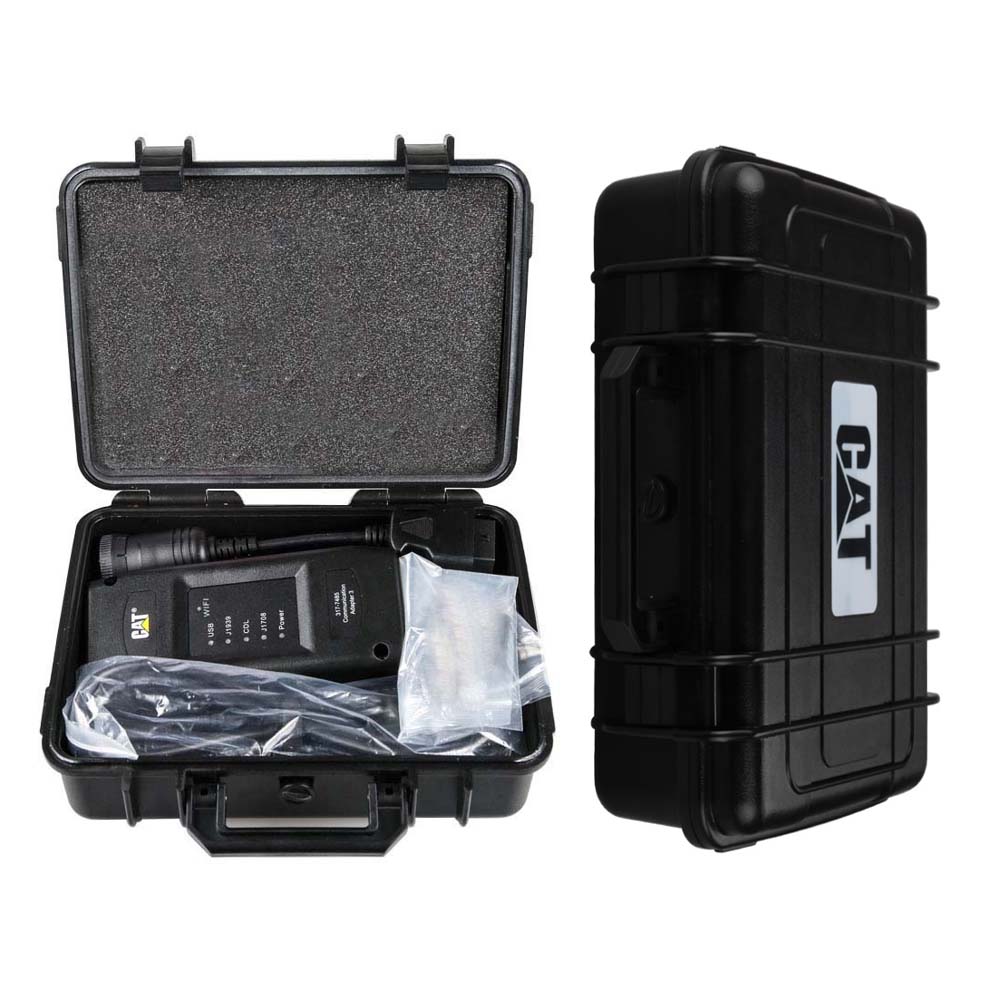
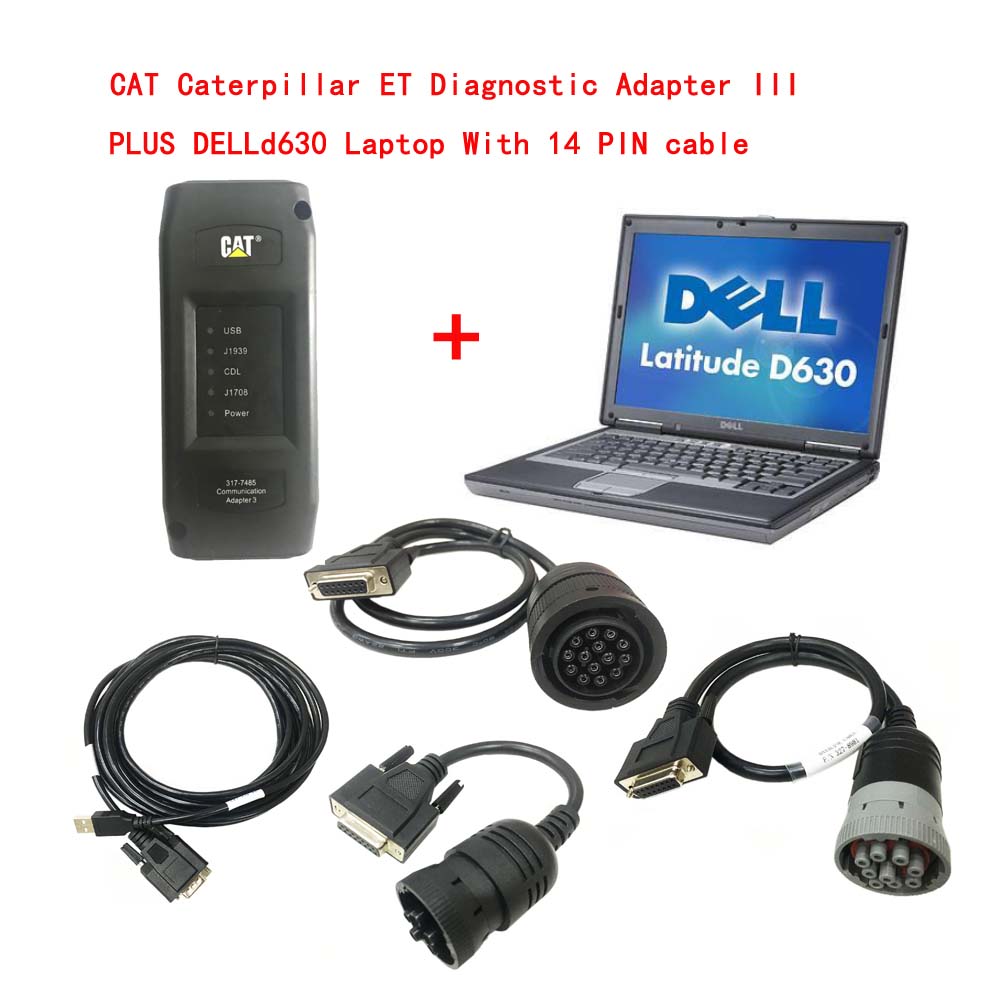
Package :
1.Used Dell D630 laptop
2.Real CAT et3 Comm Adapter III(it’s best quality cat et 3,not adapter 2,please check Communication port)
3.USB Cable (From device to your computer)
4.J1939/J1708 9PIN Cable (from device to your truck)
5.6PIN Cable (for old truck)
6.14PIN Cable(for new truck)
7.Plastic box
For more please click https://www.cnautotool.com/category-39-b0-Heavy+Duty+Diagnostic.html
Posted by: youobd2 at
11:25 AM
| No Comments
| Add Comment
Post contains 902 words, total size 9 kb.
December 23, 2021
2021 Newest Tsla PRO scanner Professaional Diagnostic and Programming Tool for TESLA S, X, 3
TslaPRO is the first independent device on the market supporting diagnostics in TESLA model S, X and 3 so far.
You must be aware that the use of someTslaPRO functions in some countries may be prohibited and against the law.
First of all, what you need to know about theTslaPRO before work.
TslaPRO:
*The tool is intended only for qualified personnel!
*You must be aware of the risk of loss if something went wrong (learn keys or make adaptations of BMS controller or something
else)
*You must have electronic skills which allow you to make adapters yourself and the connection betweenTslaPRO and the vehicles
CAN interface.
*TslaPRO uses the CAN network to communicate with the ECU.
Therefore, you will not have access to firmware, navigation update,
configuration because it cannot be done via CAN. All mentioned
things do by LAN on IC,CID not via CAN network.
Tsla PRO is a young software with small box interface but is constantly being developed.
Can help you solve a few problems with the TESLA car.
As so far,TslaPRO can work with ECU TESLA Model S with some function for TESLA Model X and3
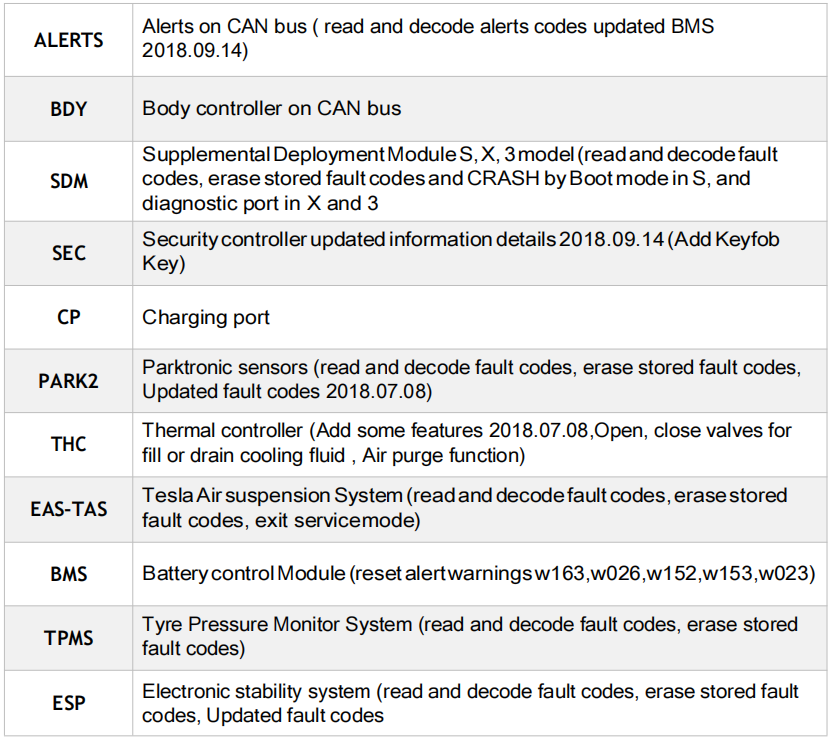
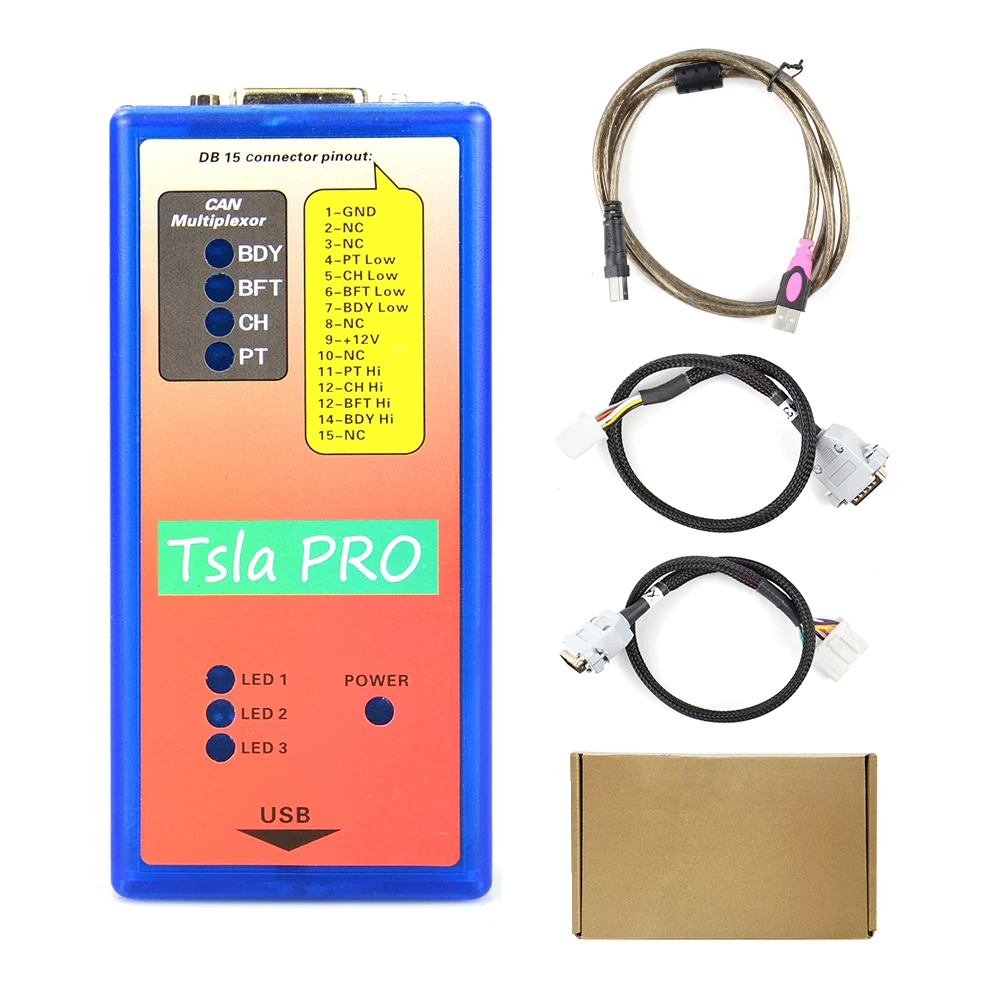
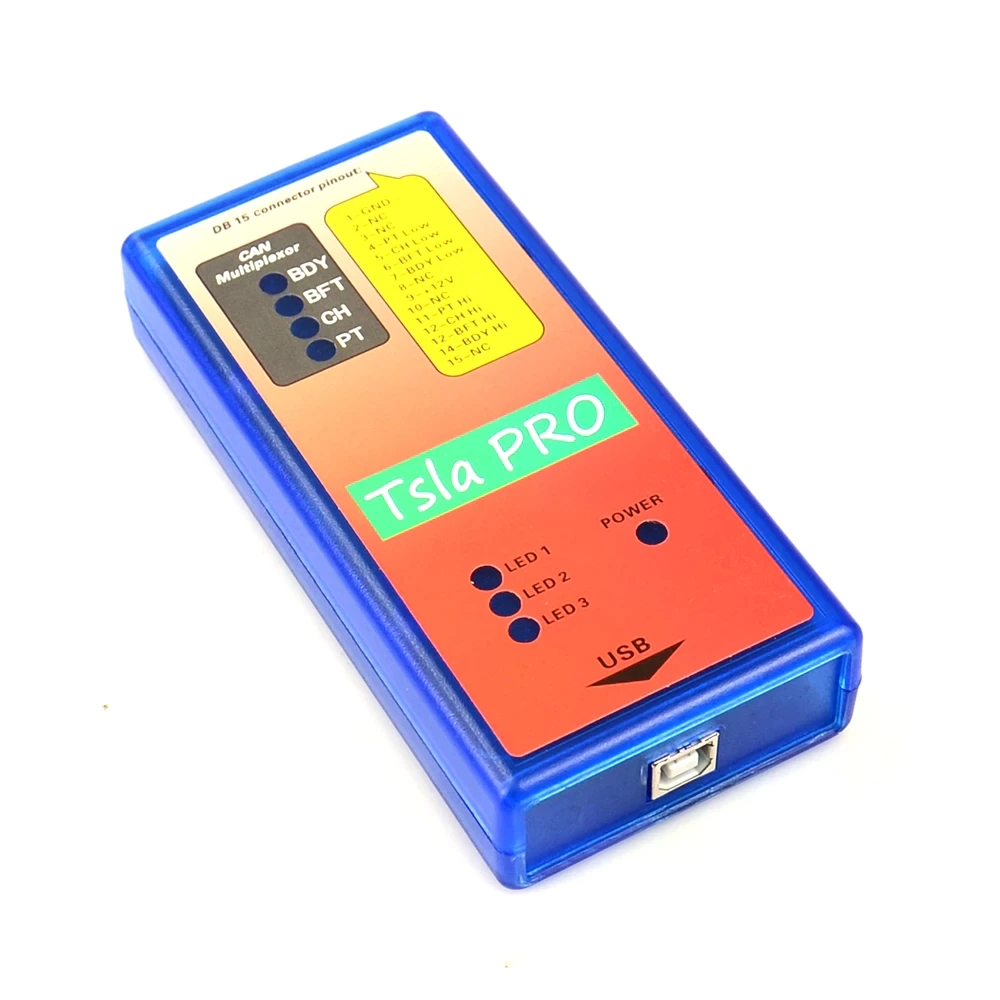
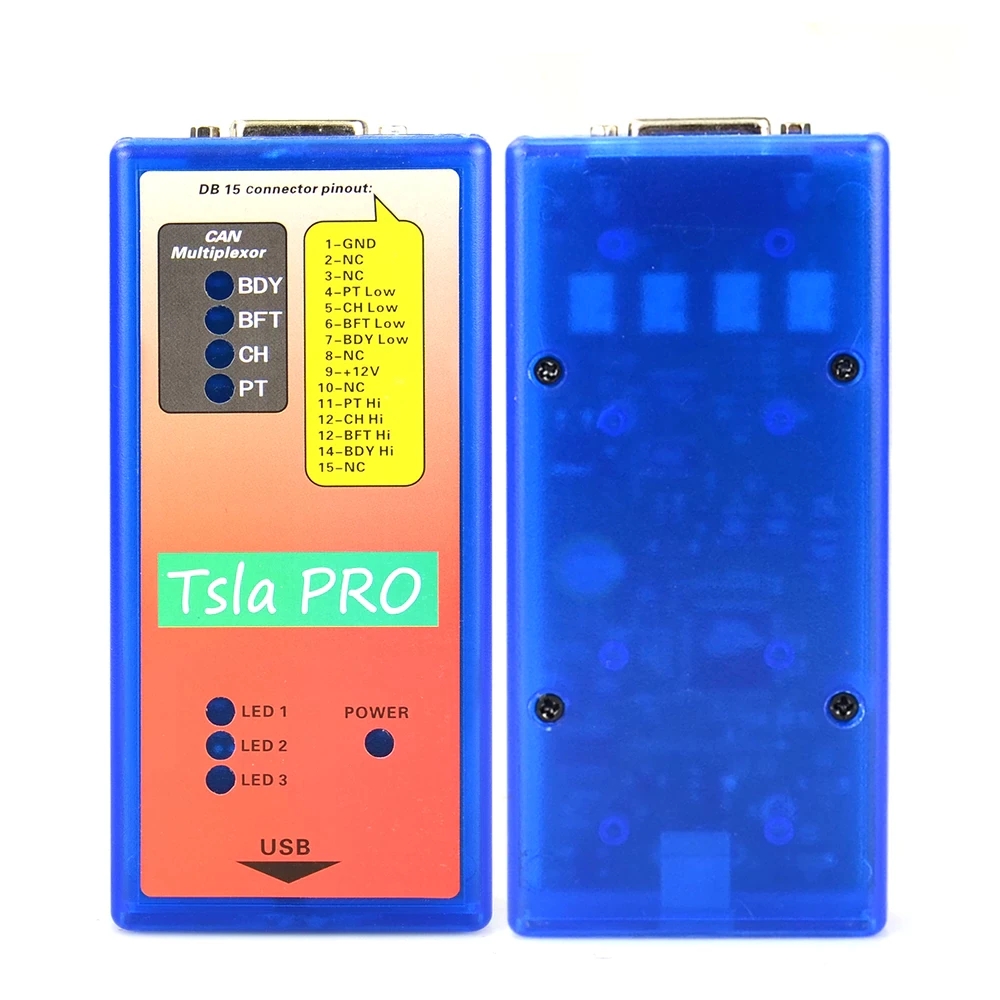
Tsla PRO Diagnostic interfaces Tsla PRO has no diagnostic connector x437A so far, but is able to working with this link, just adapter DB15x437A you must do it
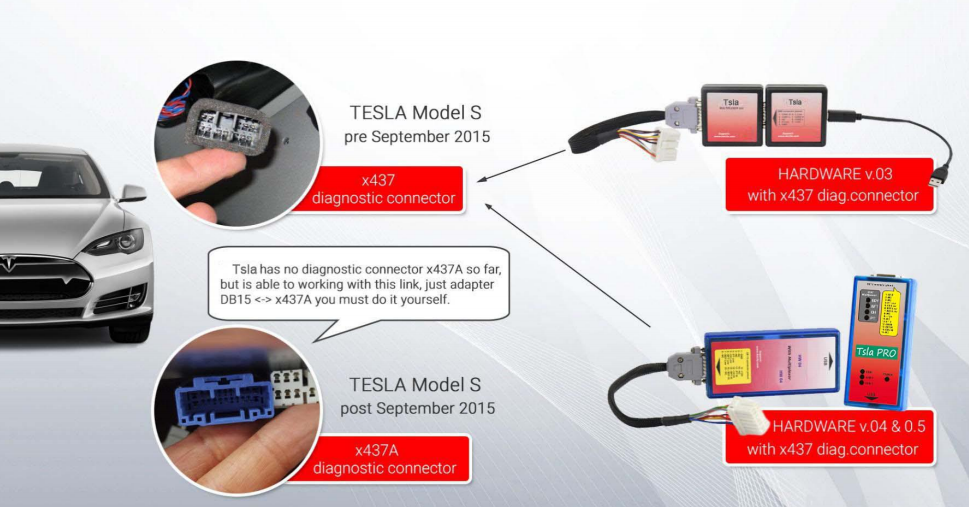
For information about Tsla PRO, please check this link:https://www.cnautotool.com/goods-7101-Tsla-PRO-Scanner-Diagnostic-Programming-Tool-TESLA-S-X-3.html
website: sale@cnautotool.com
Posted by: youobd2 at
12:51 PM
| No Comments
| Add Comment
Post contains 254 words, total size 4 kb.
December 18, 2021
Caterpillar electronic technician 2021B with WinFlash future is an updated version of the caterpillar dealer diagnostic software that can help technicians to diagnose existing and potential problems with their electronically controlled Caterpillar Engines and Machines.
Installation and activation are possible only with remote assistance using Teamviewer. We provide ONLY offline activation methods. We can also Offer Lenovo x220 loptop or Dell630 loptop which we will install the software on before shipping, so you can get it work directly after you receive it.
Microsoft ended extended support for Windows 7 as of January 2020. The Cat ET service tool no longer supports Windows 7 as of the 2020B release. The installation is still possible, but we’re not able to guarantee the stable work of 2020B or later versions.
In case if you still running windows 7, we can offer you the 2020A version as last compatible with windows 7, for this purpose, please indicate the 2020A release in the comments field.
The list of supported CAT machines and engines can be found below(if your vehicle is missing, please contact us we will double check):
Engines:
Electric Power
Electric Power Generation
Industrial
Marine Power Systems
Oil and Gas
Machines:
Articulated Trucks
Asphalt Pavers
Backhoe Loaders
Cold Planers
Compactors
Dozers
Drills
Excavators
Feller Bunchers
Forest Machines
Forwarders
Harvesters
Hydraulic Mining Shovels
Knuckleboom Loaders
Material Handlers
Motor Graders
Off-Highway Trucks
Pipelayers
Road Reclaimers
Site Prep Tractors
Skid Steer and Compact Track Loaders
Skidders
Telehandlers
Track Loaders
Underground – Hard Rock
Underground – Longwall
Underground – Room and Pillar
Utility Vehicles
Wheel Dozers
Wheel Excavators
Wheel Loaders
Wheel Tractor-Scrapers
The Built-in Factory Password Generator
The experimental feature allows you to decode (18-Bit passwords not supported) factory passwords
Cat works with the Caterpillar Communication Adapters family.
The recommended adapter is a Caterpillar Communication Adapter III Kit PN 538-5051 (Replaces 466-625
.
This diagnostic app allows you to: Change vehicle’s parameters Lock / Unlock parameters Diagnose and reconfigure Reading of error codes ECM Flash
Recently, we have received a lot of questions about the most convenient way to obtain this product.
As soon as payment is done you will be redirected to the download page.
The Electronic Technician application can be easily downloaded.
The small file size(~ 500Mb) allows you to get and set up the app within up to 20 minutes even with a slow internet connection or mobile internet.
The activation takes about 5 minutes and you’re ready to go.
Error When Launching Service Tool
There is a Microsoft issue with upgrading libraries during an installation involving certain versions of the C++ redistributable. After a successful service tool installation, when trying to run the service tool for the first time, one of the following errors may occasionally appear: "The entry point could not be located in api-ms-win-crt-runtime†or "The program can’t start because mfc140u.dll is missing from your computer.†If either of these messages is displayed, follow the procedure below. This procedure requires administrator rights.
1. Open the Start Menu
2. Click the Control Panel
3. Click the "Programs and Features†icon. If there is only a "Programs†icon, click the "Uninstall a Program†link next to the icon.
4. Find the program entry for either "Microsoft Visual C++ 2015 Redistributable (x86) – 14.0.24215″ or "Microsoft Visual C++ 2015 Redistributable (x86) – 14.0.242151″
5. If the specified program entry is not found, proceed directly to step 8
6. If the specified program entry is found:
a) Right-click the specified program entry
b) Click the Change menu item
c) Click the Repair button in the dialog that appears
d) Verify that the service tool runs properly
7. If the service tool still displays an error after the Repair operation:
a) Right-click the specified program entry
b) Click the Uninstall menu item
8. Click the link below to download an x86 version of the runtime package from Microsoft.
https://download.microsoft.com/download/6/A/A/6AA4EDFF-645B-48C5-81CC-ED5963AEAD48/vc_redist.x86.exe
9. Install the downloaded package
10. Verify that the service tool runs properly
11. If the service tool still displays an error, please send an email to the support department.
What’s New – 2021B
End of Support for Windows 8
Microsoft is ending extended support for Windows 8 as of January 2023. The service tool will be ending support for Windows 8 after the 2021C release.
Calibration Images
Images attached to calibration instructions will no longer need to be opened manually to be viewed by a technician. The service tool will now have split user interface windows for calibrations that display pictures. This will allow the technician to see the images without having to navigate away from the instructions. Images may be opened into individual windows and resized for better clarity. The user interface for calibrations that do not display pictures will remain unchanged.
Default PC Browser
The service tool will no longer automatically launch web pages in Microsoft Internet Explorer. Web pages will now launch in whatever application is configured as the default internet browser. Certain web pages require a specific browser and may launch in a different browser.
What’s New – 2021A
No significant new features or feature enhancements
What’s New – 2020C
No significant new features or feature enhancements
What’s New – 2020B
Trainer Update – 299D3
The 299D3 Skid Steer Loader has been added to the Trainer application.
What’s New – 2020A
Product Status Report Updates
The Product Status Report has been updated to include throttle configuration information.
Built-in Factory Password Generator
The experimental feature allows you to decode (18-Bit passwords not supported) factory passwords
What’s New – 2019C
Indication of Selected Communications Adapter
The service tool now displays the selected communications adapter when the service tool is disconnected. The adapter name is displayed in the status area at the bottom right of the service tool window.
End of Support for Windows 7
Microsoft is ending extended support for Windows 7 as of January 2020. The service tool will be ending support for Windows 7 as of the 2020A release.
What’s New – 2019B
Automatic Product Status Report (PSR) Upload
The service tool includes a new tool that automatically uploads Product Status Reports. The tool scans for newly generated Product Status Reports and uploads them when an internet connection is available. The default is that automatic report uploading is enabled. The Preferences dialog has an option to disable the tool.
What’s New – 2019A
ECM Naming Changes
Certain ECMs connect to the service tool over two data links at the same time. The service tool shows a message popup when the ECM is only detected on one link. The service tool has been changed to add the text **INCOMPLETE** in the ECM name when the connection is incomplete. Service tool features that display a connection icon also use a new icon for an incomplete connection.
What’s New – 2018C
No significant new features or feature enhancements
What’s New – 2018B
CEOS Fleet Configuration File TOP
A CEOS (Customer Electronic Option Selection) Fleet Configuration File can be created/modified for an engine using the Service Tool. This is available in connected and disconnected mode.
Error When Launching Service Tool
There is a Microsoft issue with upgrading libraries during an installation involving certain versions of the C++ redistributable. After a successful service tool installation, when trying to run the service tool for the first time, one of the following errors may occasionally appear: "The entry point could not be located in api-ms-win-crt-runtime†or "The program can’t start because mfc140u.dll is missing from your computer.†If either of these messages is displayed, please let us know and we will send you to step by step troubleshooting guide. This procedure requires administrator rights.
Service Tool License Corruption Issues with Windows 10 Updates
Windows 10 updates 1709 and 1803 will corrupt service tool licenses. Future Window 10 updates may do the same
If either of the license error messages is displayed, please let us know and we will send you to step by step troubleshooting guide.
What’s New – 2018A
Trainer Update – 988K XE Wheel Loader
The 988K XE Wheel Loader has been added to the Trainer application.
What’s New – 2017C
Preferences Option to Save a Product Status Report to PDF
The Preferences dialog for the Product Status Report has changed. The dialog contains a new checkbox to automatically save a Product Status Report as a PDF file when the report is created. The service tool will continue to automatically save Product Status Reports as an XML file.
What’s New – 2017B
Product Status Report Updates
The Product Status Report has been updated to include certain history features supported by the ECM, such as the after-treatment Regeneration History and the Service Test History.
Winflash Screen Update
The screen for the Winflash feature has been updated. A new Expand All button opens all sections of the screen to show all details for ECMs detected by WinFlash. A new Collapse All button hides all sections of the screen, except for header rows showing detected ECM names.
PC, Communication Hardware, and Cable Requirements
To run the service tool, the next PC, communication hardware, and cable requirements must be met. NOTE: The minimum PC Configurations should not be used as a standard when buying new personal computers for service tool purposes. If the existing equipment meets these minimum requirements, it will run the service tool.
PC Requirements
Recommended Configurations
PC containing a 2.0 GHz dual-core processor
3GB RAM
3GB of the available hard disk drive
DVD-ROM drive (optionally)
15.4-inch XGA Screen (1280×1024 compatible)
Microsoft Windowsâ„¢ 7 Professional or Windows 8 Professional, Windows 10 Professional (Not tested with Home Edition) (Note: Windows 8 RT is not supported)
RS232 port with 16550AF UART or compatible (for use with Comm Adapter II)
USB 1.1 or 2.0 port (for use with Comm Adapter 3)
Ethernet RJ45 connector
Built-in pointing device or mouse
For security purposes, Microsoft Internet Explorer version 11 or newer or Microsoft Edge is recommended.
Note: The most recent version of Microsoft Internet Explorer may not be validated to work with the service tool.
Wi-Fi (for the Wireless Comm Adapter 3)
Minimum Configurations
PC containing a Pentium 2 GHz processor or greater
1GB RAM
500MB of an available hard disk drive
CD-ROM drive
Super VGA monitor or display (1024×76
Microsoft Windowsâ„¢ 7 Professional or Windows 8 Professional, Windows 10 Professional (Not tested with Home Edition) (Note: Windows 8 RT is not supported)
RS232 port with 16550AF UART or compatible (for use with Comm Adapter II)
USB 1.1 or 2.0 port (for use with Comm Adapter 3)
Ethernet RJ45 connector
Built-in pointing device or mouse
For security purposes, Microsoft Internet Explorer version 9 or newer is recommended. Note: The most recent version of Microsoft Internet Explorer may not be validated to work with the service tool.
Configuring Cat Electronic Technician to use the Communication Adapter 3
For Cat Electronic Technician to work with the Communication Adapter 3, the settings must be changed to select the Communication Adapter 3 as the Communication Interface Device:
Step 1 Start Cat Electronic Technician.
Step 2 Click the Stop Connect button when it appears.
Step 3 Select the utility menu.
Step 4 Choose "Preferences > Modify…â€.
Step 5 Select the Communications tab.
Step 6 Select Cat Comm Adapter 3 (RP1210) and click OK.
NOTE: Because a growing number of products require multiple data link services, the "Enable Dual Datalink Service†checkbox has been pre-selected.
Servicing ECMs on more than one data link requires this checkbox to be enabled.
Failure to do this will result in undetected ECMs and reduced functionality.
Posted by: youobd2 at
05:51 AM
| No Comments
| Add Comment
Post contains 1922 words, total size 14 kb.
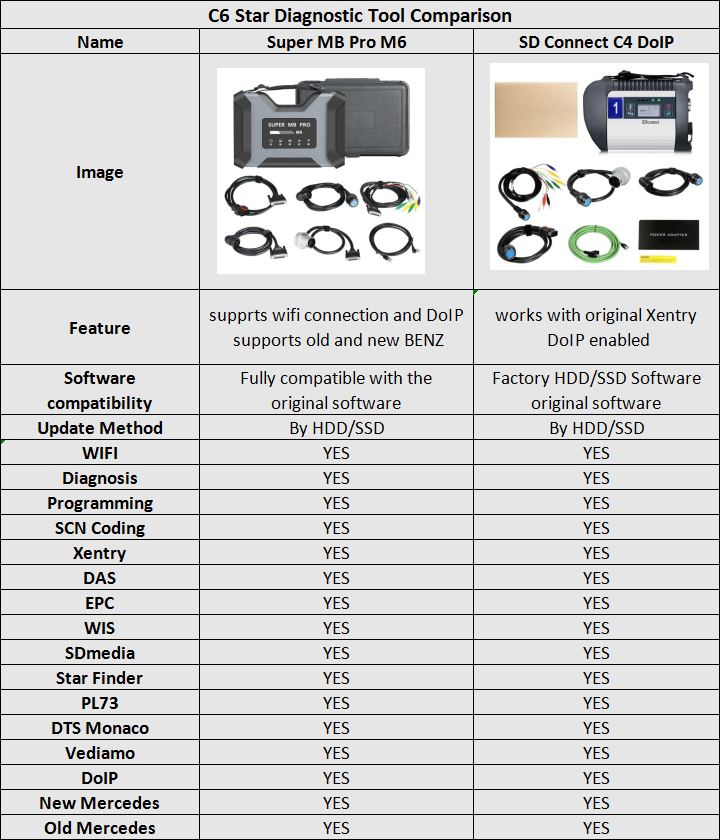
Super MB Pro M6 is a new mb star diagnostic tool that adopts the framework concept of the original C6 diagnostic tool, can completely replace the original SD-Connect-C4, is fully compatible with the original software and the diagnosis and programming for Mercedes Benz vehicles supported until 2021
MB SD Connect C4 Plus Star Diagnosis Support DOIP for Cars and Trucks with Free DTS Monaco & Vediamo, reading out & erasing trouble code, reading the real-time data of sensor and actuator, coding and programming.
Super MB Pro M6 vs.SD Connect C4 DoiP
Why Choose Super MB Pro M6 ?
1. SUPER MB PRO M6, with the strong penetration of wireless test and WIFI signal, relieves the dependency on communication transmission cable during test, and greatly reduces restriction on testing distance.
2. ABS+PVT plastic structure adoption has the advantages as follows:
1) Impact-proof & easy to carry
2) Lower consumption on product shell against wireless signal
3) Great advancement of wireless communication distance & stability
3. SUPER MB PRO M6 adopts double-radiation mode (radiation fan & radiation fin). Radiation fan will automatically turn on high-power radiation mode when SUPER MB PRO M6 internal temperature over 35℃, greatly improving the stability and safety when programming.
4. Built -in network interface prevents deformation and damage from impact.
5. SUPER MB PRO M6 is the only diagnostic tool on the market that is highly consistent with the original MB Star C6:
1) Fully compatible with the original software.
2) You can directly upgrade the newest firmware without installing additional driver.
6. Can perform as the same functions as that of the original:
Compatible with the Mercedes Benz models with protocol DOIP, K-line, CAN Low, Can High, LIN, RS485, etc, works with the old cars and new cars.
7. Support diverse Mercedes-Benz models, covering 12v car, 24v diesel truck & bus, MPV etc.
8. Support firmware update without installing the battery, but directly plug the device to the OBD port of the car to supply power, you do not need to worry about that the firmware will be damaged in the process of update.
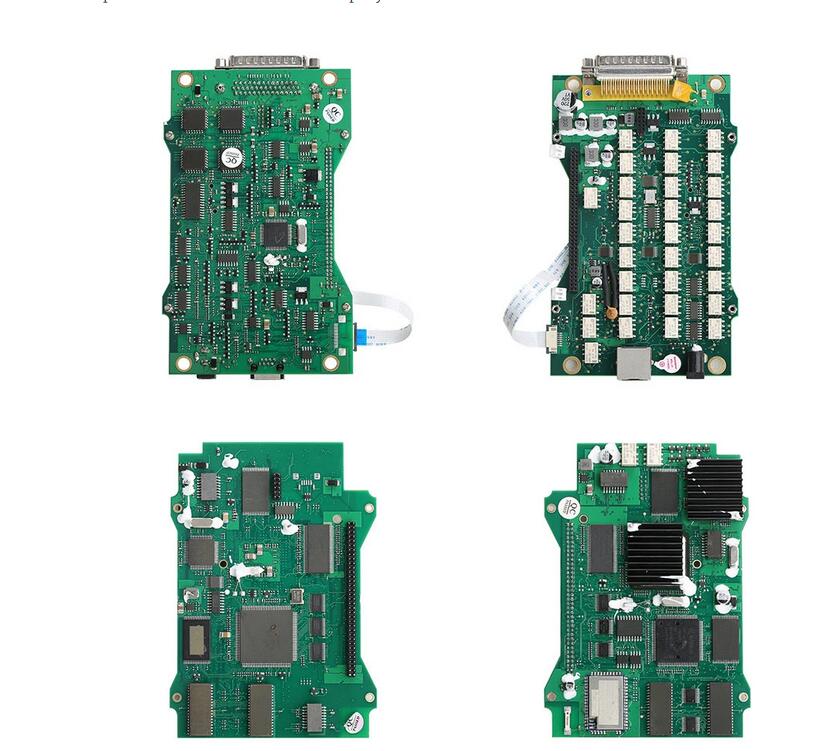
Super MB Pro M6 PCB Board Display
Posted by: youobd2 at
05:44 AM
| No Comments
| Add Comment
Post contains 364 words, total size 4 kb.
30 queries taking 0.0569 seconds, 162 records returned.
Powered by Minx 1.1.6c-pink.

