



February 22, 2021
Porsche piwis 3 latest software version 39.9 release! Full set with Lenovo T450 Laptop ready to use, comes with USB dongle, supports update online. Piwis 3 full set with 39.9 software supports Porsche old and new vehicles till 2020, supports engineering mode and online programming.With new DoIP Ethernet diagnostic technology, supports Wifi and Lan Cable connection.
With Porsche Piwis 3 What Can We Do?
Read/clear error code
Catch data stream
Computer programming match
Component test
Maintenance information consult
Components site drawing
Wiring diagram
Porsche Piwis 3 with USB Dongle Version Online Update Instruction.
1.provide picture of the back of the laptop and hardware for approval before update.
2.After approval, plus USB dongle and start the laptop, below page will come out:
Input domain name, user and password to login.
Domain name:(www.autosos.club)
Factory will provide user name and password when updating.
3.After login, download the latest software (need around 3~5 hours), when download done, pls contact us and send team viewer to activate the software.
4.Done.
Posted by: youobd2 at
07:29 AM
| Comments (1)
| Add Comment
Post contains 172 words, total size 1 kb.
February 20, 2021
Question:
I’m in the USA and have an Canadian Yukon. WillVXdiag vcx nano gmwork for a Canadian Yukon as well? 08 Denali?
Solution:
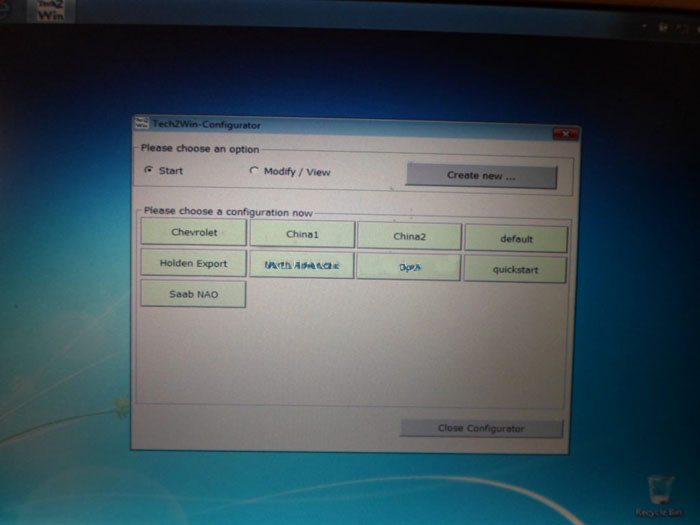
Yes, at the start up of Tech2win, your going to get the first pop up screen, and since it a GM car from the states, select North America,
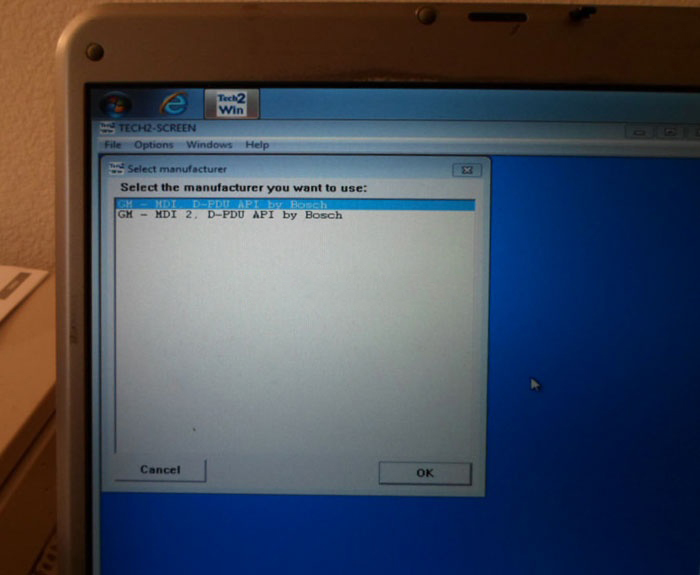
Next screen will beMDI1,
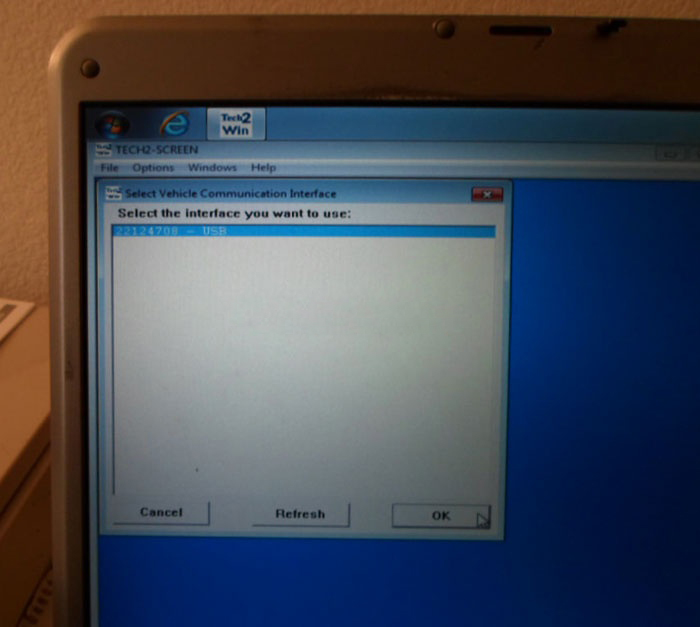
then USB device (the Nano).
As for how deep you are going in tech2win, it will ask you if the car is a export in some screens such at in fob programming, and your going to take the export path then.
So quick walk through in tech2win for it in diagnostic.
2008
LD truck
GMC truck
C type body
Yukon
Also to point out, depending on what was changed to make it an export, there is the option of just going into BCM programming to change the car back to non export model instead. Hence export Fob programming has a 10 min wait timer before you can program a Fob in, will with the BCM set to USA, no wait time instead. Hell, if you don’t want the day time running lights to come on, easy enough to change the BCM to mexico use to bring up the DRL RPO code to shut it off.
Posted by: youobd2 at
11:11 AM
| Comments (1)
| Add Comment
Post contains 220 words, total size 2 kb.
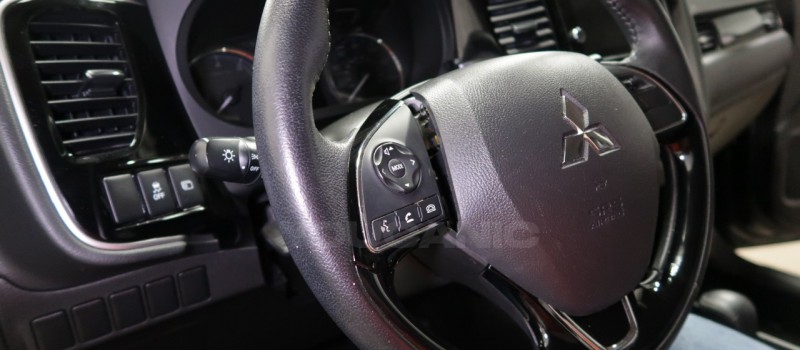
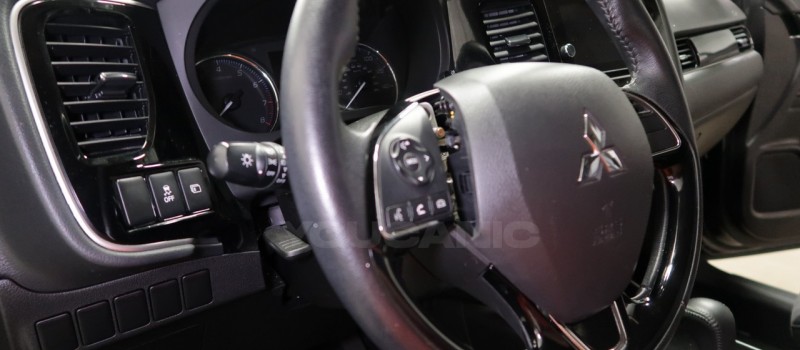
In this guide, we will show you how to remove and replace the combination switch on a 2019 Mitsubishi Outlander. It is common for the combination switches to fail on a vehicle. It can happen due to wear and hard use.
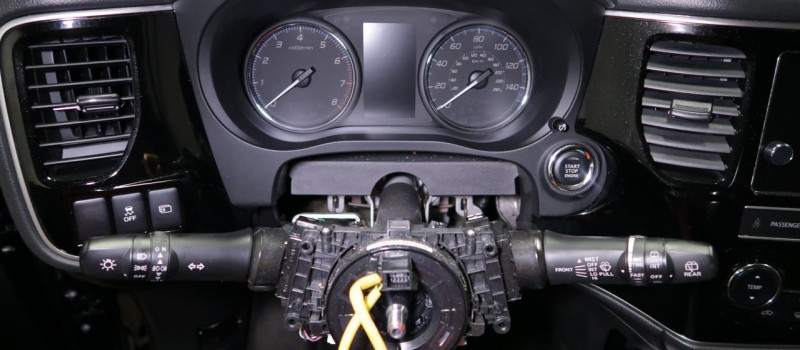
The combination switch is the electronic switch assembly that controls several vehicle functions. It is used to control the turn signals, the high and low beam headlights, and wipers. It is usually mounted on the steering column, where it is easily accessible to the driver.
This repair is quite in-depth and does require some technical automotive knowledge. However, with a bit of persistence and if you follow this guide, you will be able to tackle this repair yourself.
Symptoms
Common symptoms of a failing combination switch:
Turn signals not operating properly
Wipers not operating properly
Headlights not operating properly
Switch getting stuck or not staying in place when using turn signals
What you will need
Tools
Flathead screwdriver
Phillips head screwdriver
T30 Torx (on certain older models)
17mm socket and ratchet
Professional OBDII scan tool
Pliers
Torque Wrench
Parts
Mitsubishi Combination Switch
Procedure
First, start by disconnecting the battery.
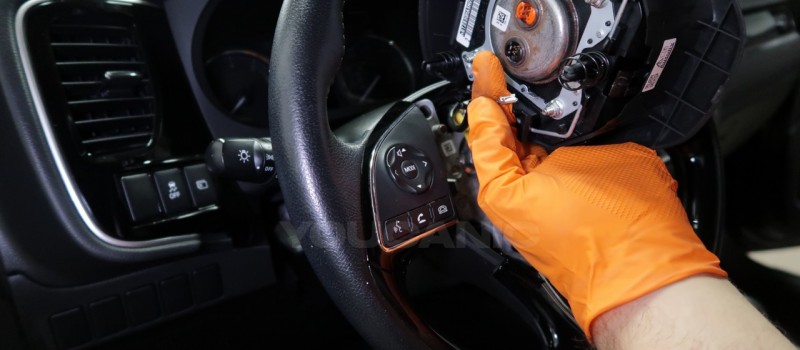
Wait at least 15 minutes before you start working on the airbag system. Always keep you body away from the airbag. If not handled with care an airbag may deploy and cause injuries.
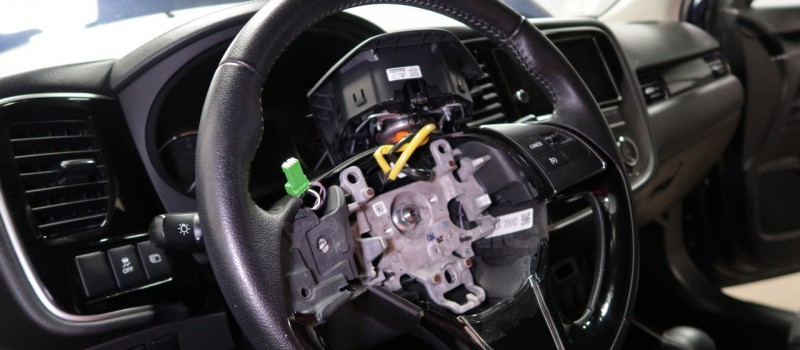
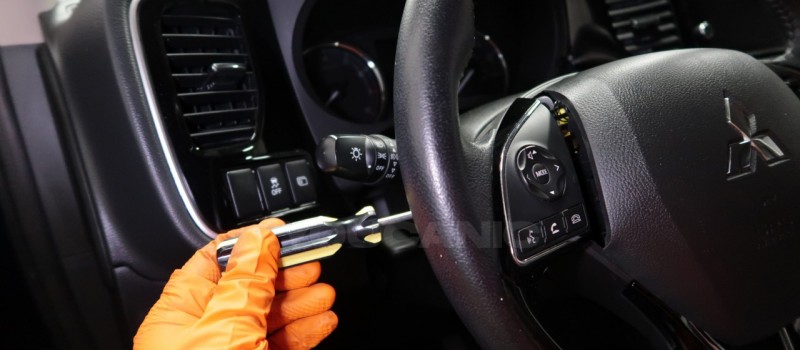
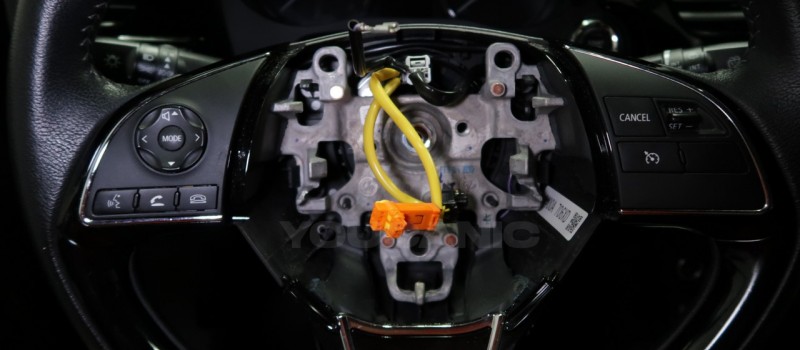
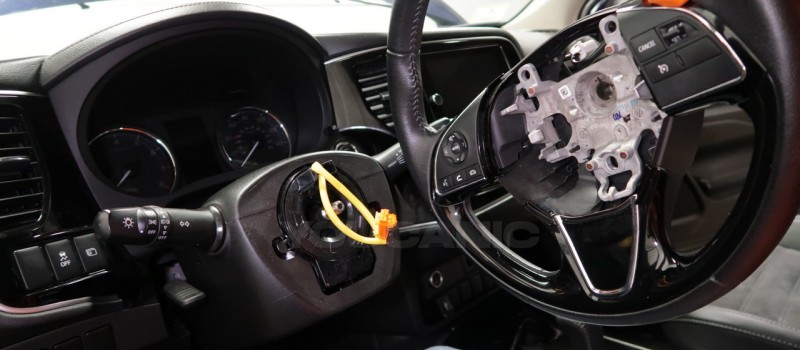
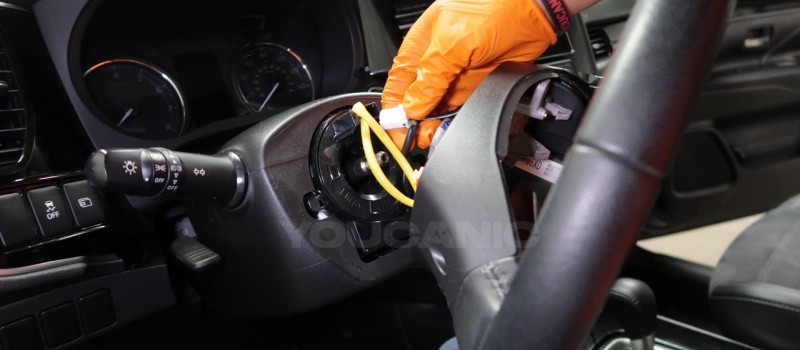
You will need to remove the airbag, steering wheel, and clockspring assembly. A guide for doing this can be found here.
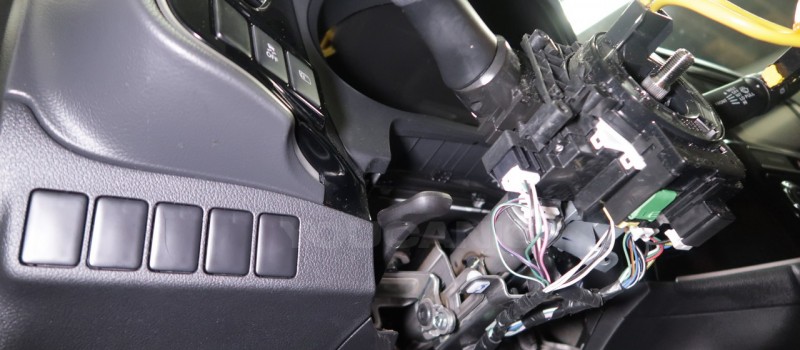
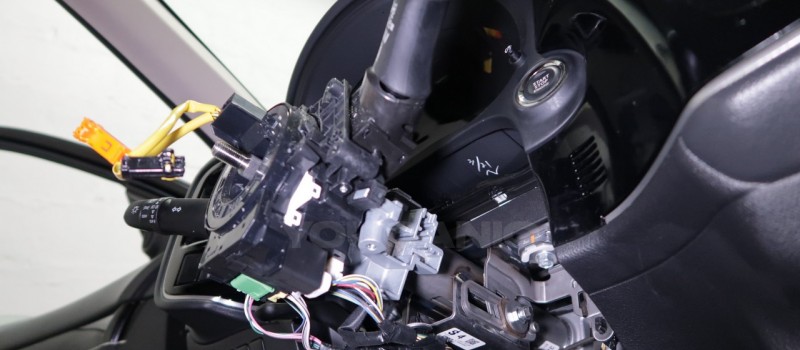
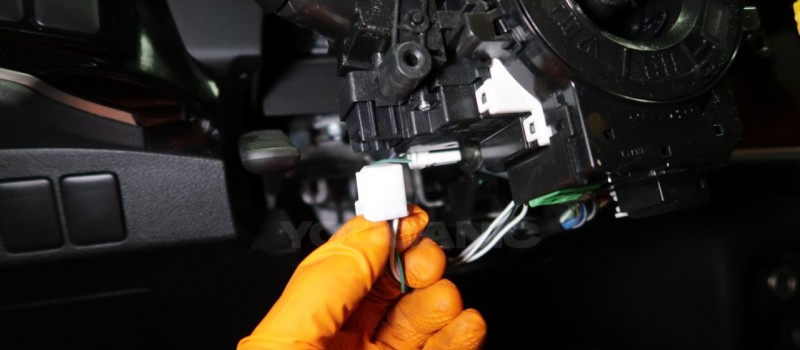
Next, remove the three electrical connectors from the combination switch by pressing down on the tabs on the end of them and pull out.
Now, remove the combination switch. On top of the combination switch assembly, the spring clamp that holds it in place can be accessed. Use a pair of pliers to squeeze the metal clamp and pull the assembly towards you to remove it from the steering column.
Replace the assembly with a new one. Reverse the procedure to put everything back together. Make sure the clockspring is in its correct position, and follow all safety procedures.
Finally, connect the battery and start the vehicle. Check for any malfunction indicator lights on the dash. If the airbag light is on, clear the airbag control module with aprofessional OBDII scan tool.
Test to make sure all the switches are now working, you are done!
Specifications
Torque
Steering wheel nut 30-35 ft-lbs
Vehicle Applications
All Mitsubishi models including Galant, Lancer Evo, Outlander, Eclipse, Mirage, and more. All year models including current-gen: 2012, 2013, 2014, 2015, 2016, 2017, 2018, 2019, 2020, and 2021.






Posted by: youobd2 at
11:05 AM
| Comments (1)
| Add Comment
Post contains 438 words, total size 11 kb.
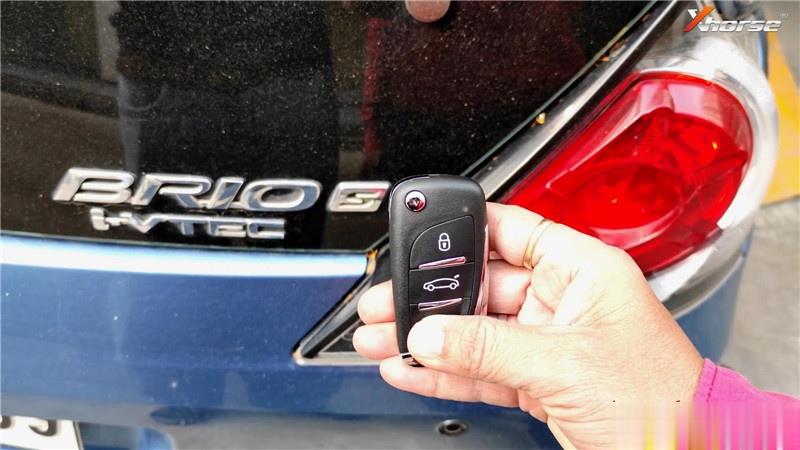
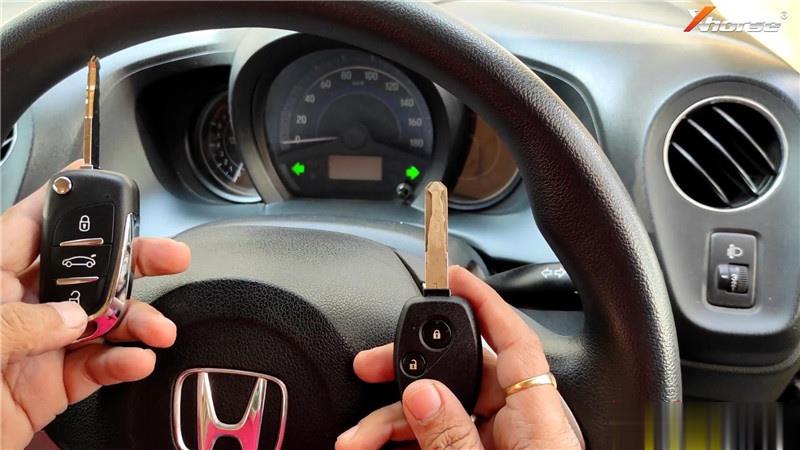
Today I’m going to do key programming & remote generation for Honda Brio ID46, using with new arrival Xhorse VVDI Key Tool Plus Pad. This is the new Xhorse universal smart key to be programmed.
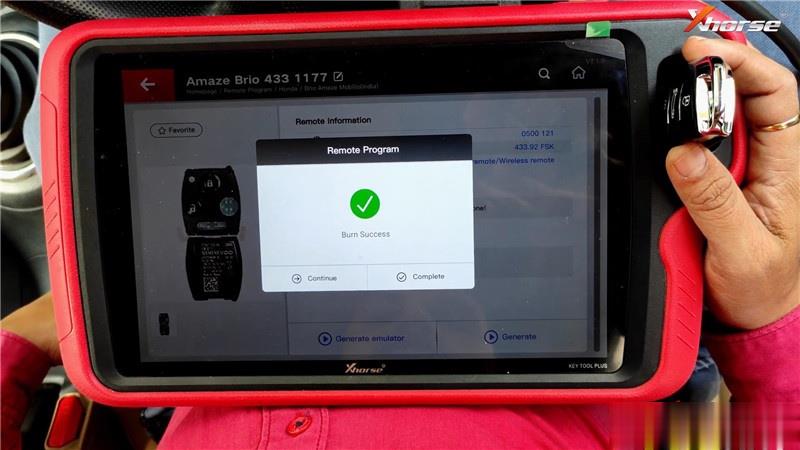
Generate Remote
Put the new smart key into VVDI Key Tool Plus Pad slot
Remote program >> Honda >> Brio Amaze Mobilio(India) >> Amaze Brio 433 1177 >> Generate
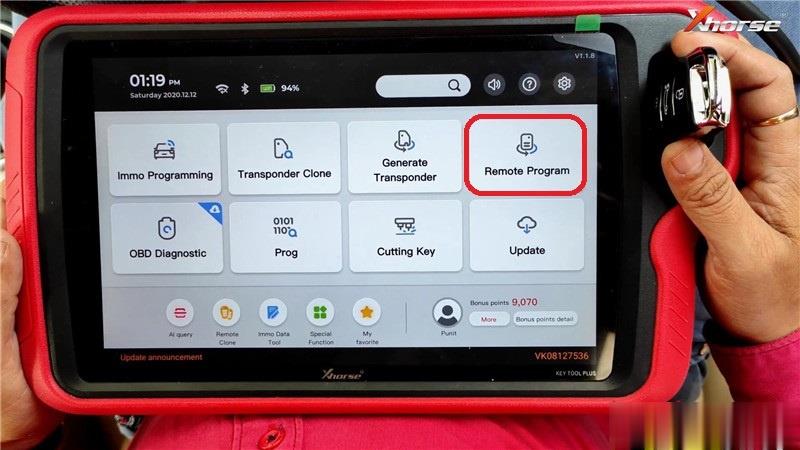
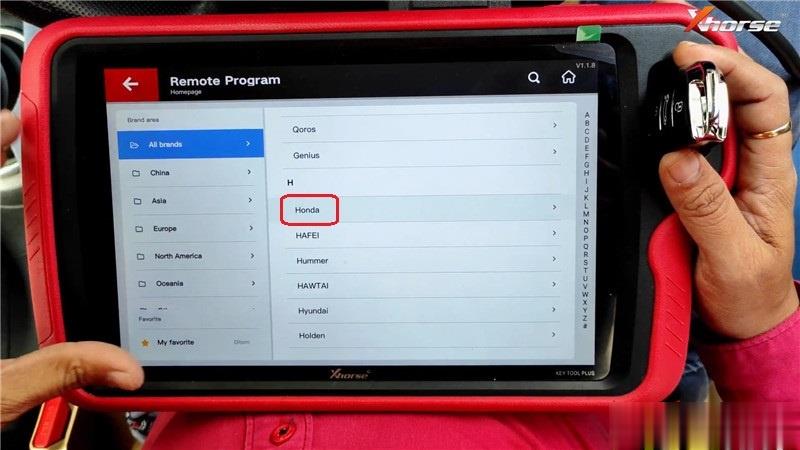
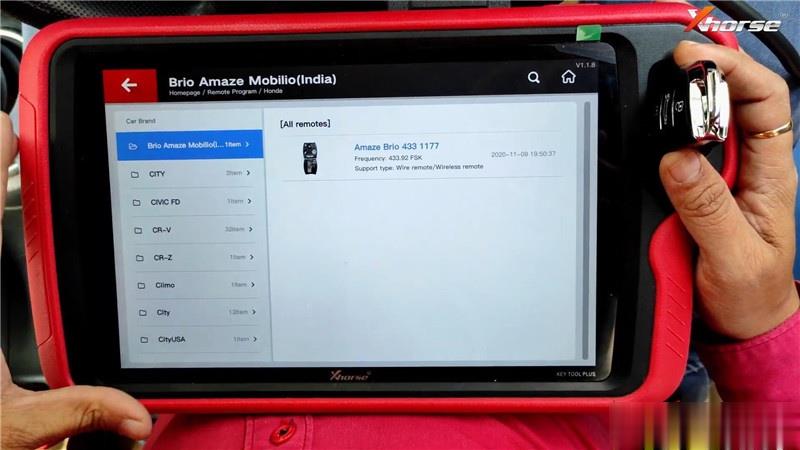
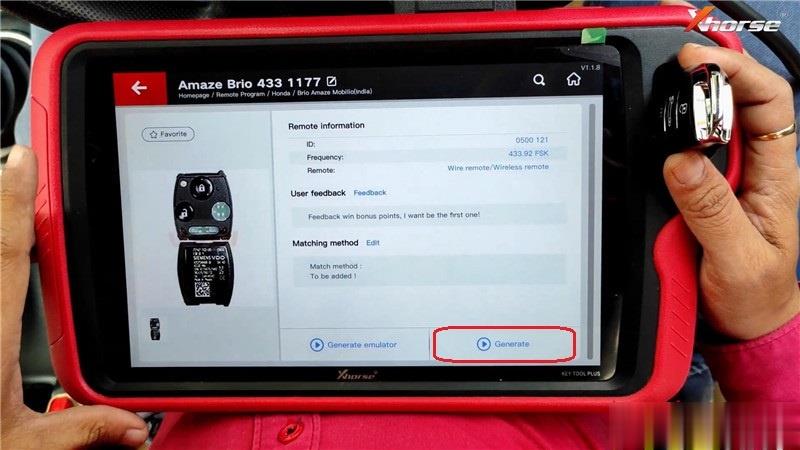
Writing data, please wait…
Burn success, press "Complete†to finish.
Program Key
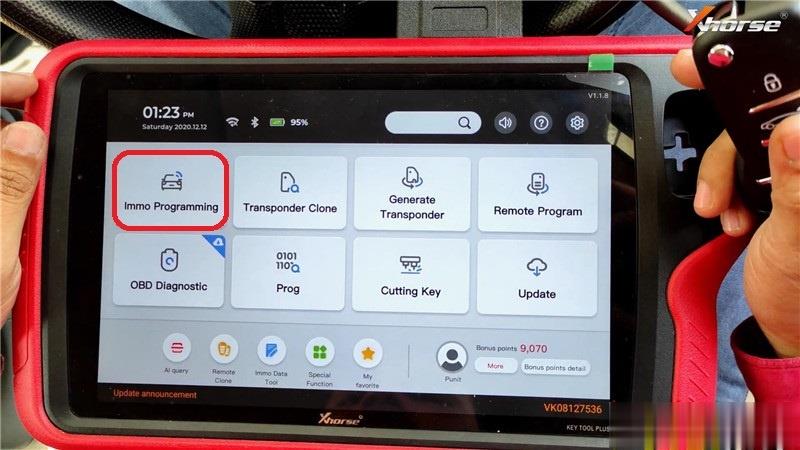
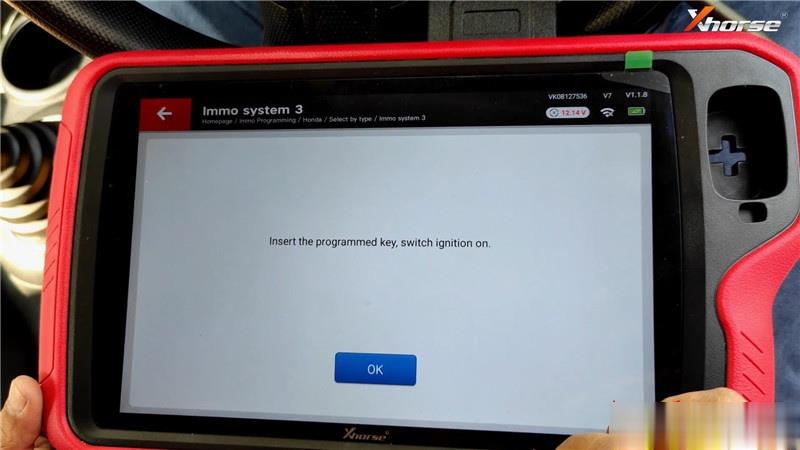
Connect Xhorse Key Tool Plus Pad with OBD, using the working key to turn ignition on.
Immo programming >> Honda >> Select by type >> Immo system 3 >> Begin >> Add a key


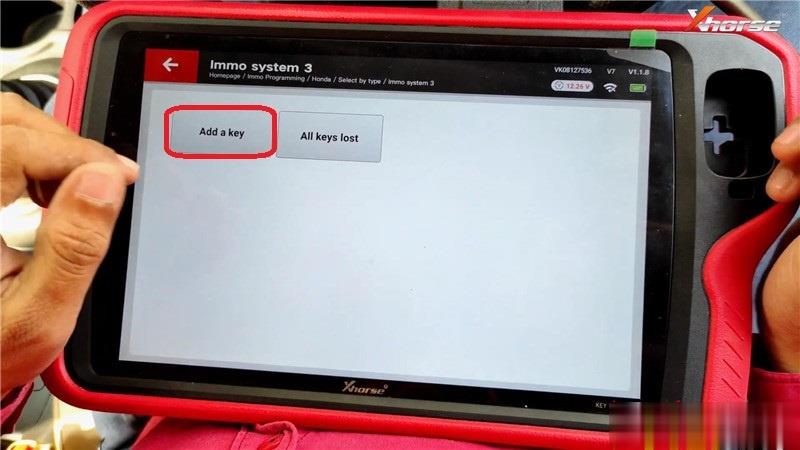
Follow the prompts to operate:
Turn off ignition switch, press "OKâ€.
Switch ignition on. Press "OKâ€.
Turn off ignition switch…
Turn on the ignition switch.
If no response within 10 seconds, please turn off/on the ignition switch again.
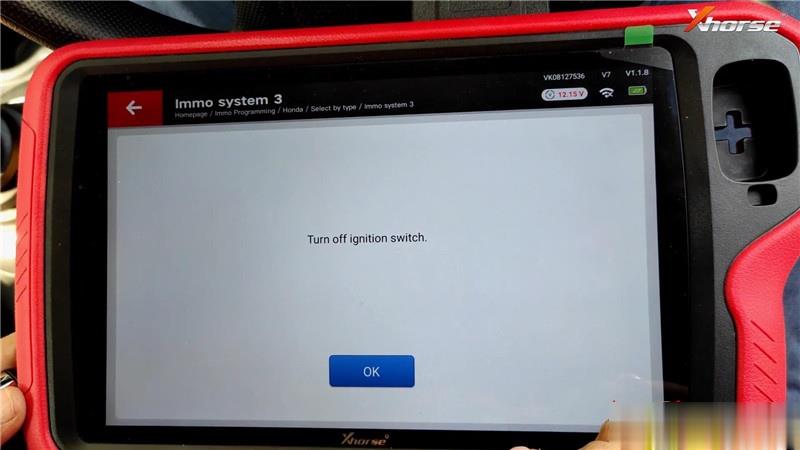
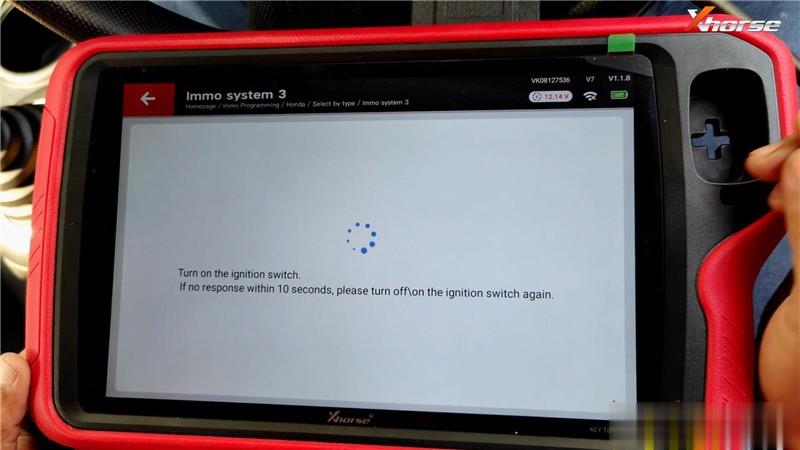
Turn off ignition switch.
Insert the new key and switch ignition on within 15 seconds.
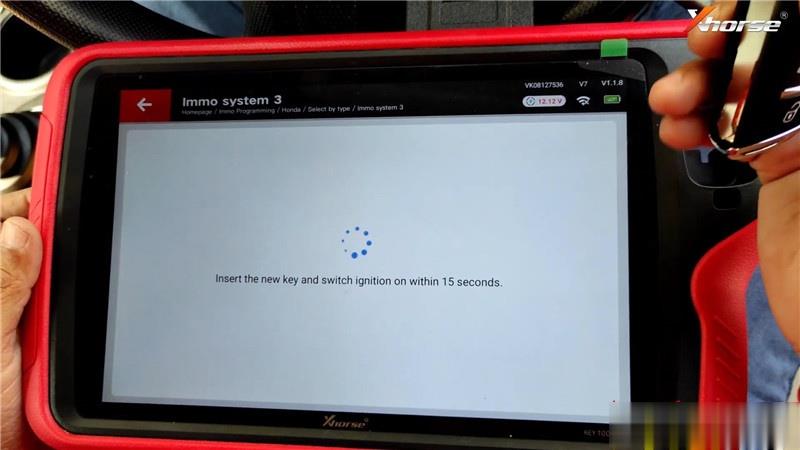
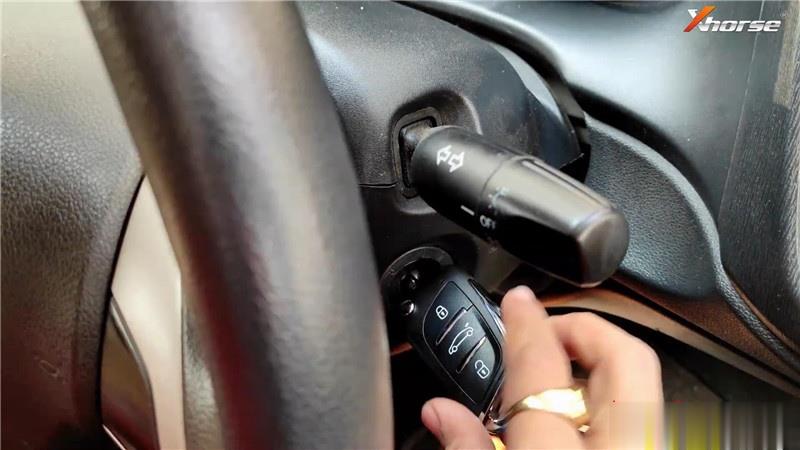
Continue to operate as prompted:
Turn off ignition switch…
Switch ignition on.
Turn off ignition switch.
Switch ignition on.
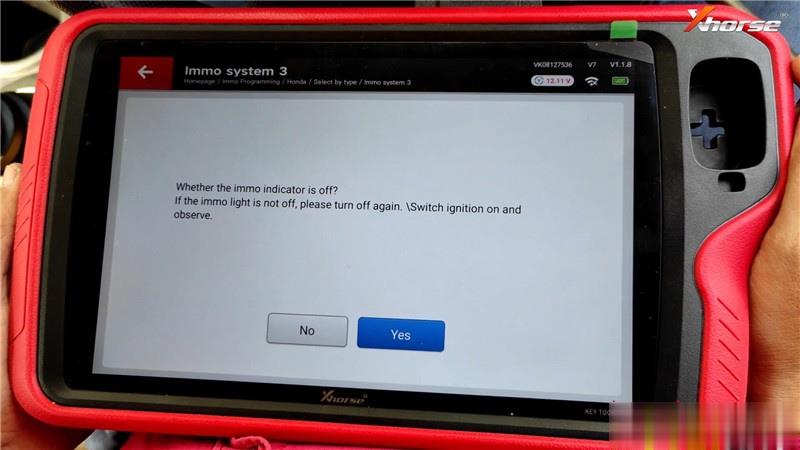
Whether the immo indicator is off?
If the immo light is not off, please turn off again. Switch ignition on and observe.
The indicator is off, so press "Yesâ€.
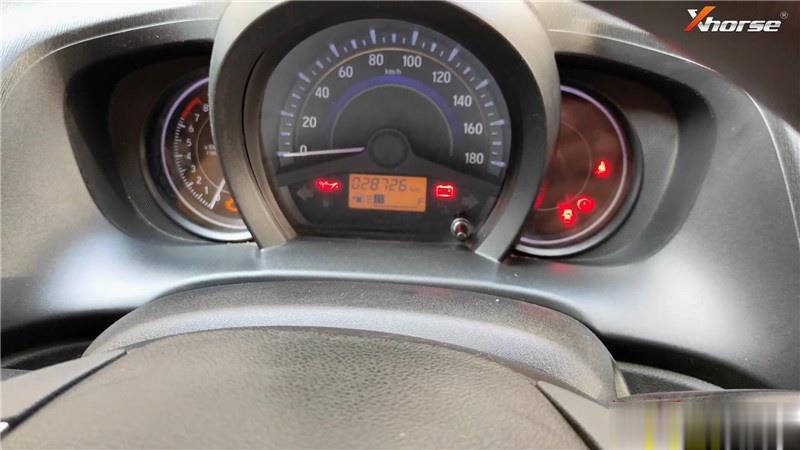
Turn off ignition switch.
Switch ignition on.
Operation completed, please check if the key function is normal. Press "OKâ€.

Let me try the new key, it can start the ignition normally. But the remote does not work.
Switch the ignition on, press LOCK button on new key, then switch off again. Repeat for several times. The new key remote can work now.
Done!
Posted by: youobd2 at
10:35 AM
| Comments (1)
| Add Comment
Post contains 288 words, total size 10 kb.
Recently, many customers stated that they failed to activate the Renault Can Clip software. As shown below, an error message "Code incorrect, verifiez votre saisie (please check the input)†is displayed. For this problem,www.obd2tool.com technicians provide related solutions.
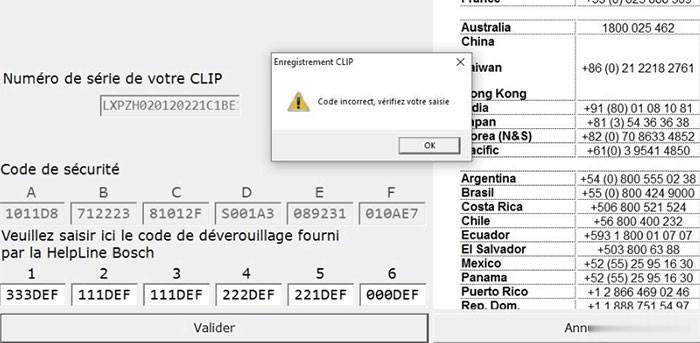
The reason is that the effective date of the registration code of the Renault Can Clip software is 12/31/2020 12:00:00 AM. But it is 2021 and the registration date has expired.
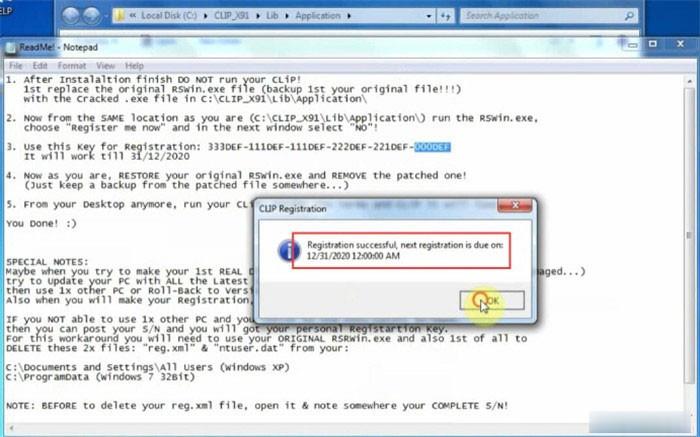
The solution to this problem is to change the computer date. Because so far, there is no new cracking software for Renault Can Clip.
Step 1: Change the computer date to any day before December 31, 2020 (for example, 20/12/2020)
Step 2: Then install the latest software Renault Can Clip V200
Download Renault’s Can Clip 200 for free:
https://share.weiyun.com/EODWlrxi
Password: xw7e66
Size: 2.71 GB
Safety: No risk!
Note: Please contact us to get a weiyun account to download as soon as possible.
Operating system: Windows XP, 7, 10 32bit
Languages: English, German, Danish, Spanish, Finnish, French, Italian, Norwegian, Dutch, Portuguese, Romanian, Swedish
Compatible equipment: It can be used for all Chinese clone Renault Can Clip diagnostic tools (No. SP19-A, No. SP19-C and No. SP19-D)
Renault Can Clip 200 new features:
-Diagnostic help button in the "New†dialog
-New RNFI software package released
-This Clip version does not integrate new vehicles
Guidelines for activating CAN Clip 200:
After installation, please do not run your Clip!
Step 1: Replace the original RSWin.exe file (backup the first original file!!) with the corrupted .exe file in C:\ CLIP_X91\Lib\Application\.
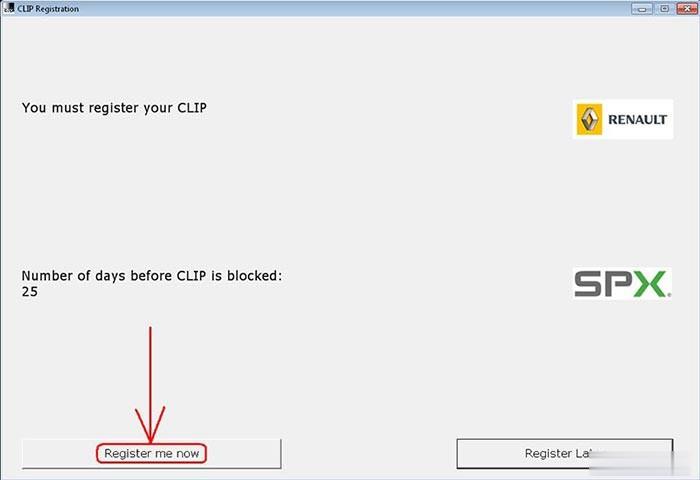
Step 2: Run RSWin.exe from the same location as your location (C:\ CLIP_X91\Lib\Application\)
Click "Register me nowâ€
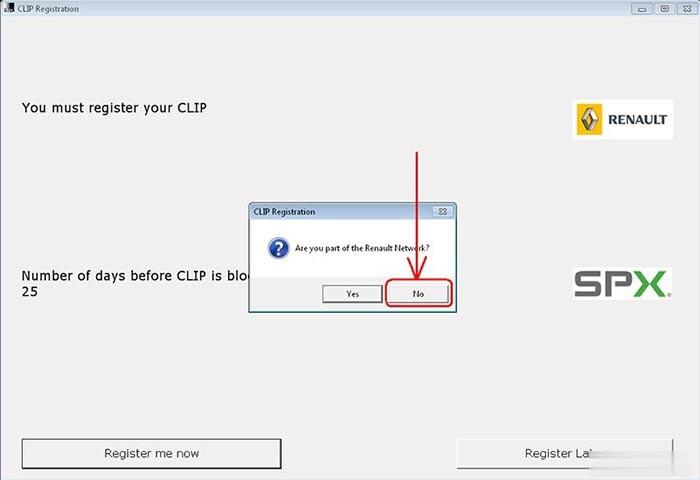
When prompted "Are you part of the Renault Network?â€, please select "Noâ€!
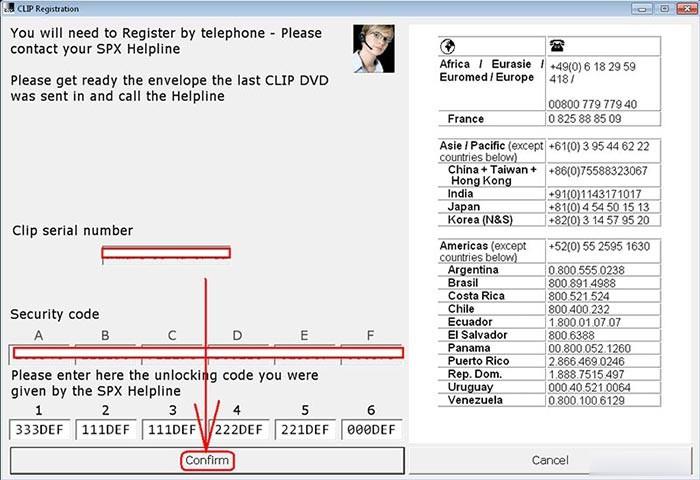
Step 3: Use this key to register: 333DEF-111DEF-111DEF-222DEF-221DEF-000DEF. It is valid until December 31, 2020.
Step 4: Once the registration is successful, please restore the original RSWin.exe and delete the patched RSWin.exe! (Just save a backup of the patched file somewhere…)
Step 5: Run the Renault Can Clip software, accept the terms and load the Clip.
Posted by: youobd2 at
10:24 AM
| Comments (1)
| Add Comment
Post contains 349 words, total size 5 kb.
February 17, 2021
Porsche PIWIS Tester III is the third-generation Porsche diagnostic tool:
1.more user-friendly and efficient for auto diagnostics and online programming.
2.Work on both Old and New Porsche.
3.With New DoIP Ethernet diagnostic technology,Supports Porsche Models after 2002.
Newest Software Version:
V39.900 + V39.700 Software, pre-installed on Lenovo T440 Laptop.
The Porsche PIWIS 3 (PST3) is the newest Diagnostic Tool in the market. It can read trouble code, clear trouble code, shows ECU information. It test live data, display actual values, and programs. On all; process malfunction navigation, showing all interior circuit diagram. Specially if were produced after 2005. The PIWIS III has original oscillometer and multi-meter Function. It is the absolutely necessarily tool for the job.
PIWIS III with Piwis Software Overview
1. Software Version:
Dual System: V39.900 + V39.700
2. Functions: Diagnosis and Programming
3. Update: By SSD
4. Connection: Via USB or Wifi
5. Support Vehicles: Support all Porsche till 2020
7. Multi-Languages: German, English, US English, French, Italian, Spanish, Japanese, Chinese, Russia, Portuguese, Nederlands
Top 4 Reason to get Tester III Diagnostic Tool :
1. Exclusive support for P0rsche third generation diagnostic PIWIS 3
2. New DoIP Ethernet diagnostic technology
3. Luxury car diagnosis, ultra low threshold
4. Support Porsche Models after 2002.
Piwis III Supports New & Old Cars:
All Porsche from 1998-2020:
1.Porsche 911(997) (991)
2.Boxster/Cayman (987)
3.Cayenne up to MY 2010
4.Cayenne from MY 2011
5.Panamera
Especially the latest models:
1.Paramera (971) 2018
2.Caynenne (92A) 2018
3.Macan (95B) 2018
4.911 (991) 2018
Also support All Other Old car models
Porsche PIWIS TESTER PIWIS3 Features & Functions :
1. New operating system and more intuitive software interface
2. New VCI, support for models with DoIP diagnostics after 2017
3. Maintenance, repair, control unit replacement, programming code
4. Login online anti-theft matching programming
5. Guided fault finding
6. Maintenance circuit diagram view
7. Engineer mode (development version) can support special functions such as installing, modify, Flash.
Piwis Tester 3 Lenovo (Second Hand) laptop details:
Brand: Lenovo
Model: Lenovo T440
CPU Type: Intel(R) Core (TM) i5-4300M CPU
CPU Speed: 2.60GHz
Installed memory: 4096MB
Package Listing :
1× Porsche PIWIS Tester III
1× USB Cable
1× Software SSD
1× Second Hand Laptop Lenovo T440
1× Power Adapter
Posted by: youobd2 at
09:25 AM
| No Comments
| Add Comment
Post contains 398 words, total size 3 kb.
February 11, 2021
As a car locksmith, it is necessary to make a deep understand on Volkswagen immobilization system generations. Because different immo generations need difference chip and key programmerto perform key programming. So here Obd2tool.comshow you guide on how to identify Volkswagen immobilization system generations. If you want to check VW immobilization cases, please refer to VW Key Programming.
There are five generations immobilization system for Volkswagen:
IMMO 1:
IMMO 1 would probably start off from 2004, around 2004 it requires a 4-digits PIN code, but you can get the PIN via OBD, you probably have to do this via bench. It does not require a dealer key and the transponder type is an ID48/PCF7935.
IMMO 2:
IMMO 2 is probably between years 2000 and 2005, it does require a 4-digits PIN code. And it also does not need a pre-coded key. And you use ID48 and T6 chip.
IMMO 3:
IMMO 3 is probably between 2004-2009. It requires a 5-digits PIN code, and it also require pre-coded key. However there are some scenarios where it does not require it. Only VW will know like immobilizer 3 and immobilizer 4,there are a lot of integration between them. It is really hard to just say okay between this year and this you are gone get this type of immobilizer. IMMO 3 need ID48 CAN 22-25 chip.
IMMO 4:
IMMO 4 is probably between 2005 to 2019, it requires a 5-digits PIN code and it also need a pre-coded key, and it resemble with IMMO 3 system, need ID48 CAN 22-25 and ID8E.
MQB System:
MQB system is probably from 2013 and up, it requires a 5-digits PIN code and require a pre-coded key. It equipped with MQB ID88 transponder chip.
IMMO 5:
IMMO 5 is probably from 2009 to 2019, it requires a 5-digits PIN code and pre-coded key also required. It with HITAG Keys.

Above mention the chip type used in Volkswagen immobilizer system, if you want to get more transponder chip applied in auto locksmith,
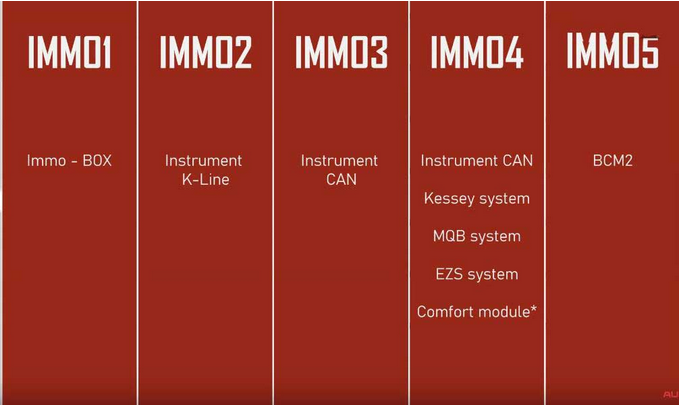
Some immobilization you can do through OBD and some you can, somebody go to take like a body control module off. So knowing this is would help you in your key coding journey.
IMMO 1:Immobilization Box
IMMO 2:Instrument K-Line
IMMO 3:Instrument CAN
IMMO 4:Instrument CAN, Kessey system, MQB system, EZS system or Comfort module
IMMO 5:BCM2
Posted by: youobd2 at
10:15 AM
| No Comments
| Add Comment
Post contains 397 words, total size 3 kb.
General Motors Factory Scan Tools
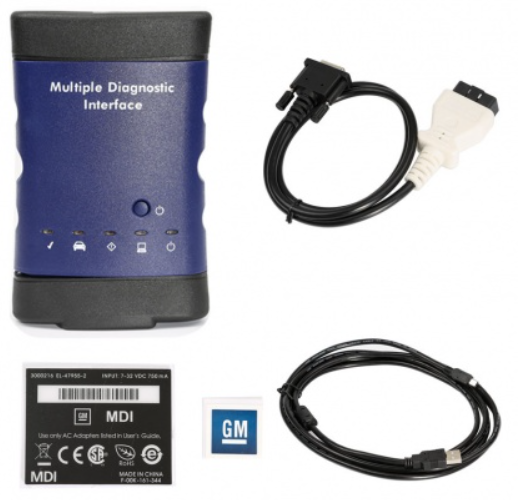
GM MDI 2 and GM MDI: This newest release GM factory scan tool begins it’s coverage in model year 2010. MDI when combined with the Global Diagnostic System 2 (GDS2) software application allows servicing of GM’s new Global Architecure Platform (Global A) vehicles. Model coverage currently includes 2010-2013 Buick LaCrosse, 2010-2013 Cadillac SRX, 2010-2013 Chevrolet Camaro, 2010-2013 Equinox, 2011-2013 Chevrolet Volt, 2011-2013 Chevrolet Cruze, 2010-2013 GMC Terrain and 2011 Buick Regal. By model year 2014 virtually all GM vehicles are serviced by using the MDI/GDS application. For all other 2010-2013 GM vehicles you will need either a GM Tech-2 or the optional ‘Tech-2 Emulator’ program to achieve OEM level functionality. The ‘Tech-2 Emulator’ uses the MDI interface device as the communications interface between pc and vehicle.
The GM MDI 2 and GM MDI when coupled up with the software application ‘GDS-2′ allows your shop to be ‘dealer level’ capable on all the above listed GM cars. Scan, pull codes, graph data and have all bi-directional controls available for all vehicle systems including Powertrain, Body, Chassis and Network. This tool will also allow you to re-program controllers as long as you have internet access on the laptop your MDI/GDS application is installed on.
GM MDI 2 Diagnostic Tool Multiple Diagnostic Interface V2020.09 GM Scanner
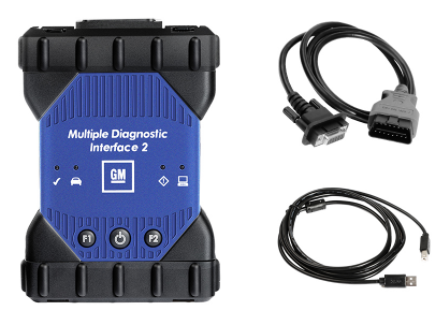
GM MDI Scan Tool Multiple Diagnostic Interface V2020.09
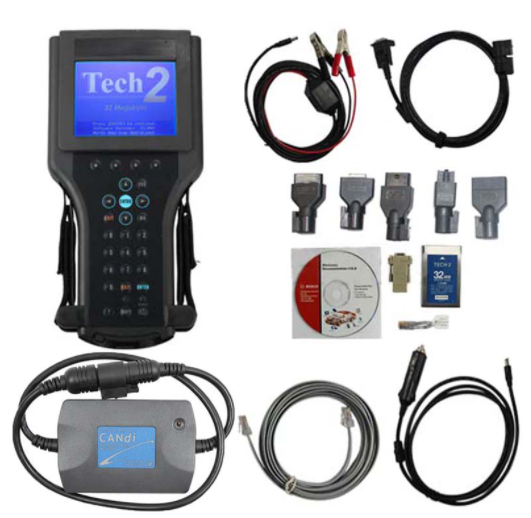
GM Tech 2: This is the GM factory scan tool used in all GM dealers since 1996. Model coverage includes all makes and models of GM vehicles including passenger cars, trucks and vans. Model year coverage is from 1992 to 2013. For GM vehicles prior to 1992 you will need a Tech1A or a MasterTech listed below to achieve OEM level functionality.
The Tech 2 will allow your shop to be to ‘dealer level’ capable on all covered GM cars. Scan, pull codes, graph data and have all bi-directional controls available for all vehicle systems including Powertrain, Body, Chassis and Network. This tool will also allow you to re-program controllers with the optional TIS-2-Web program.
GM Tech2 GM Scanner Works For GM/SAAB/OPEL/SUZUKI/ISUZU/Holden
Tech1A: This was the factory scanner for all GM dealers from 1983 to 1995. It is still available, but in limited quantities. The Tech1A can be a solution for restoration speciality shops working on older GM products such as Corvettes or for the private car collector.

Posted by: youobd2 at
10:08 AM
| No Comments
| Add Comment
Post contains 406 words, total size 4 kb.
February 08, 2021
The JPRO heavy duty scanner diagnostics software is user friendly, it displays/erases SAE (generic) and OEM Engine, ABS, Transmission & Chassis Codes. The screen controls and menus are the same no matter which factory software is loaded on your computer
Heavy duty diagnostic tool JPRO support Mack, Volvo, Cummins, Detroit Diesel, International & PACCAR. ford, GM, Isuzu & Sprinter
Is JPRO Diagnostics capable of parameter adjustments? No, JPRO Diagnostics is a diagnostic tool only.
Can JPRO heavy duty trucks Diagnostics clear Fault Codes? Yes, JPRO heavy duty trucks Diagnostics has the ability to clear both active and inactive fault codes. JPRO Diagnostics can also clear a single selected fault code.
Does JPRO Professional Diagnostic Tool work on a PC running Microsoft Windows Vista? JPRO Professional Diagnostic Tool support Windows 7 Ultimate 32bit&64bit,Windows 7 Professional 32bit&64bit
Notice:
1.Software use period one year from the activation date, after one
year can continue activate, we provide a free registration machine
2. Software version: please use 2016V1 or 2019V1 version, if use 2017
year software ,it will prompt update. it is better not to update.
because after update ,it may occur uncertain errors
3. Hardware version is USB version( without WIFI) , Driver version : USB 4.0.5983.2
4. Operation system support Windows 7 Ultimate 32bit&64bit,Windows 7 Professional 32bit&64bit
JPRO Truck Dignostic Tool Features:
1.Includes Heavy-Duty Modules: Mack, Volvo, Cummins, Detroit Diesel, International & PACCAR
2.Includes Medium-Duty Modules: Ford, GM, Isuzu & Sprinter
3.Bi-Directional Controls – Perform parameter changes (Mack &
Volvo), DPF Regens (Mack, Volvo, Cummins, Detroit Diesel, International
& PACCAR) & bi-directional tests with proprietary data &
faults
4.OE Level Fault Code Information – Display over 99% of Heavy-Duty &
Medium-Duty fault codes with detailed OEM level component and trailer
descriptions
5.Fault Management – Clears faults and diagnoses all vehicle components in a single, easy to use application
6.Vehicle Reporting – View and print log files, including: Vehicle Health, Trip Reports & LOV Reports
7.Store & Save Data – Record data log files for playback at a later time, even away from the truck
8.Total Vehicle Health Status – See the entire vehicle in one pass on
one screen + Up-to-Date – Provides 99% coverage of all heavy-duty truck
DTCs through 2016
JPRO Heavy Duty Dignostic Tool Includes:
1.Software on DVD-ROM with Keygen and Drivers
2.JPRO DLA+ 2.0 Adapter Cable
3.Heavy-Duty Vehicle Cables (6-pin, 9-pin, OBD-II Type-B cable for Mack & Volvo)
4.Medium-Duty Type-B OBDII Cables (Ford, GM, Sprinter/Hino/Isuzu, Mack & Volvo)
5.USB Cable
Posted by: youobd2 at
10:11 AM
| No Comments
| Add Comment
Post contains 418 words, total size 3 kb.
February 04, 2021
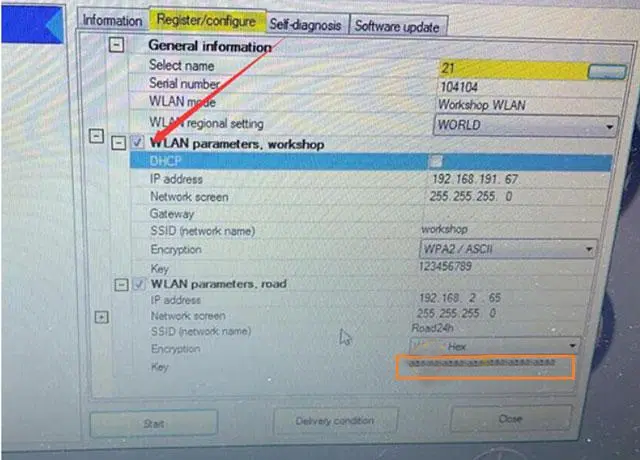
MB SD DOIP C4 SDconnect toolkit error: register/configure(212 "The key is not divisible by 2 and therefore not hexadecimal.â€
SDconnect toolkit error

Working solution byObd2tool.comengineer:
1. Do not check the option "Wlan parameters. workshopâ€.
2. Reset the key number as 26 lowercase letter: aaaaaaaaaaaaaaaaaaaaaaaaaa.
SDconnect toolkit error solution
Posted by: youobd2 at
05:22 AM
| No Comments
| Add Comment
Post contains 59 words, total size 2 kb.
What is BMW ICOM?
BMW ICOM(Integrated Communication Optical Module) is the data interface to the vehicle and is the successor to OPS (Optical Programming System) and OPPS (Optical Testing and Programming System). OPS and OPPS are not supported by ISTA/P. Three different ICOM interfaces are available, with which all BMW Group vehicles can be processed.
BMW ICOM A Module
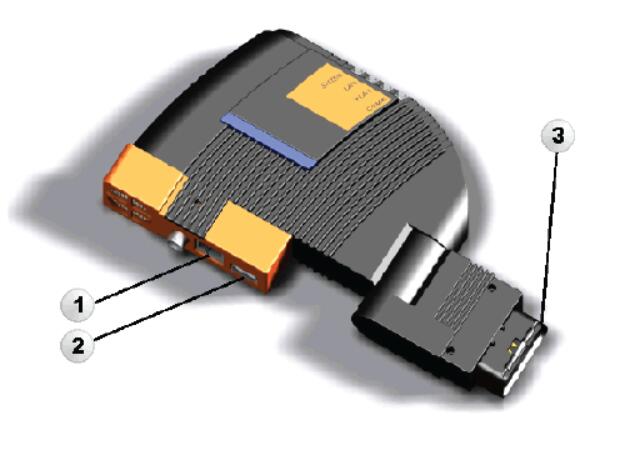
1 Network Connection
2 USB Port
3 OBD Connector
Connecting ICOM to OBD socket
Plug the OBD connector on the ICOM A into the OBD socket on the vehicle. Then connect the ICOM A to the workshop network using the network connector. The OBD connector on the ICOM A can be angled, allowing it to be adjusted for OBD sockets at different installation locations in the vehicle.
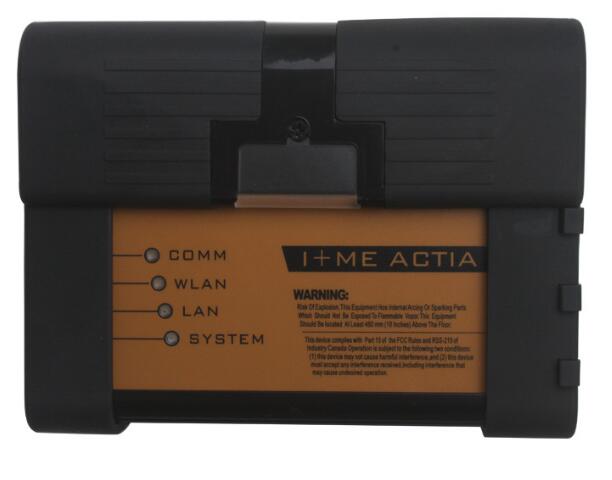
BMW ICOM A2 Module
BMW ICOM B Module

4 MOST Connector
5 USB Port
Using ICOM at MOST direct access port
Also use the ICOM B module to connect the ICOM to the vehicle MOST direct access port. For this purpose, connect the USB ports of ICOM A and of ICOM B with the USB cable. Then connect ICOM A to the workshop network via the network connector.Connect ICOM B via the MOST connector to the MOST direct access port of the vehicle and plug the OBD connector of ICOM A into the OBD socket on the vehicle.Repeat the procedure if the MOST connection or ICOM is not recognized.
BMW C Module

6 Connector for OBD port
7 Diagnosis head connector
Using ICOM at 20-pin diagnosis plug
Use the ICOM C module to connect the ICOM to the 20-pin diagnosis plug on the vehicle. For this purpose, plug the OBD connector into the OBD port on theBMW ICOM A2and connect the diagnosis head connector to the 20-pin diagnosis plug on the vehicle.
Posted by: youobd2 at
05:14 AM
| No Comments
| Add Comment
Post contains 306 words, total size 4 kb.
38 queries taking 0.1183 seconds, 150 records returned.
Powered by Minx 1.1.6c-pink.

