



June 30, 2020
The new Mercedes Benz diagnostic tool MB SD Connect C5 isverified working great. Here are customer feedback to Benz C5 SD Connect (not original Xentry Connect C5).
1."Mercedes Sprinter year 2006 and 2014 works, both the
diagnosis All the personal cars also works, no problemâ€
2."All the trucks including euro6 also works, no problem.Bus Mercedes
Tourismo euro5 year 2010-2012 test works, BUT year 2014 euro6 does NOT
work, it says that the license is invalid. Both sd c4 and sd c5, we have
tested both on the same cars, to be sure.â€
3.SD Connect C5 this one
customer has test, works good, in function it no difference with SD C4,
but performance it is better. So you can buy MB SD C5 if you want buy
new MUX. CnAutotool.com SD C5 use the same software as MB SD Connect C4.
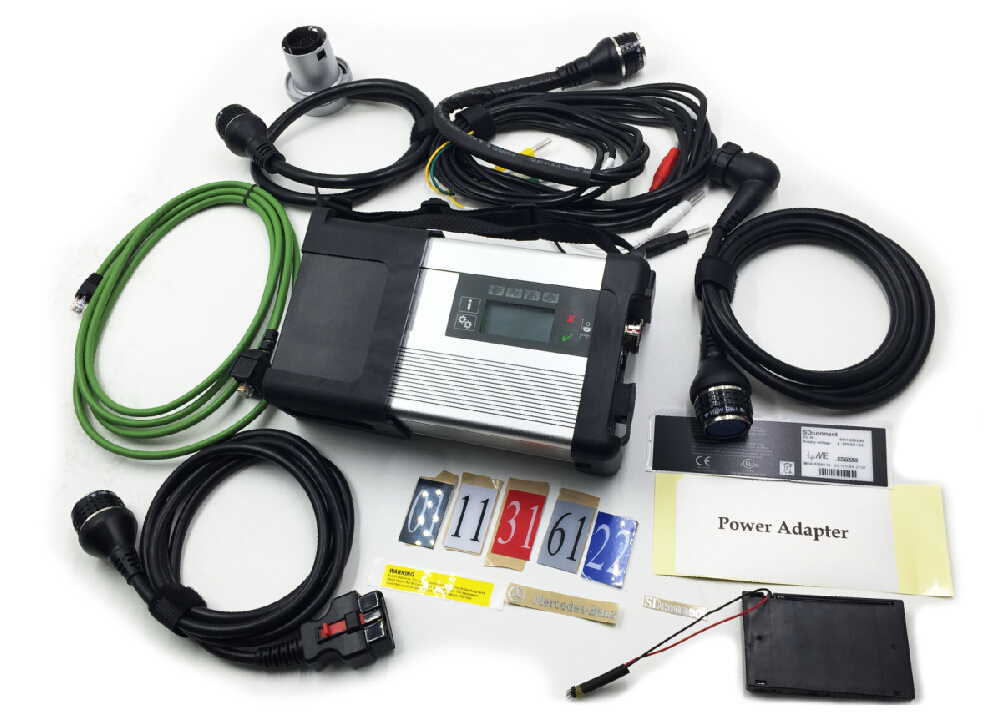
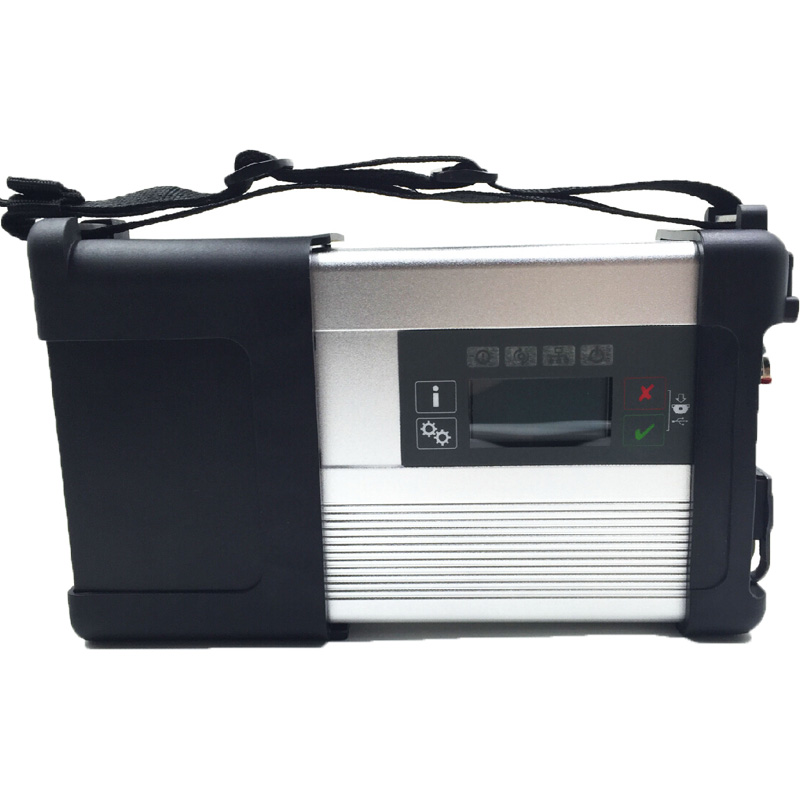
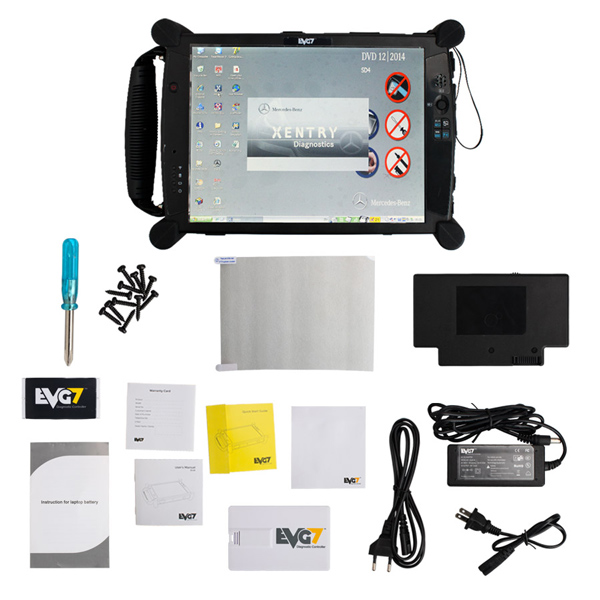
SD Connect C5 with necessary cables and EVG7 Tablet:

MB SD Connect Compact 5 Supported Vehicle List:
MB SD C4 Support Mercedes Benz Cars After Year 2000
Passenger Car Support List:
A(176),
A(169), A(16 , B(246), B(245), CLC(117), C(204) C(203),
C(202), 190(201), E(212), E(211), E(210), 124(124), S(222),
S(221), S(220), S(140), S(126), E(207), CLK(209), CLK(20
,
CLS(21
, CLS(219), CL(216), CL(215), CL(140) SLK(172), SLK(171),
SLK(170), SL(231), SL(230), SL(129), SL(107), SLS(197), M(166),
M(164), M(163), G(463), G(461), E(212), E(211), E(210),
124(124), S(222), S(221),S(220), S(140), CLK(209), CLK(20
,
CLS(21
, CLS(219), CL(216), CL(215), CL(140), SLK(172), SL(231),
SL(230), SL(129), SL(107),SLS(197), M(166), M(164), M(163),
G(460), GL(164), GLK(204), R(251)
, B(246), B(245), CLC(117), C(204) C(203),
C(202), 190(201), E(212), E(211), E(210), 124(124), S(222),
S(221), S(220), S(140), S(126), E(207), CLK(209), CLK(20
,
CLS(21
, CLS(219), CL(216), CL(215), CL(140) SLK(172), SLK(171),
SLK(170), SL(231), SL(230), SL(129), SL(107), SLS(197), M(166),
M(164), M(163), G(463), G(461), E(212), E(211), E(210),
124(124), S(222), S(221),S(220), S(140), CLK(209), CLK(20
,
CLS(21
, CLS(219), CL(216), CL(215), CL(140), SLK(172), SL(231),
SL(230), SL(129), SL(107),SLS(197), M(166), M(164), M(163),
G(460), GL(164), GLK(204), R(251)
Van Support List:
MB 100(631), T1, SprinterIII, SprinterII, SprinterI, Sprinter900,
Citan, Vito(639), Vito(63
, V(63
, Viano(639), T2, Vario,
Vaneo(414)
Truck Support List:
Actros963/4, Actros2,3, AtegoIII, AtegoII, AxorII, Eonic, Zetros, Actros, Atego Light, Atego Heavey, HPN M96, Atron, HPN M2000, SKL, FSK, Further model series
Unimog Support List:
U20, UGN, UHN
Bus Support List:
TRAVEGO, INTOURO, INTEGRO, CITARO, CAPACITY, CITO, TOURISMO, O350/O403, CONECTO, O404, O405-O408,
Minibus, OC500, TOURO, TOURINO, MBC, MULITEGO, O500, O500/OH, OH, OH368, OF, OF384, LO, O400,
FURTHER MODEL SERIES
Super Sports Car Support List:
SLR(199)
MB SD C5 Language: English, Bulgarian, Danish, Greek, Spanish, French,
Italian, Korean, Polish, Romanian, Serbo-Croatian, Turkish, Czech,
German, Finnish, Hungaria, Japanese, Dutch, Portuguese, Russian,
Swedish, Chinese
MB SD C5 Package List:
1pc x C5 Multiplexer (new C5 case)
1pc x OBDII 16PIN Cable
1pc x 38PIN Cable
1pc x 14PIN Cable
1pc x 8PIN Cable
1pc x Lan Cable
1pc x EVG7 DL46
1pc x Li-Ion Battery
1pc x Power Adapter
1pc x User's Manual
1pc x USB memory card for drivers
Posted by: youobd2 at
11:32 AM
| Comments (2)
| Add Comment
Post contains 413 words, total size 6 kb.
June 17, 2020
Heavy Duty Truck Scanner John Deere Service Advisor Languages: EnglishOperating System:4.0AG, 4.0 CCE and 2.8 CF standard software package comes in hard drive (HDD) format, easy to install.HDD comes in default VMware Windows XP system only, supports host machine Win XP,Win 7,Win 8 and Win 10. (If your computer supports WinXP VMware, it should work).Notice:4.0 Software supports vehicles to 2013; ( Free)4.1 Software supports vehicles to 2014-2015; (160USD- additional cost ),4.1 software support 3038E truck4.2 Software supports vehicles to 2016; ( 250USD-additional cost ) 4.2 software supports Multi-language: English, French, Spanish, Portuguese & ItalianQC NO. John Deere 4WD LoaderJohn Deere BackhoeJohn Deere BundlerJohn Deere CompactorJohn Deere CrawlerJohn Deere DelimberJohn Deere ExcavatorJohn Deere Feller BuncherJohn Deere Felling HeadJohn Deere ForkliftJohn Deere ForwarderJohn Deere HarvesterJohn Deere Harvester HeadsJohn Deere Landscape LoaderJohn Deere Log LoaderJohn Deere LoggerJohn Deere Mate. And ShreddersJohn Deere Motor GraderJohn Deere OEM EnginesJohn Deere ScraperJohn Deere Skid SteerJohn Deere SkidderJohn Deere SlasherJohn Deere TractorJohn Deere TractorsJohn Deere Tree HarvesterJohn Deere TruckJohn Deere Utility VehiclesJohn Deere WinchJohn Deere Worksite Pro Attachment. 1.How to solve John Deere Service Advisor Search Engine ErrorThat is for any individual when he/she runs the John Deere Carrier Guide^(heavy responsibility diagnostic device, the machine seems error message that the hunt engine module cannot be loaded after which this system ends.NOTE THAT YOU ARE TRYING ANY TRICK ON YOUR OWN RISK.Not obligatory answers:Resolution 1:Run as machine administrator, roll again laptop date reactivate the use of activator Then roll date again to standard date if error nonetheless renew as soon as once more. Hi, I have two scanner,. EDL connection with service advisor is perfect.
But with usb link, it doesn’t work. The very best solution in the
market is what the dealers use. John Deere dealers use a combination of
PC-based computer with two critical components –
CnAutotool.com John Deere Service Advisor software and the John Deere EDL v2 Adapter.
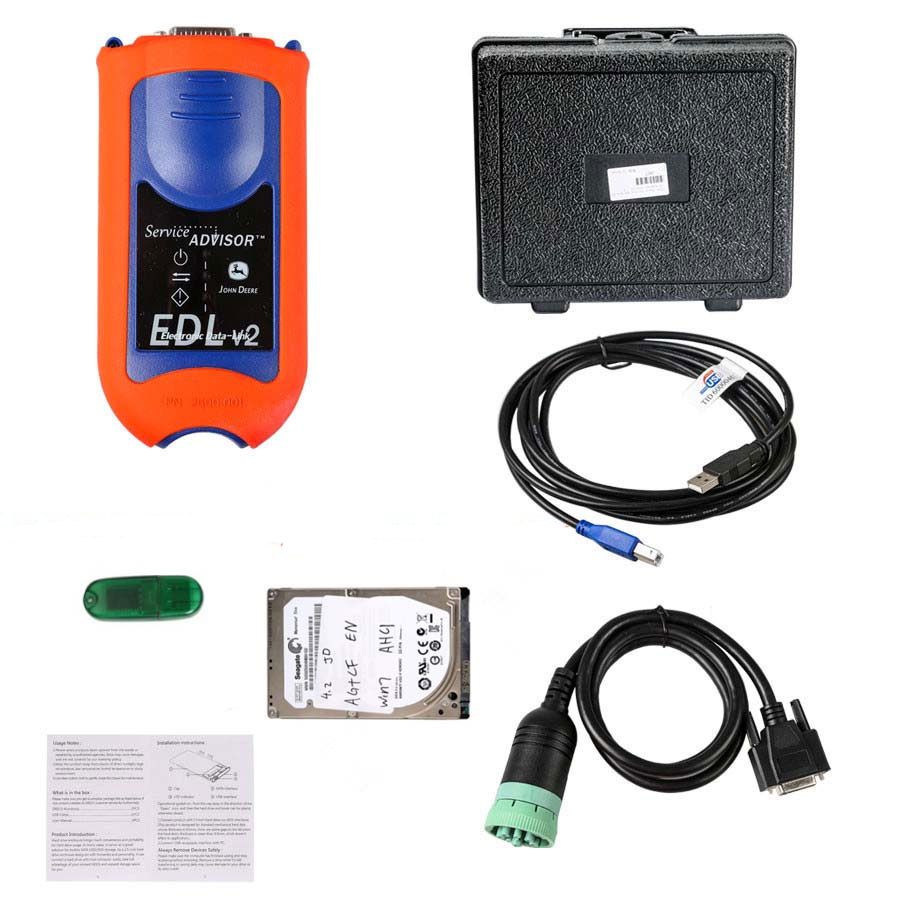
This John Deere Electronic Diagnostic Adapter (EDL) is designed to diagnose John Deere technology and works in conjunction with the Service Advisor EDL software. John Deere Diagnostic Kit EDL allows you to perform diagnostic for service of agricultural, turf, construction, forestry equipment John Deere. Buy Diagnostic Kit EDL v2 (Electronic Data Link v2) for All John Deere Models – Include Service Advisor Software 2017: Code Readers & Scan Tools.
The EDL v2 adapter looks like the picture shown below. It comes with a
hard carry case, the adapter itself, a 9-pin connector, and the USB
cable. This tool is available for purchase from our website as well.The
John Deere EDL Adapter also has a variety of "extra†cables you can
purchase, almost all of which are for some of the much older equipment.
You can see all of the available cables on our website.The problem comes
into the other side of the equation — The diagnostic software. John
Deere dealers refuse to sell this software to anyone.
John Deere Service Advisor Software
This includes owners of the equipment, repair shops, or anyone else
for the matter. The reason for this is simple: Dealers don’t want anyone
besides themselves to perform John Deere diagnostic tests and commands,
since it would in sense be money leaving their own pockets. If there is
no one else that has the software solutions to perform the advanced
diagnostics, the customer has to go to them. However, we were fortunate
enough to have the opportunity to get our hands on this software, so
here are some screen shots showing what this software looks like.
John Deere Service Advisor Free
FYI, Service Advisor 90% works with China clone.Topic 1: John deere
SA possible with Nexiq usb link?It is possible to install Professional
Diagnostic Tools John Deere Service Advisor on your laptop, though the
installation is really complicated. If you have a Lenovo Thinkpad
laptop, the easiest way is to restore the main partition from the image
of my computers’ c: drive. And every time i change my laptop, i just
restore it.Win7 installed and fully updated. It takes hours.The image
will not work on XP, but SA works fine. My suggestion, buy used Lenovo
T400 or T500.
John Deere Service Advisor 2.6
It’s more or less 250 EURO in Europe. Install windows 7 and then can put my image. Takes 10 minutes and u have SA working.Topic 2: How to get Nexiq china worked?I spent a month doing research on this and i managed my Chinese Nexiq to work 90%. The thing is that Nexiq has only 2 channels while EDL has 3. The 3rd one is Powertrain and it is used very seldom. I reprogrammed all the controllers on 6690 premium except two, but found a way around it opening the pld file with pld editor and changing Powertrain channel to Vehicle (channel 1).
Lots of machines don’t even have a 3rd Powetrain channel. Like all 5R; 6115R, 6125R, 7280R. From my experience only the older machines have it and still can be programmed most of the time. Programming controllers is easy, but diagnostics is a bit annoying. Every time you establish the connection u have to remove the USB plug and plug it again for the readings to appear. Connection establishment is taking a long long time and you never see the ECU.
Only all the other controllers. So all the time something doesn’t work. If you are prepared for this here is what you have to do:a) Rewire the the cables as shown in the picture in my post here:I switched places channel 1 with channel 2 (see the pic) with my Chinese version and now it works fine, probably it was possible to do it adjusting the software settings as mentioned above, but i tried a lot, and nothing helped.
Now i can connect, tried with 6125R and 5070M. Works fine!!!
Except one very important thingy. After i establish the connection, all the reading give the same meaningless number.
Then, I discovered accidentally, I pull out the USB cable, get the
message "Connection interrupted†I put it back in, get the message
"Connection resumed†and wuolla, all the readings show up immediately.b)
You don’t have to change the firmware. Both will work pretty much the
same but with different issues.P.S. For diagnostics only, there is a
subprogram of SA that works without any cable rewiring, it doesn’t have a
Program Controller option, and you still need to reinsert the usb after
connection has been established. You just need to select the right port
(which is usually 1939ImplementAutoboud or 1939AppAutoboud depending on
the machine) and model. If you have SA, you will find the software at
c rogram FilesService ADVISORxvdsXJDET.exeJust to let you know, after a
year working like that, i bought another EDL (recommended by a folk in
the forum, much much much more than the old one)So much relief.
rogram FilesService ADVISORxvdsXJDET.exeJust to let you know, after a
year working like that, i bought another EDL (recommended by a folk in
the forum, much much much more than the old one)So much relief.
Posted by: youobd2 at
05:46 AM
| Comments (2)
| Add Comment
Post contains 1135 words, total size 8 kb.
June 15, 2020
The newest ODIS software has been updated to V5.26 which works with VAS 6154 and VAS5054A on Win 7 & Win 10 32 bit/64 bit.
What’s new in ODIS 5.26?
(1)ODIS Software Version: 5.26 for Full Brand till 2019.12 (also includes 5.16 for each brand till 2019.
(2)ETKA: 8.0 (2018.11)
(3)Elsawin: 6.0 (2016.1)
(4)ODIS Engineering: 11.0
(5)VCDS Software Version: 19.6.2

(6)OS System: Win7, Win10 32bit/ 64bit
The old software version all come with win7 system, most of customers know that the VAS5054A doesn’t support to use with win10 system, but with this 5.26 version is ok to use on Win10.
(7)Multi-Languages:
English/Japanese/Portuguese/Romanian/Korean/Dutch/Polish/Turkish/Spanish/French/Italian
Croatian/Danish/German/Swedish/Finnish/Slovenian/Czech/Russian/Greek/Chinese
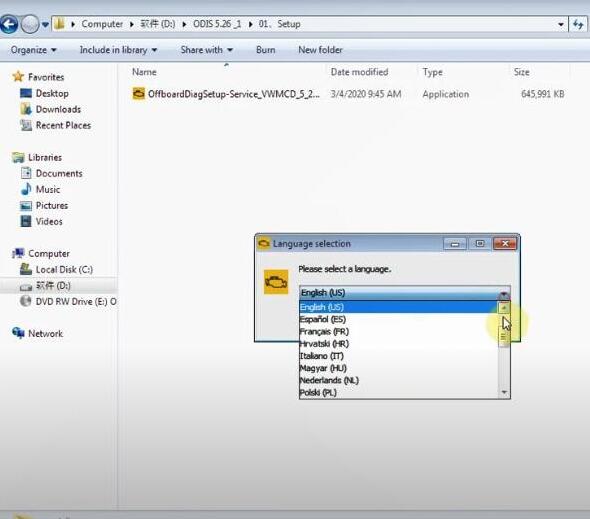
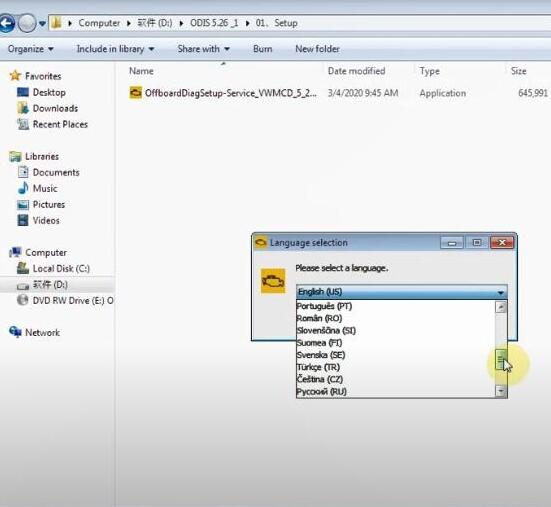
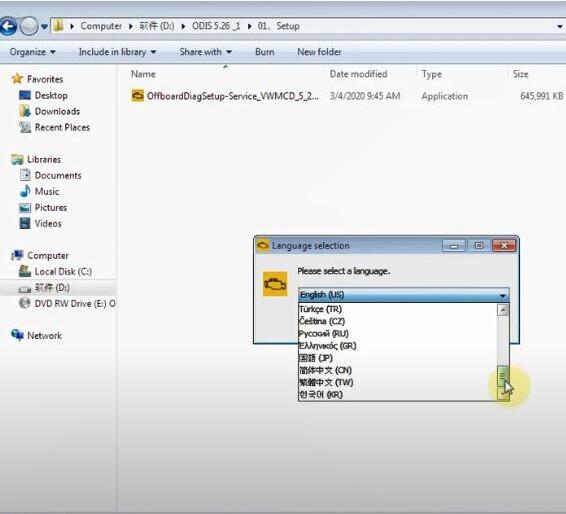
(
Support Vehicles: VAG Group includes Volkswagen (Shanghai VW, FAW-VW, VW Commercial Vehicles etc.), Audi, Lamborghini, Bentley, Skoda, Seat, Bugatti, MAN total 11 brands.
(9)Compatible Hardware: VAS5054A (Item No.SP33-B, SP33-BO), VAS6154A
Where to download ODIS 5.26 Postsetup 98.0.160?
The download links offered below are testing ok, no dead links.
Torrent 1
https://mega.nz/file/MQRHWCxa#KgHLLAOCi23WqW_6PhO21Xuuu9db7ztnI_dl3i8HMEM
Size: 18KB
0.MS_Visual_C++2010 for W10
0.Prerequirements x64 W7
0.Prerequirements x86 W7
1.OffboardDiagSetup-Service_VWMCD_5_2_6-B52_6_0_2
2.ODIS-S 5.2.6 Patch+License-Full After Unrar this the password for the 7zip archive is as always fantomel
3.PDU-API_fix_x86+x64 for W10
5.Bad VAS5054A Patch
5a.Softing_PDU-API_1.20.42 for clones
EN SFD-Manual for UMB.pdf
EN Windows 7 Announcement UMB.pdf
supportnews-en.pdf
Torrent 2
4.ODIS-Service_update_5_2_6-EU_20200317_98.0.140
https://mega.nz/file/UYYjzaQZ#kZZVPDkYkcsHLncU5LA_kkJ0BeqyFsSh5OADqayJNOw
Size: 44KB
Torrent 3
ODIS-Service_update_5_2_6-EU_20200330_98.0.160
https://mega.nz/file/cNIFkCpZ#pQIJ9IjNZDW4ssa3KFl1s2HhjreAv1SqFJ7ROtgaSuA
Size: 39KB
Torrent 4
4a.ODIS-Service_update_5.1.6_v89.5.520 to 5.2.6-EU_20200303_96.0.10
https://mega.nz/file/8AQXjA5Z#uoieG-AwhhMxEerjeMGoWcN01dfl-h4drls38FV0U_c
Size: 16KB
Torrent 5
4b.ODIS-Service_update_5.1.6_v89.5.520 to 5.2.6-EU_20200317_98.0.140
https://mega.nz/file/UMJnTC5R#tTMDCHP6zpFrJ6CaMmAIFMPgFqGcmW38nGKYA4c9Jkw
Size: 15KB
Win10-VAS5054-ODIS-S-526:
https://mega.nz/file/7YFSnK6a#hEWrlS6QKStccFJ_pokawY9TIVgekvjUcv9g4JfxCWY
How to install VAS 5054A, VAS 6154 ODIS 5.26?
Here is the installation guide on Win7 32 bit for reference.

The installation guide for VAS5054a and VAS-6154 are same. The difference is that it requires to install VAS driver for VAS6154.
VAS 5054A ODIS 5.26 install video
VAS 6154 ODIS 5.26 install video
Note: It will take a long time to copy the 5 software from DVD to the local disk of computer, please keep patient.
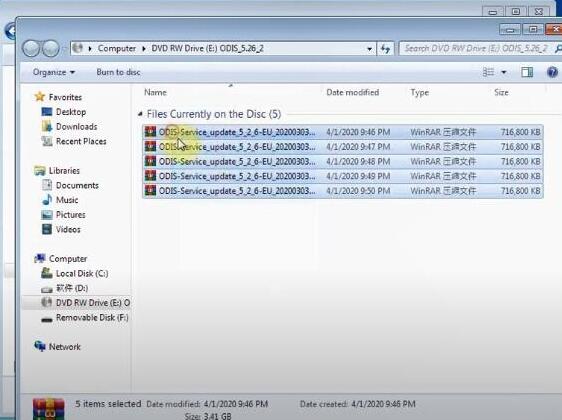
Main steps:
Step 1: Install OffboardDiagSetup-service_VWMCD_5_2
Step 2: Install Offboarddiaglauncher
Step 3: Run Offboard Diagnostic information system
Step 4: Install ODIS 5.26 patch
In detail…
Depends on your need to update windows system
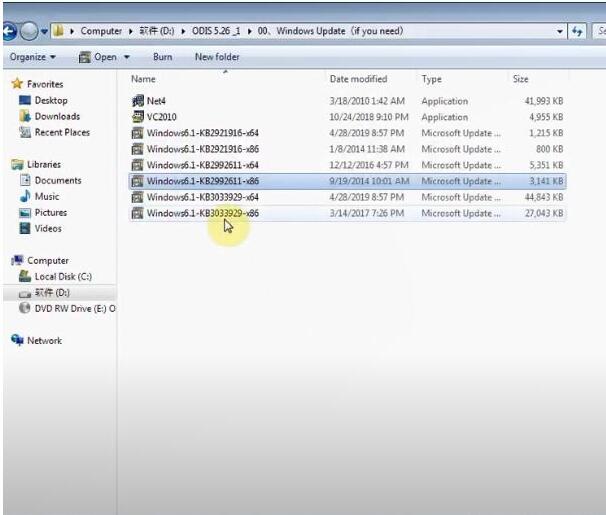
Step 1: Install OffboardDiagSetup-service_VWMCD_5_2
Select a language
Choose target folder

Select diagnostic interface: VAS 5054 or VAS 6154

Click "Search†to select the related license
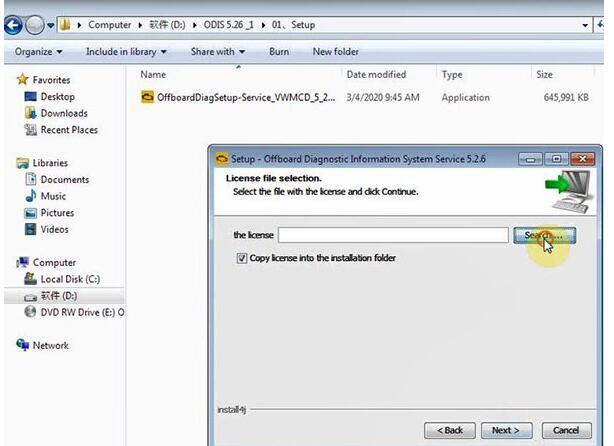
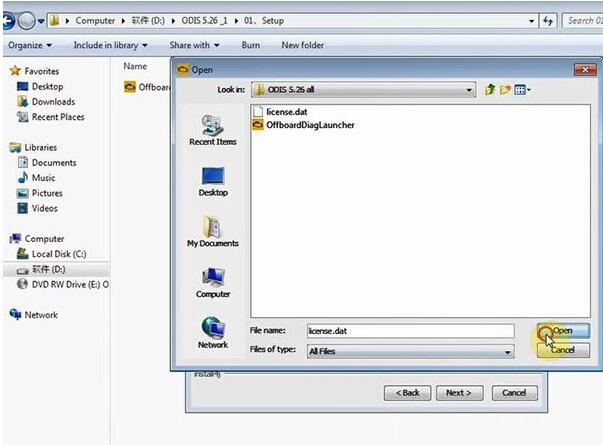
Install Offboard Diagnostic information system service success
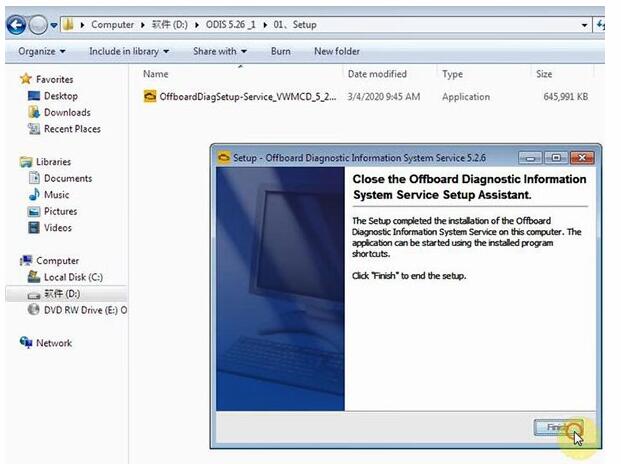
Step 2: Install Offboarddiaglauncher
Copy the offboardDiagLauncher from local disk to program files (x86)
Step 3: Run Offboard Diagnostic information system
Right click "Offboard Diagnostic information system†to run as administrator
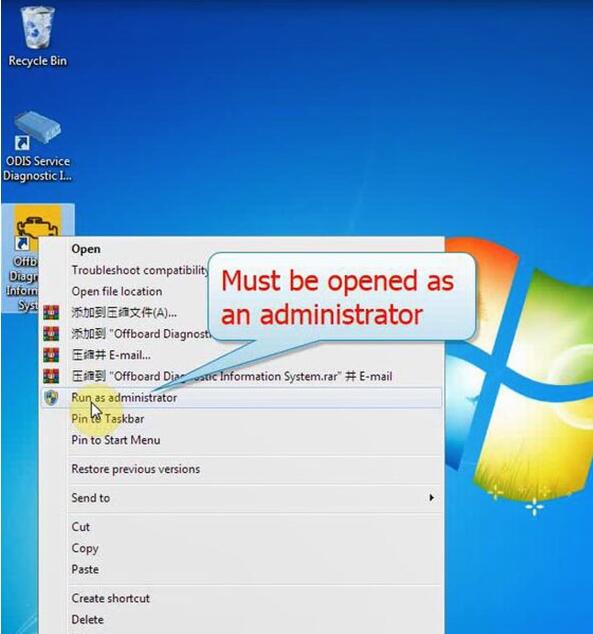
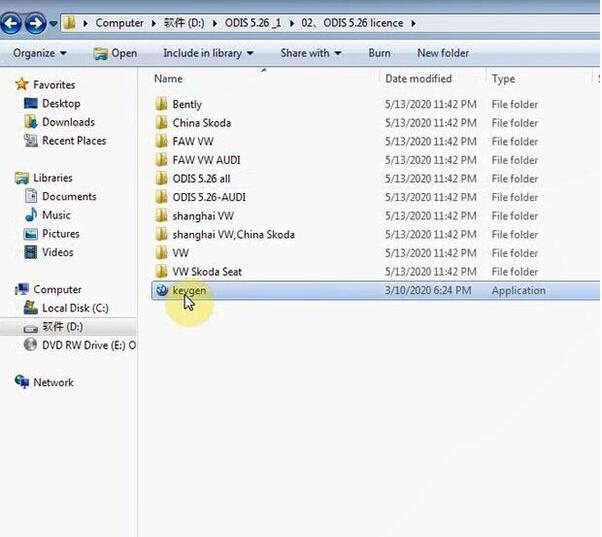
Open "keygen†option
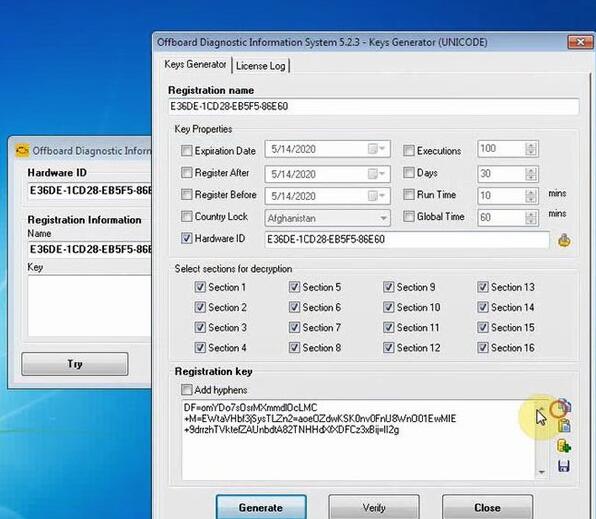
Get the hardware ID and name from "Offboard Diagnostic information system
5.23 Registration Dialog†to the corresponding positions in the "Keys Generatorâ€
Then obtain the registration key and paste to "Registration Dialog†to register

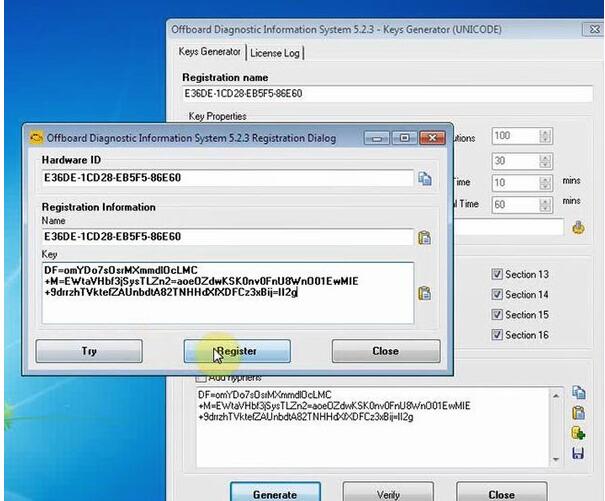
Input Postsetup configuration data
URL: Click "Select local directory†to choose
User name: abc
Kerword: abc
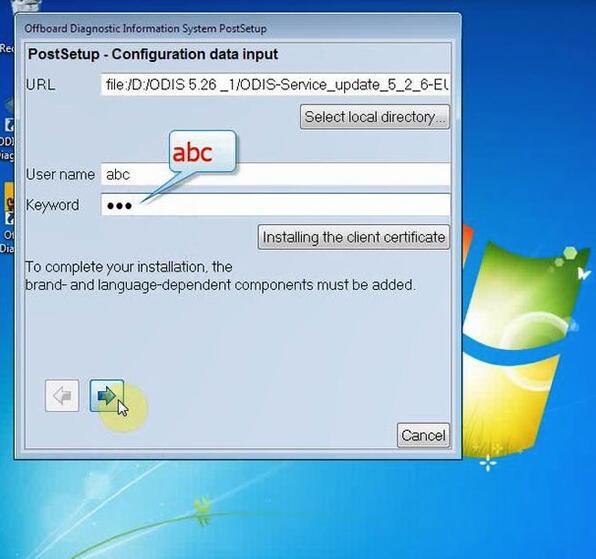
Select the corresponding language and download ODIS data
Restart computer
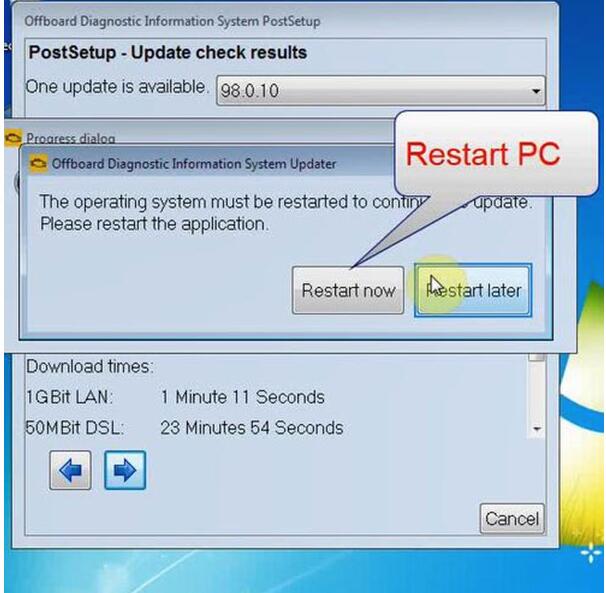
Step 4: Install ODIS 5.26 patch
Copy ODIS 5.26 patch to C disk
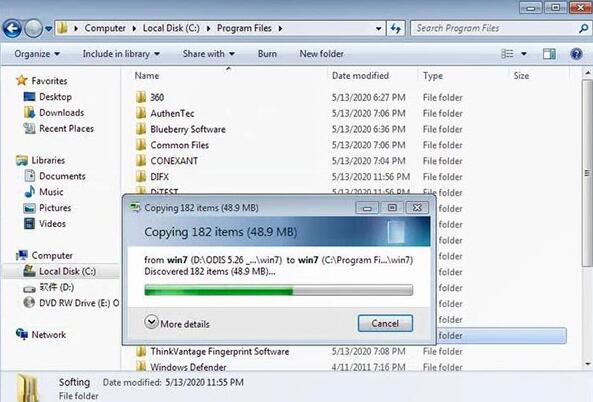
Install ODIS 5.26 software succeed
Then you can start to diagnose…
Posted by: youobd2 at
01:20 PM
| Comments (2)
| Add Comment
Post contains 499 words, total size 14 kb.
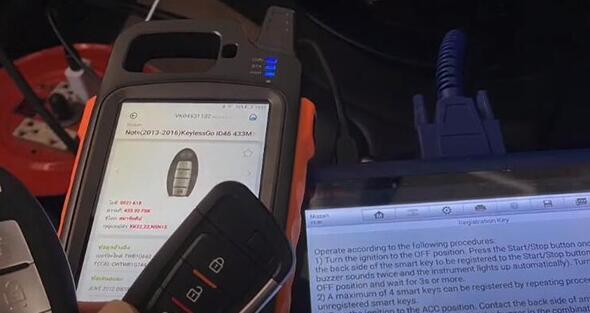
In this post, you will learn how to add a new smart key on 2019 Nissan Note by Key tool Max and Autel IM508 key programmer.
What you need:
Nissan Note 2019
Nissan Note working key
VVDI smart remote
Xhorse VVDI key tool Max
Autel MaxiIM IM508 auto key programmer
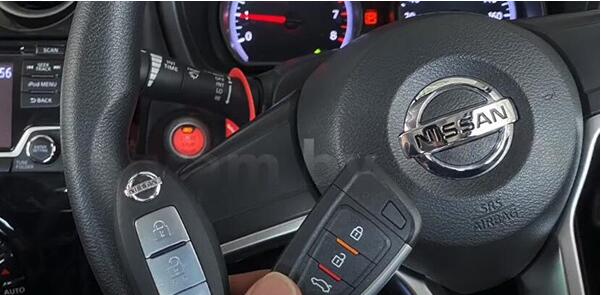
Main steps:
1.Generate ID46 chip with Key tool Max:
2.Add new smart key with Autel IM508:
Go ahead…
1.Generate ID46 chip with Key tool Max:
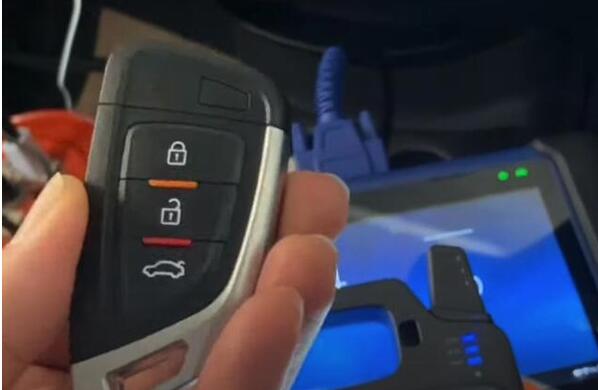
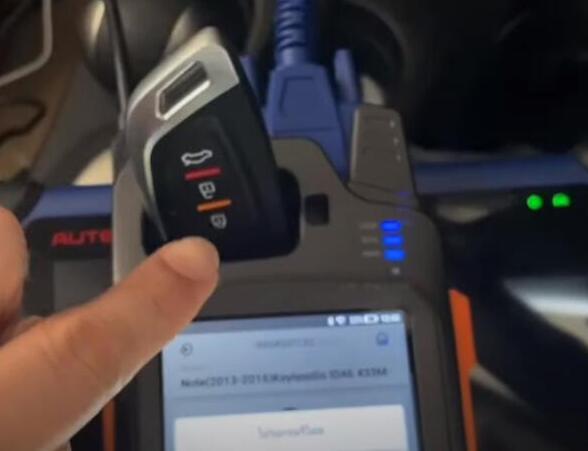
Put battery into this VVDI smart remote and plug it into key tool max coil
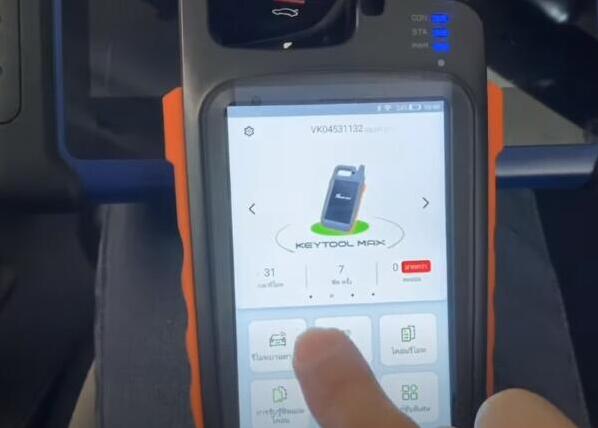
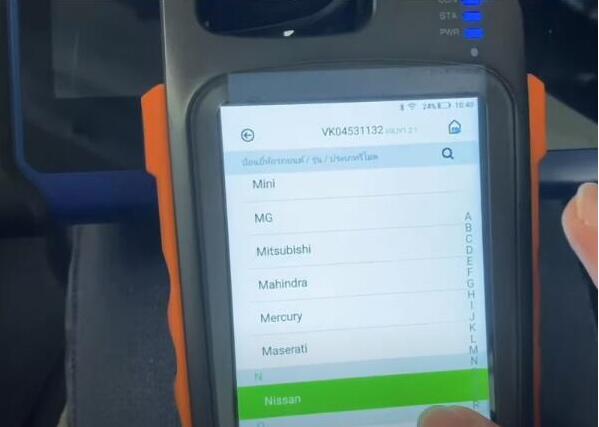
Select Vehicle remote-> Nissan-> Note-> Note (2013-2016) KeylessGo ID46 433M4433.92MHz FSK
Part number: TWB1G662
FCCID: CWTWB1G744
Then press Generate remote
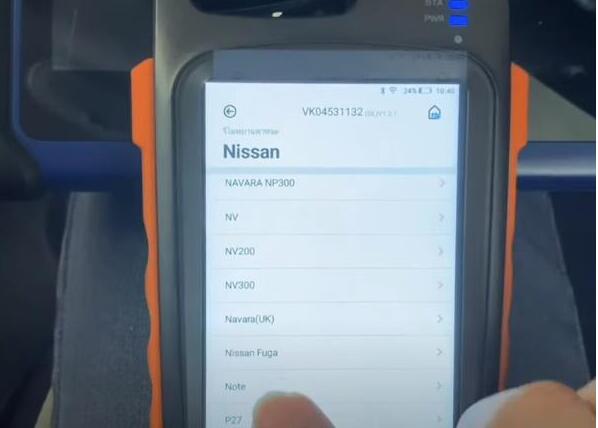
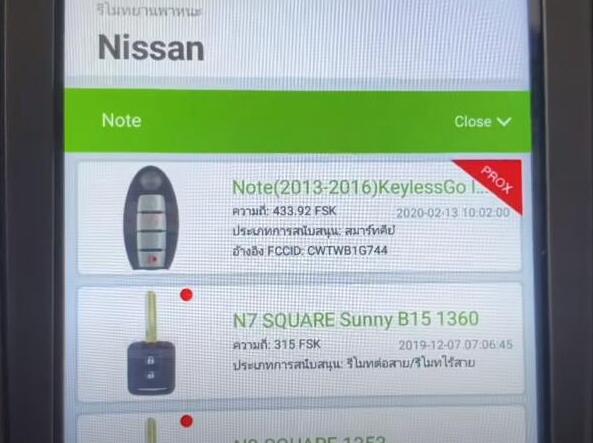
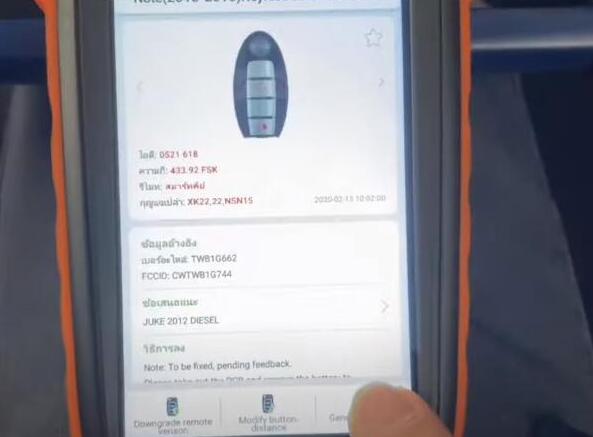
If it failed to generate, check whether the key put well firstly
And pay attention to the caused reasons:
1.If used wire-key, keep the battery with disconnected and make sure the wire be ok.
2.If used wireless key, please insert battery and place the key into left coil.
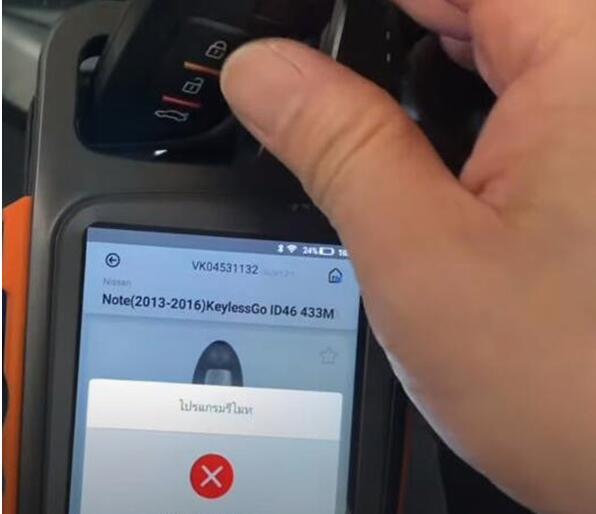
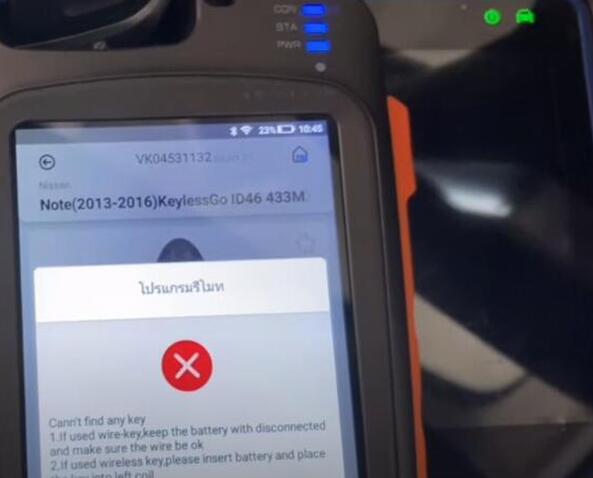
Put the smart remote correct side on coil antenna, and then it can generate
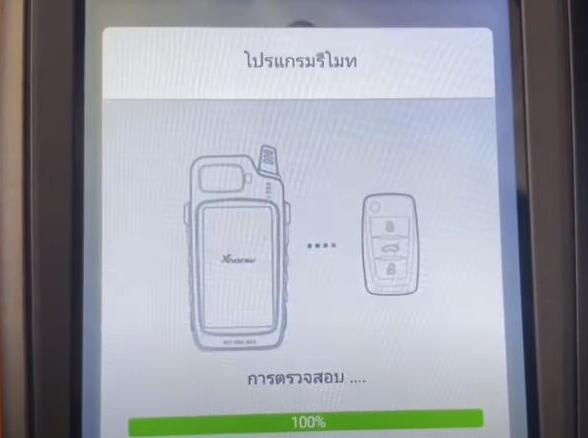
It will take a little time to write smart remote…
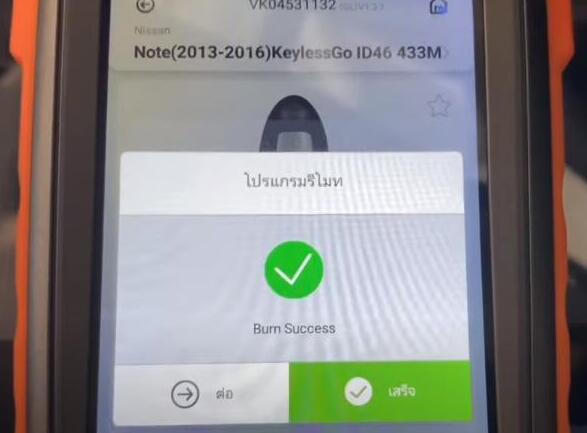
Burn success
2.Add new smart key with Autel IM508:
Connect Autel IM508 to the vehicle
Run MaxiIM application
Select IMMO-> Nissan-> System Selection-> Auto detect Type
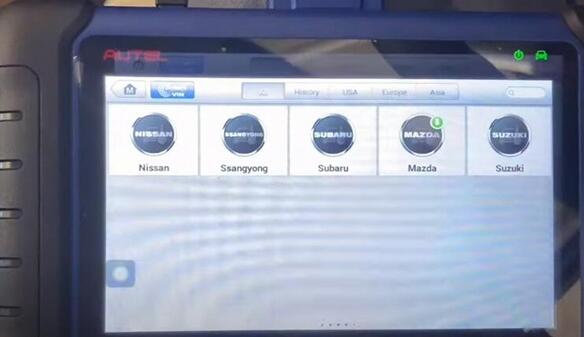
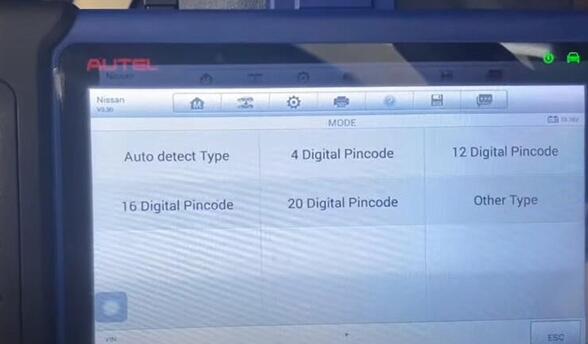
Follow the prompt on the screen to turn on the hazard warning light and open and close the driver door once.
Scanning vehicle system… (This step will take some minutes, please keep patient)
Select IMMO Status Scan
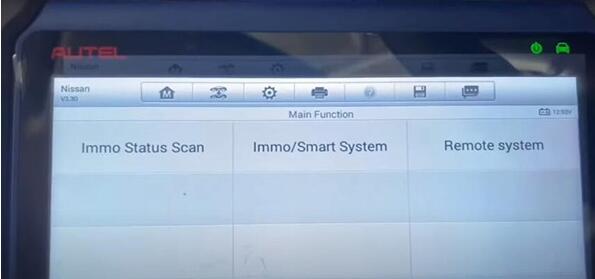
Smart key and 4 digits authorizations code support
Press IMMO Matching-> All smart key lost
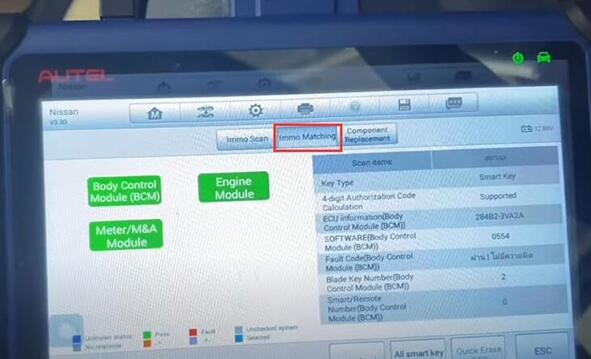
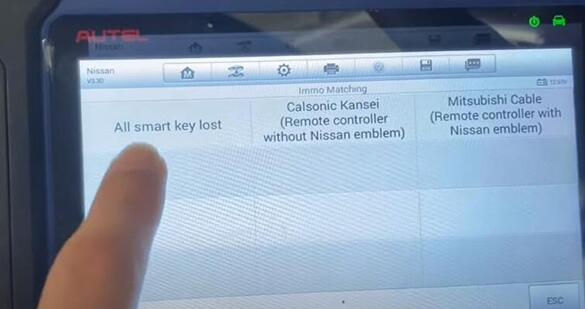
Set the vehicle as the following status and the press [OK]
-Ignition switch or power switch: LOCK
-Hazard switch: ON (for preventing BCM from entering into CAN communication sleep mode)
-P (A/T) or neutral (M/T)
-Battery voltage: More than 12V
-Steering: Turn on and turn off the cab door once, Not in fully locked
Then go to next procedure.
Pay attention to the prompt:
"This procedure erases all registered key ID. Therefore, all of the customer’s keys should be obtained before starting this procedure. Do you want to continue?â€
Click [YES] to continue
Then you will hear steering lock release sound…
Press push-button ignition switch for 2 seconds or more and turn ignition switch to the ON position
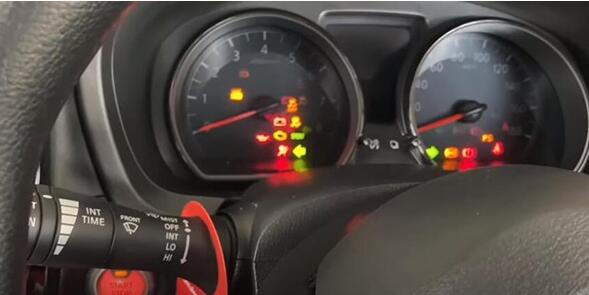
Follow the procedures on the screen to operate one by one
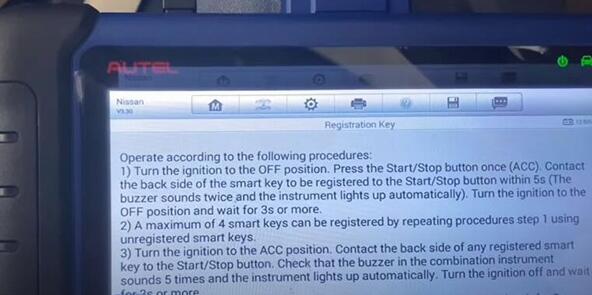
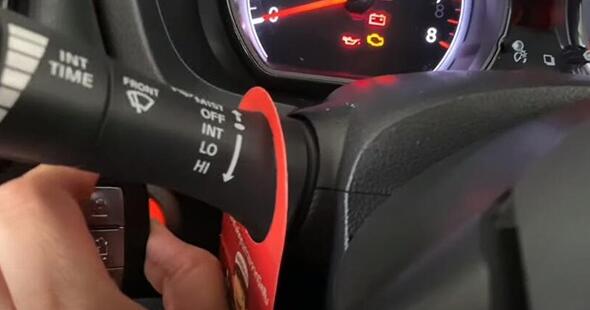
Program smart key success
Finally, test all the remotes function
Posted by: youobd2 at
01:14 PM
| Comments (1)
| Add Comment
Post contains 411 words, total size 12 kb.
June 14, 2020
Increased Ria 2019- remote system (North America)
Increased Sportage 2018-2020 remote system (North America)
Increased Sorento 2019-2020 remote system (North America) ; font-family: Gudea, Tahoma, Arial; font-size: 18px; font-style: normal; font-variant-ligatures: normal; font-variant-caps: normal; font-weight: 400; letter-spacing: normal; orphans: 2; text-align: start; text-indent: 0px; text-transform: none; white-space: normal; widows: 2; word-spacing: 0px; -webkit-text-stroke-width: 0px; background-color: rgb(255, 255, 255); text-decoration-style: initial; text-decoration-color: initial;">Hyundai [V30.80] Upgrade ; font-family: Gudea, Tahoma, Arial; font-size: 18px; font-style: normal; font-variant-ligatures: normal; font-variant-caps: normal; font-weight: 400; letter-spacing: normal; orphans: 2; text-align: start; text-indent: 0px; text-transform: none; white-space: normal; widows: 2; word-spacing: 0px; -webkit-text-stroke-width: 0px; background-color: rgb(255, 255, 255); text-decoration-style: initial; text-decoration-color: initial;">Increased Accent 2019-2020 remote system (North America)
Increased Elantra 2018- remote system (North America)
Increased Sonata 2017- remote system (North America) ; font-family: Gudea, Tahoma, Arial; font-size: 18px; font-style: normal; font-variant-ligatures: normal; font-variant-caps: normal; font-weight: 400; letter-spacing: normal; orphans: 2; text-align: start; text-indent: 0px; text-transform: none; white-space: normal; widows: 2; word-spacing: 0px; -webkit-text-stroke-width: 0px; background-color: rgb(255, 255, 255); text-decoration-style: initial; text-decoration-color: initial;">Land Rover [V30.96] Upgrade ; font-family: Gudea, Tahoma, Arial; font-size: 18px; font-style: normal; font-variant-ligatures: normal; font-variant-caps: normal; font-weight: 400; letter-spacing: normal; orphans: 2; text-align: start; text-indent: 0px; text-transform: none; white-space: normal; widows: 2; word-spacing: 0px; -webkit-text-stroke-width: 0px; background-color: rgb(255, 255, 255); text-decoration-style: initial; text-decoration-color: initial;">Increased Velar 2017 cluster calibration ; font-family: Gudea, Tahoma, Arial; font-size: 18px; font-style: normal; font-variant-ligatures: normal; font-variant-caps: normal; font-weight: 400; letter-spacing: normal; orphans: 2; text-align: start; text-indent: 0px; text-transform: none; white-space: normal; widows: 2; word-spacing: 0px; -webkit-text-stroke-width: 0px; background-color: rgb(255, 255, 255); text-decoration-style: initial; text-decoration-color: initial;">Alfa [V32.38] Upgrade ; font-family: Gudea, Tahoma, Arial; font-size: 18px; font-style: normal; font-variant-ligatures: normal; font-variant-caps: normal; font-weight: 400; letter-spacing: normal; orphans: 2; text-align: start; text-indent: 0px; text-transform: none; white-space: normal; widows: 2; word-spacing: 0px; -webkit-text-stroke-width: 0px; background-color: rgb(255, 255, 255); text-decoration-style: initial; text-decoration-color: initial;">Increased Giulia key programming (No Need Pincode)
Increased Stelvio key programming (No Need Pincode)
Posted by: youobd2 at
01:46 AM
| No Comments
| Add Comment
Post contains 97 words, total size 6 kb.
June 10, 2020
X300DP Plus Renault AKL Review:
1) Programming of a Renault CAPTUR phase 2 (201
with the OBDSTAR succeed
2) Renault Talisman, 2017 year, all keys lost, make dealer key and program smart card OK. It’s safe, easy and quickly, you need reading
BCM, precode your new card, and coding this card.
3) All key lost Scenic 4 2017 done by obdstar x300dp plus. You learn flash first but with obd renault adapter. If you don’t have the
converter you have to plug the card without connecting the OBD but by feeding in 12 v the tablet.
4) AKL capture 2016 done by obdstar. With the converter green adapter.
5) Renault scenic 2019 all keys lost succeed. Need safe battery voltage.
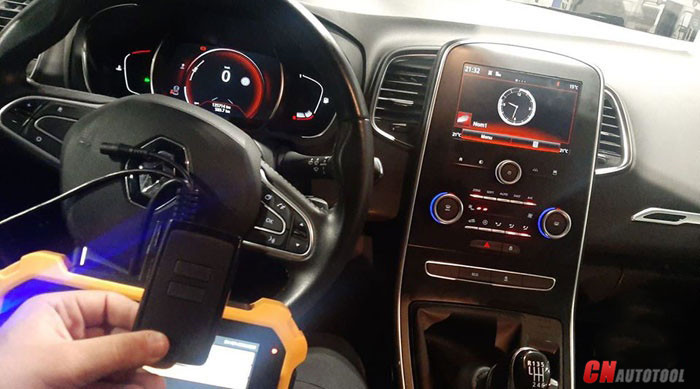
6) Kadjar 2016 read pin and add a new key succeed. update to new version (30.87). Now all works perfect.
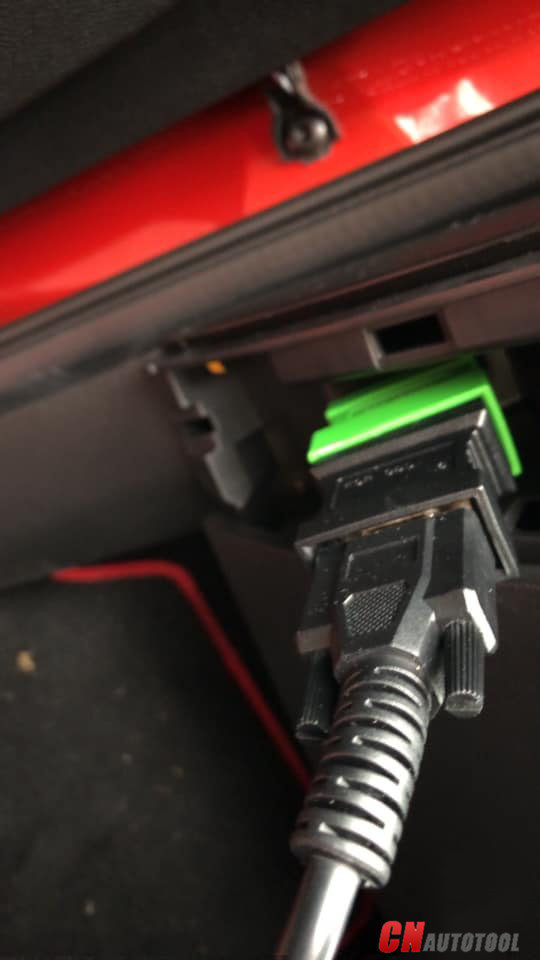
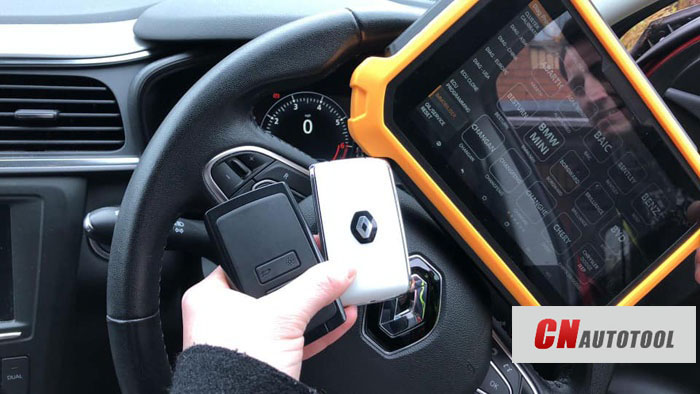
7) OBDSTAR cannot do Renault Kwid AKL, only copy, i just tried.
Renault Master 2010 All lost Key in a minute!!! Pin code is needed. Very very good!!!
Renault Master 2010 All Lost Key
9) I have X300 DP Plus and this is the list of successful Renault keys programmed:
Megane 3, year 2010 and 2012
Laguna 3, 2011
Espace 5 , year 2016 and 2017
Megane 4, 2016
Duster 2014, 2015, 2016
Koleos 2014
Clio 4, 2015
If you are interesting in OBDSTAR X300 DP PLUS key programmer, please visit our website:www.cnautotool.com
Posted by: youobd2 at
07:29 AM
| No Comments
| Add Comment
Post contains 239 words, total size 2 kb.
June 02, 2020
BMW ICOM Software Version : V2020.05
ISTA – D: 4.22.32,with SDP Programming Database 4.22.32
ISTA – P: 3.67.1.006 with Engineer Programming,supports the programming of BMW motorcycles and electric vehicles can program F/G/I/K chassis for car (through the ICOM, not other cable )
Vin: V2020.2.15
BMW ETK: 2020.01
BMW KSD: 2020.01 Multilanguage
BMW FSC Navigation Code Generator
BMWAiCoder for BMW Coding
What is Vehicle and Key Memory (CKM)?
On customer request, various vehicle settings can be changed by means of coding on certain E-model series (e.g. E46, E6X). Some settings (Key) are allocated to a certain key (max. four keys), e.g. heating/air conditioning/ventilation while other settings (Vehicle) apply globally to the entire vehicle, e.g. antitheft alarm system.
Vehicle and Key Memory settings can be selected under the "CKM†tab after determining the native measures plan in the "Vehicle†menu.
Note:
Due to different legal stipulations, there may be national differences in possible CKM settings. Factory settings may also vary from country to country.
Note:
When replacing control modules, it may happen that individual data in the CKMsettings are not automatically restored. Before replacing a control module, theCKM settings in the vehicle must be printed out so that these can be restoredafter the control module has been replaced.
BMW E70, E71, E81, E82, E87, E88, E90, E91 E92, E93, F01 F02MINI R55 and R56
On these model series, all Vehicle and Key Memory functions are programmed directlyin the vehicle (please refer to "Personal Profile†in the Owner’s Manual: individualsettings for a maximum of 3 remote control units via the display in the instrument clusteror via the Central Information Display).
BMW E38, E39, E46, E52, E53, E60, E61, E63, E64, E65, E66, E83, E85 and E86MINI R50, R52 and R53Rolls-Royce
The procedure for programming the Vehicle and Key Memory is described below. Thebasic prerequisite is that all control modules on a vehicle are programmed to the currentsoftware status:
Two or more parameter keywords (e.g. active, inactive) are assigned to a function or afunction keyword. The current setting is shown by a selected checkbox next to theparameter keyword and can be changed by the service technician. Key functions can beset individually for the max. 4 keys. The factory setting is represented by acorresponding symbol next to the parameter keyword.
The CKM functions are divided into a maximum of three levels of hierarchy. Main group(e.g. central locking), group (e.g. unlocking rear window, boot/rear lid) and an optionalsubgroup (e.g. lids after ignition on).
Vehicle and Key Memory
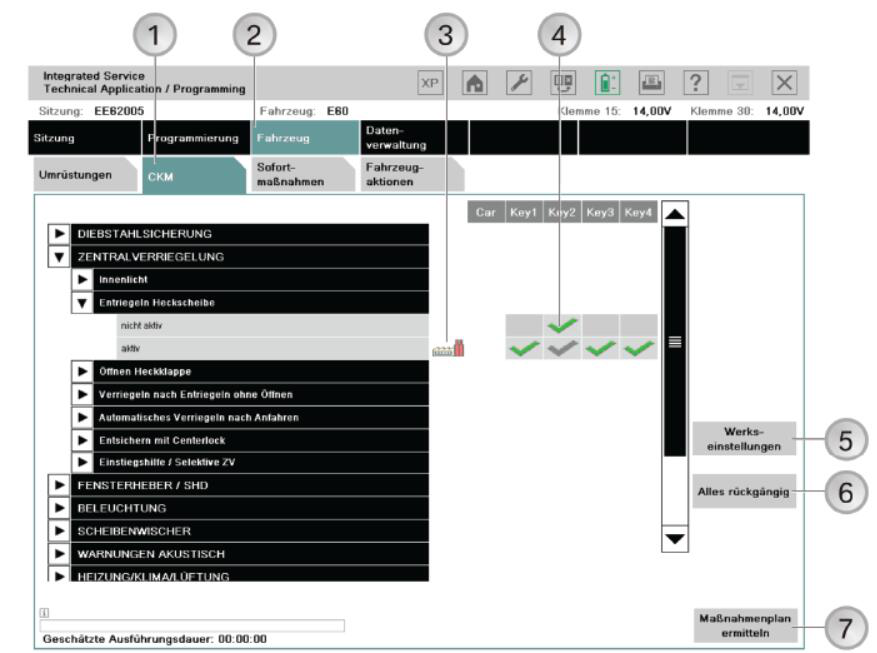
1 "CKM†tab
2 "Vehicle†menu
3 Symbol for "Factory settingsâ€,shows the factory setting of the function
4 Tick – the green tick shows the selected setting of the function,the gray tick shows the active setting of the function
5 "Factory settings†button,establishes the factory settings for the vehicle and keys
6 "Cancel all†button,cancels all settings
7 "Determine measures plan†button
Note:
You can print out the set CKM values. Printing out the CKM settings could cause values that have been entered in the list but not yet stored in the vehicle to be lost,making it necessary to re-enter them. It is advisable to print out the CKM settings at the start of programming and if necessary immediately after completing CKM reprogramming.
Procedure for changing CKM settings
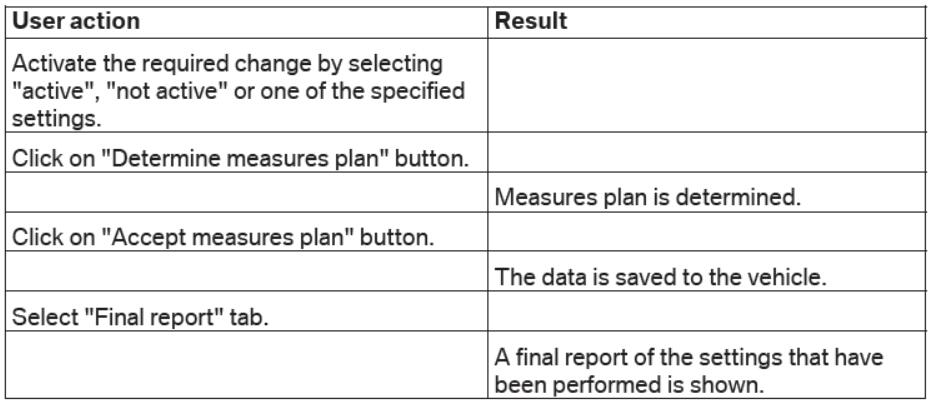
Note:
The selected settings for the Vehicle and Key Memory are retained even when the control modules are reprogrammed or encoded. If the CKM backup or restore cannot be successfully performed, this will be seen in the final report.
Posted by: youobd2 at
04:26 AM
| Comments (1)
| Add Comment
Post contains 591 words, total size 5 kb.
Lonsdor K518 support Porsche Cayenne key programming including program smart key and make dealer key.
Details:
1. Program smart key: to program smart card (please make dealer key first);
2. Make dealer key: use the backed up BIN data to make the non-dedicated key to be dealer key.
Basically, there will be 4 parts in the whole help file: Function, Reference, Attention and Operation.
Function
1. Program smart key: to program smart card (please make dealer key first);
2. Make dealer key: use the backed up BIN data to make the non-dedicated key to be dealer key.
Reference
Chip type:Dedicated smart card
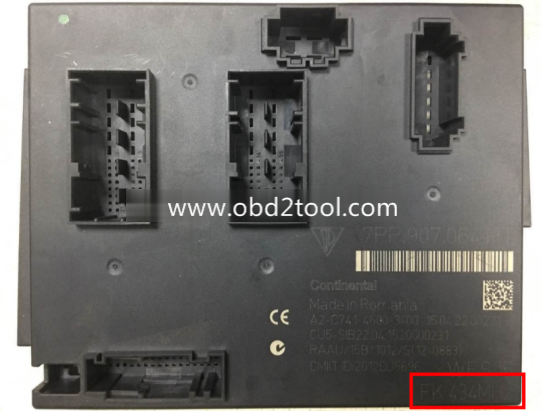
Frequency:315/433/434 frequency (please check the logo in the lower right of the lid of the BCM box)
Key embryo no.:31
Code requirement:Dismantle & read BCM to make dealer key
Key generation:Program smart key complete, remote will automatically generated
Under the steering wheel (BCM position):
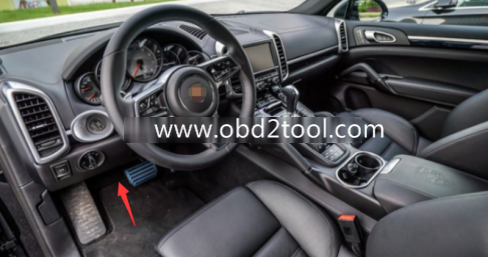
BCM is located at the bottom left of the steering wheel, please note the frequency type, basically there will be 315/433/434,
The following picture is for 434 frequency:
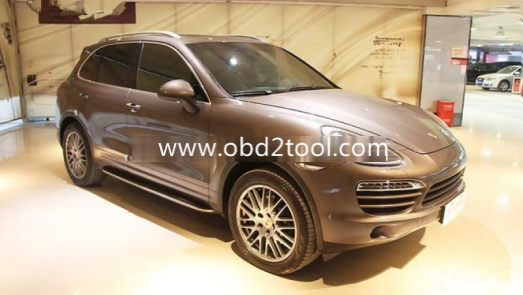
11-15 Cayenne Car Model
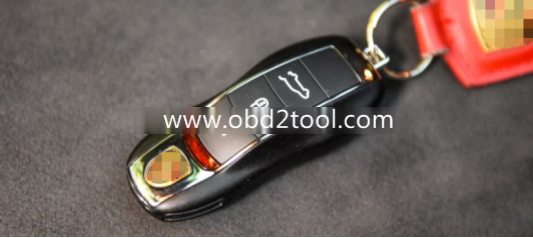
The car key
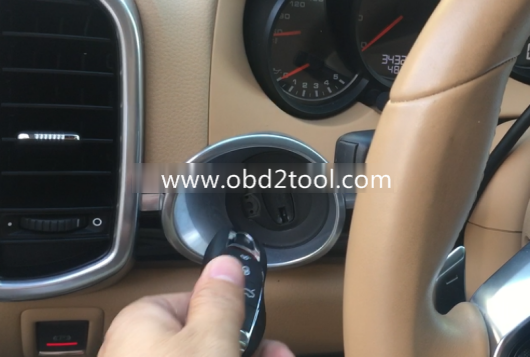
The induction keyhole
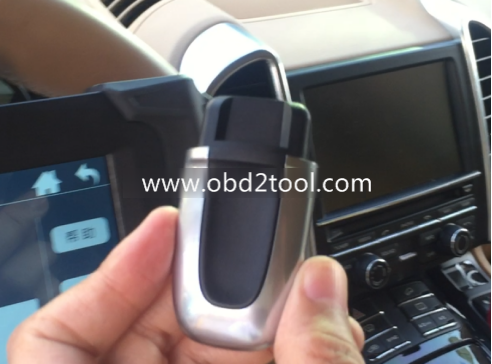
The mechanical knob key inserted into the induction keyhole
Attention
1. All the keys need to learn, or it will not be able to start the vehicle, it is recommended to learn the original car keys first,and then learn the new key, battery must be well installed.
2. The newly added key must be either the dealer key made via the car BCM data, or the key ordered back through the VIN code.
3. When learning key, it is required to insert the key into the induction keyhole, to learn a smart key, remove the machanical rotate key from the induction keyhole if any and then insert the smart key to program.
Operation
Step 1: Use the programmer to read and write BCM data and save it as bin file;
1. BCM is located in the lower left of the steering wheel, please pay attention to view the frequency type, usually there will be 315,433,434 frequency (below picture is for 434):
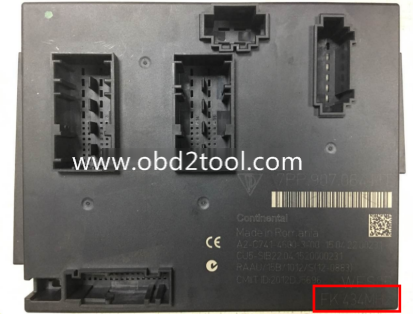
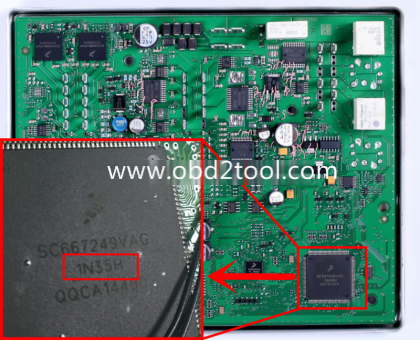
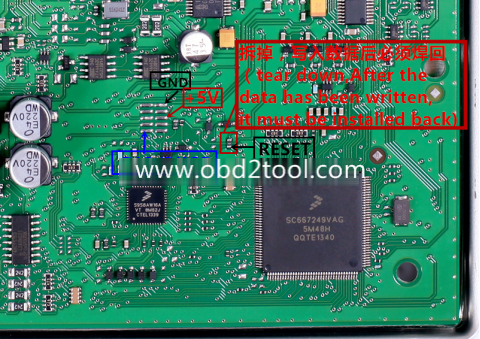
2. Read the BIN (D-FLASH / EEPROM) file with the programmer specifically for reading BCM. Please pay attention to the type here: namely 1L15Y 2M25J metal crystal, or 5M48H 1N35H ceramic crystal (red mark):
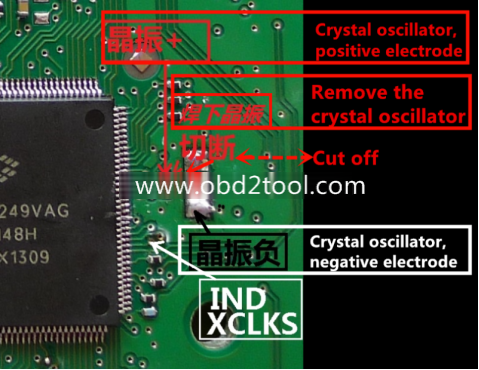
3. Please refer to the following picture to wire:
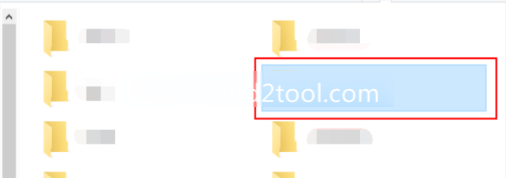
Step 2: Copy the bin file into K518ISE: please use the USB cable to connect the K518ISE to the computer, open the device internal memory, find the folder "customfile†and copy the bin file into it (as shows below).
Note: bin file suffix "bin†must be lower case letters, directly put the file into the folder rather than create a new folder:
Step 3: Make dealer key
Step 4: Program smart key
Posted by: youobd2 at
04:20 AM
| Comments (1)
| Add Comment
Post contains 469 words, total size 5 kb.
39 queries taking 0.0364 seconds, 148 records returned.
Powered by Minx 1.1.6c-pink.

